Shopify is great.
It's fast, stable, secure, has a ton of apps, and typically looks pretty good.
It is a very solid shopping cart platform and one I highly recommend (I personally have two stores).
However, editing your sales pages is nearly impossible without being a master coder, leaving your store looking like everyone else's.
And, the bigger problem with Shopify is that there's no great way to build a sales funnel with it… and we LOVE funnels!
Sure, there are a couple apps like Zipify's One Click Upsell App and Funnel Buildr 2.0; however, they both have drawbacks…
One of the tools is frustratingly buggy and the other restricts what you can do to your OTO and Downsell pages… you're stuck using their “proven” template.
Enter ClickFunnels.
ClickFunnels is a tool that gives you the power to create awesome sales funnels with ease!
Your sales pages, OTO pages, downsell pages, order confirmation pages… everything can look like whatever you want!
You have FULL control!
Of course, ClickFunnels has its own set of problems… it does a lackluster job in handling customers/orders, it doesn't notify customers when their orders ship, and it doesn't integrate with nifty dropshipping apps like Dropified and Oberlo.
So, we have the best funnel builder tool and the best shopping cart platform, all we need to do now is combine the two… which is where this post comes in!
The Shopify/Ecommerce Sales Funnel
First things first, we must talk about the funnel and the strategy behind it!
This is the Shopify sales funnel model:

Want my Shopify Sales Funnel in your Clickfunnels account? Click here to learn more!
We will go through each page separately down below, but the general flow is this:
- You send traffic to your sales page via ads, emails, SEO, etc.
- Hopefully they buy your offer – if not, retarget them and send cart abandonment emails
- Assuming they purchase your offer, you greet them with another offer called an OTO or One-Time-Offer that complements the product they just purchased
- If they say “No” to your first OTO, you can offer them a Downsell
- Whether they say “Yes” or “No” to your Downsell, you will offer them a second OTO (OTO 2)
- If they say “Yes” to your first OTO, you offer them another OTO (OTO 2)
- If they say “No” to your first OTO, you can offer them a Downsell
- Whether they say “Yes” or “No” to OTO 2, they will arrive on the Order Confirmation page
That's it!
Within a few minutes, they're through your sales funnel and have hopefully picked up an OTO or two and increased their average order size!
Now, let's break down the individual pages…
Sales Page
The first page of the funnel is the “Sales Page” and it's the page that tells your visitors about your offer.
Speaking of offer… what should you offer on this page?
A proven seller.
Makes sense, right?
If the product on this page doesn't sell… it doesn't matter how cool the rest of your funnel is, no one will ever see it.
You need to sell something so unbelievably amazing that people can't help but whip out their credit cards and buy it!
Beyond offering something people actually want, price is likely the second biggest factor in having a successful front-end product…
- Warm traffic (people who know who you are, past customers, etc): try and stay under $50
- Cold traffic (people who have no clue who you are): try and stay under $10
Of course, those are just rules of thumb and you could try more expensive products.
Another note; you may need to take a loss on this first product… assuming you make it up with your OTOs/Downsells and/or in the long run. Remember, it doesn't matter how amazing the rest of your funnel is if people aren't getting past this first page. Your #1 goal is to ensure people are buying your front-end offer.
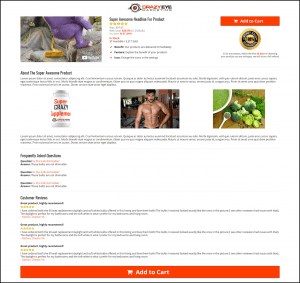
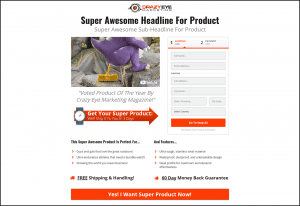
The Sales Page Design
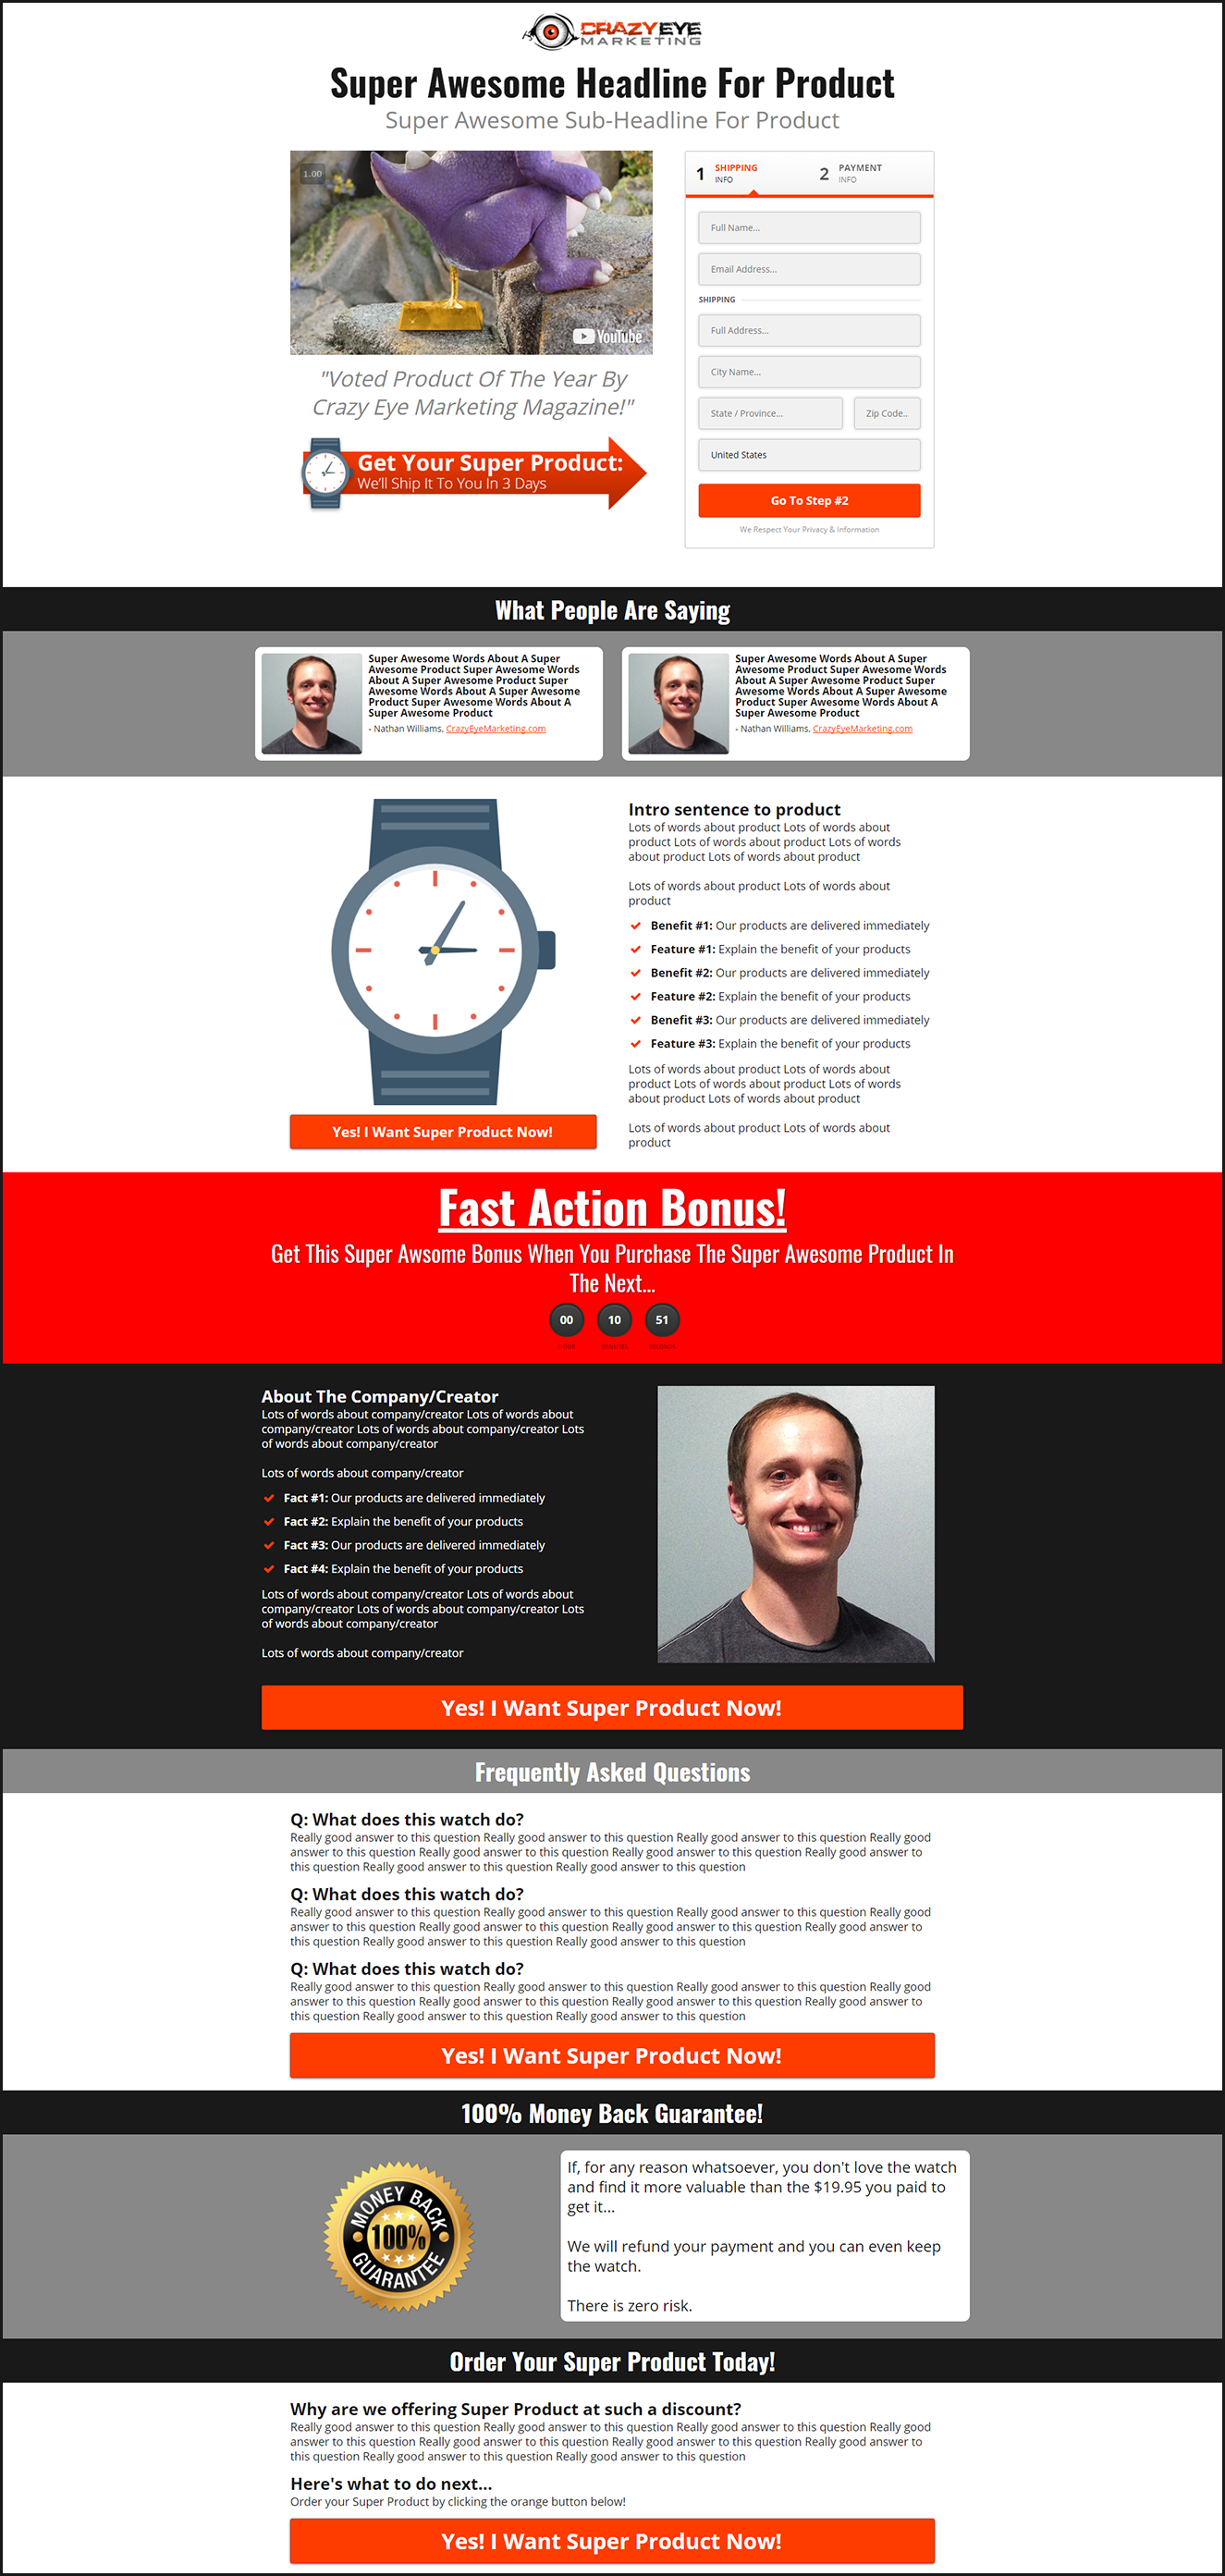
Click Here To Checkout A Live Version Of This Page
Let's breakdown the elements of this sales page:
- Headline & Sub-Headline: Two critically important elements that pull people into your offer
- Product Image(s)/Video: You must show people what they're about to purchase… right?!
- Testimonials: Nothing like a little social proof to make people feel comfortable
- Copy & Bullets: Tell the visitor what they need to know to make an informed decision
- Fast Action Bonus: A bonus for those that purchase right away
- Adding this to one of our sales pages increased conversions from 7% to 11% (57% increase!)… since then, we've been adding it to ALL of our sales pages!
- 98% of the time, all we give away is a little digital product. A guide, checklist, mini-course, etc. that we think they'd find ultra interesting and helpful. But, that's not to say you couldn't offer a physical product, gift card, or something else to get the visitor to take action
- Try to assign a dollar amount to the bonus that's greater than the price of the product they're about to purchase. For example, “Get my top 10 fat loss recipes ($19 value) for FREE when you purchase the measuring cups in the next XX:XX!”
- About The Company/Creator: A little “about us” section so people know who they're buying from. Do you support a cause? This is a great place to let people know!
- Frequently Asked Questions: Answer some Qs people might have
- The Guarantee: Include a guarantee… marketing 101
- Why & Final Call-To-Action: If you're offering a product at a ridiculously reduced rate, people are going to want to know what the catch is… so tell them. Then, close out the page with another CTA to go buy the product
The 2-Step Order Form
I want to take a minute here to talk about this 2-Step Order form because it's pretty awesome!
Step #1, customers enter their contact info:
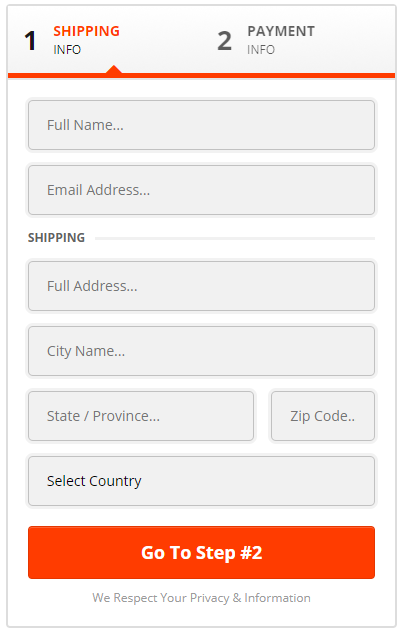
When they click “Go To Step #2”, all that information gets saved! Even if they don't go through with their order, you will still capture their contact information, giving you the ability to reengage with them time and again! (a la, “Cart Abandonment”)
Step #2 gives you the power to add an Order Bump:
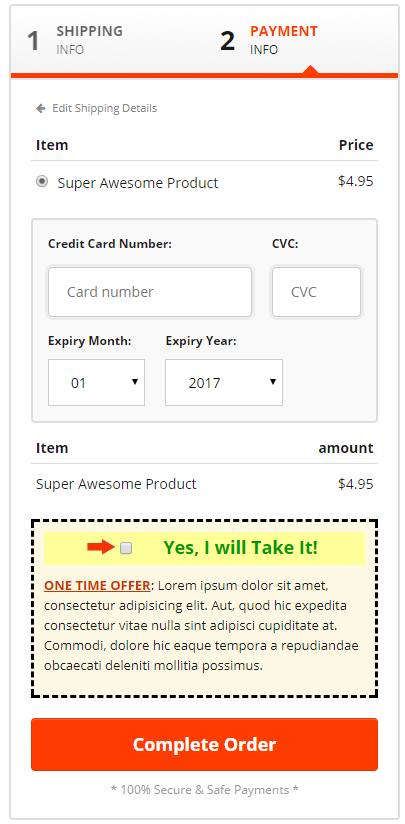
That little check box with the red arrow and the green “Yes, I will Take It!” has the power to dramatically increase your average order size!
When someone ticks that little box, another product gets added to their order… it's that simple!
I typically try to offer a digital product for the bump since they're nearly 100% profit. This helps in recouping ad spend and the cost of the initial product, if I'm taking a loss.
You can also offer another physical product or even expedited and/or insured shipping as a bump!
Cart Abandonment Series
If an individual fills out Step #1 of the 2-step order form, but fails to complete their purchase, I recommend you retarget them and send them a couple cart abandonment emails.
Here are a couple successful cart abandonment emails I've used:
Email 1 – Sent 1 hour after abandonment:
Subject Line: Complete Your Purchase
Hey %FIRSTNAME%,
Your shopping cart at Crazy Eye Marketing has been reserved and is waiting for your return!
In your cart, you left: Super Awesome Product
Click here to complete your purchase!
Thanks for shopping!
Crazy Eye Marketing
Email 2 – Sent 1 day after abandonment:
Subject Line: Last Reminder About Your Cart!
Hey %FIRSTNAME%,
Your shopping cart at Crazy Eye Marketing has been reserved and is waiting for your return!
In your cart, you left: Super Awesome Product
Click here to complete your purchase!
Thanks for shopping!
Crazy Eye Marketing
Hopefully, between retargeting and the cart abandonment emails, the individual completes their order. If they don't, simply add them to your general autoresponder automations which introduces other offers you have.
CF Pro Tools
Personally, I run a few “pro tools” on my 2-step order form and I highly recommend them because they optimize your form.
The “pro tools” are from Jaime Smith of CF Pro Tools.
Most are FREE! Which is insane because they provide so much power.
I use:
- CF USA Only Shipping Hidden – Automatically selects USA as country and then hides the country option (one less field to fill out)
- CF Best Seller Highlight – Highlight your top selling offer
- CF Select Default – Pre-select a product option (typically pre-select the “most popular” option)
- CF 2 Step Track Lead – Track leads. Those that fill out Step #1 of the 2-step form.
- CF State Selector (paid) – “Forces” people to select a State abbreviation. Otherwise people type all sorts of random stuff and misspell their own state. (the fewer options you give someone, the better)
- CF Cart Mode (paid) – Gives you the ability to easily offer quantities and/or variants on your order forms (this is a game-changer!)
- CF Order Summary (paid) – Works with CF Cart Mode to “do the math” for people when they select multiple variants and/or quantities
I'm not a partner, affiliate, or anything for CF Pro Tools. It's simply an awesome resource that I highly recommend!
One-Time-Offer Pages (OTO 1 & OTO 2)
The One-Time-Offer pages are used to offer complementary products, ie. cross sells.
You can offer most anything from:
- Single products
- Product bundles
- Digital assets
- Continuity/subscription programs
- Big ticket items (“profit maximizer”)
Basically, whatever else you think someone will buy after purchasing your initial product.
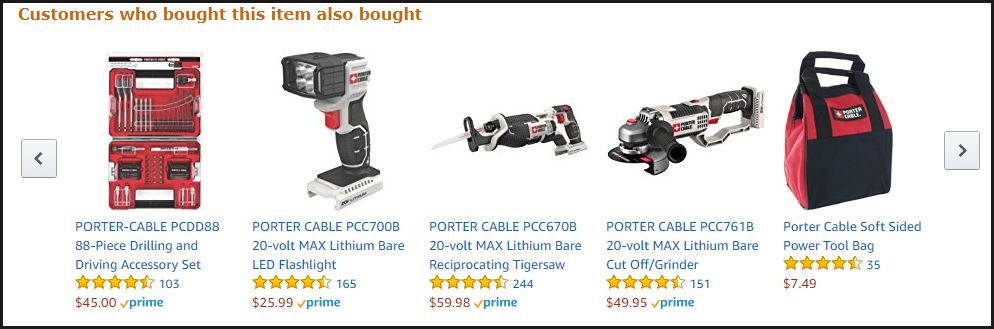
Getting OTO Ideas
If, for some reason, you can't come up with complementary products to offer, head over to Amazon.com, find your product or something similar, and then scroll down to the “Customers who bought this item also bought” section:
The OTO Page Designs
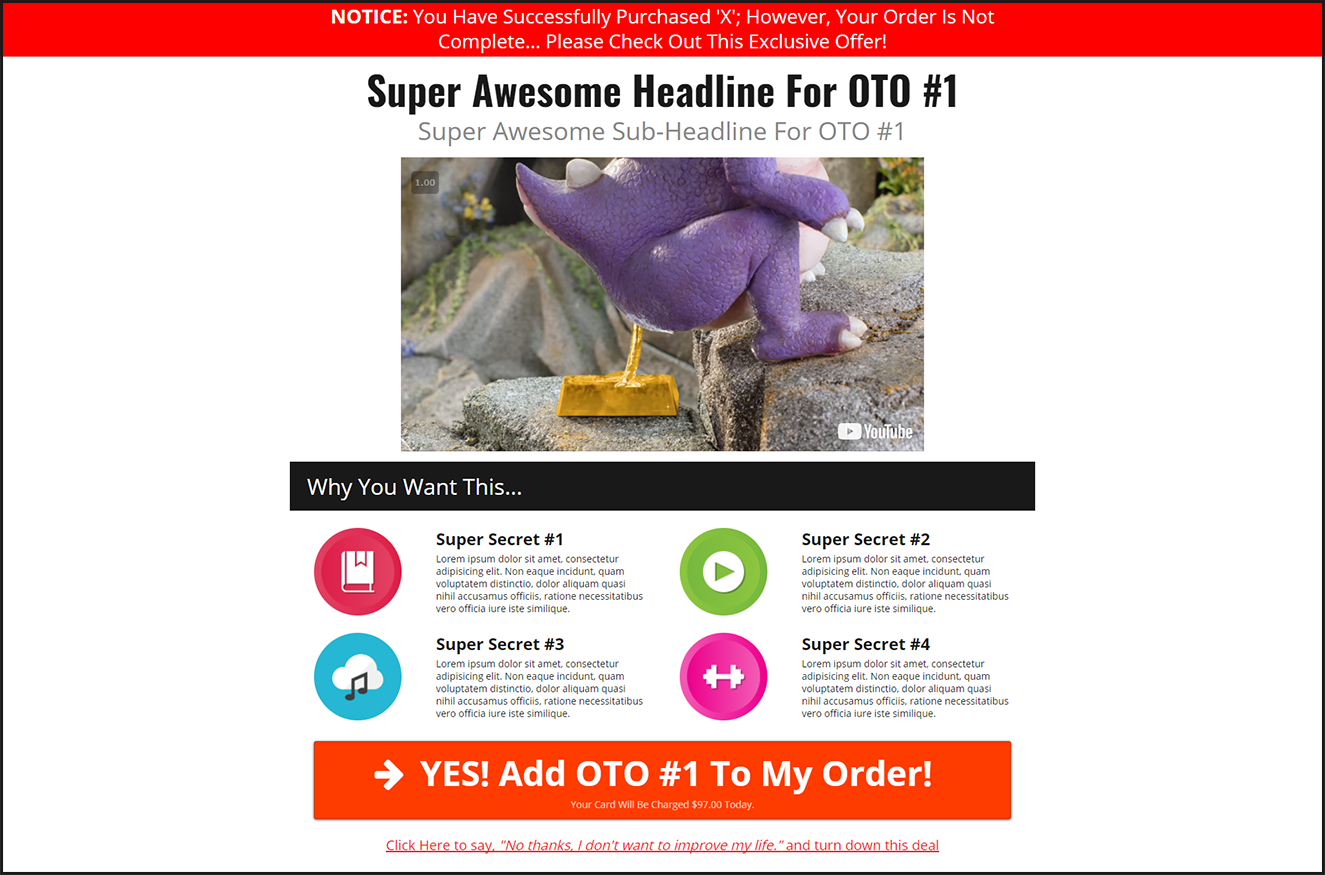
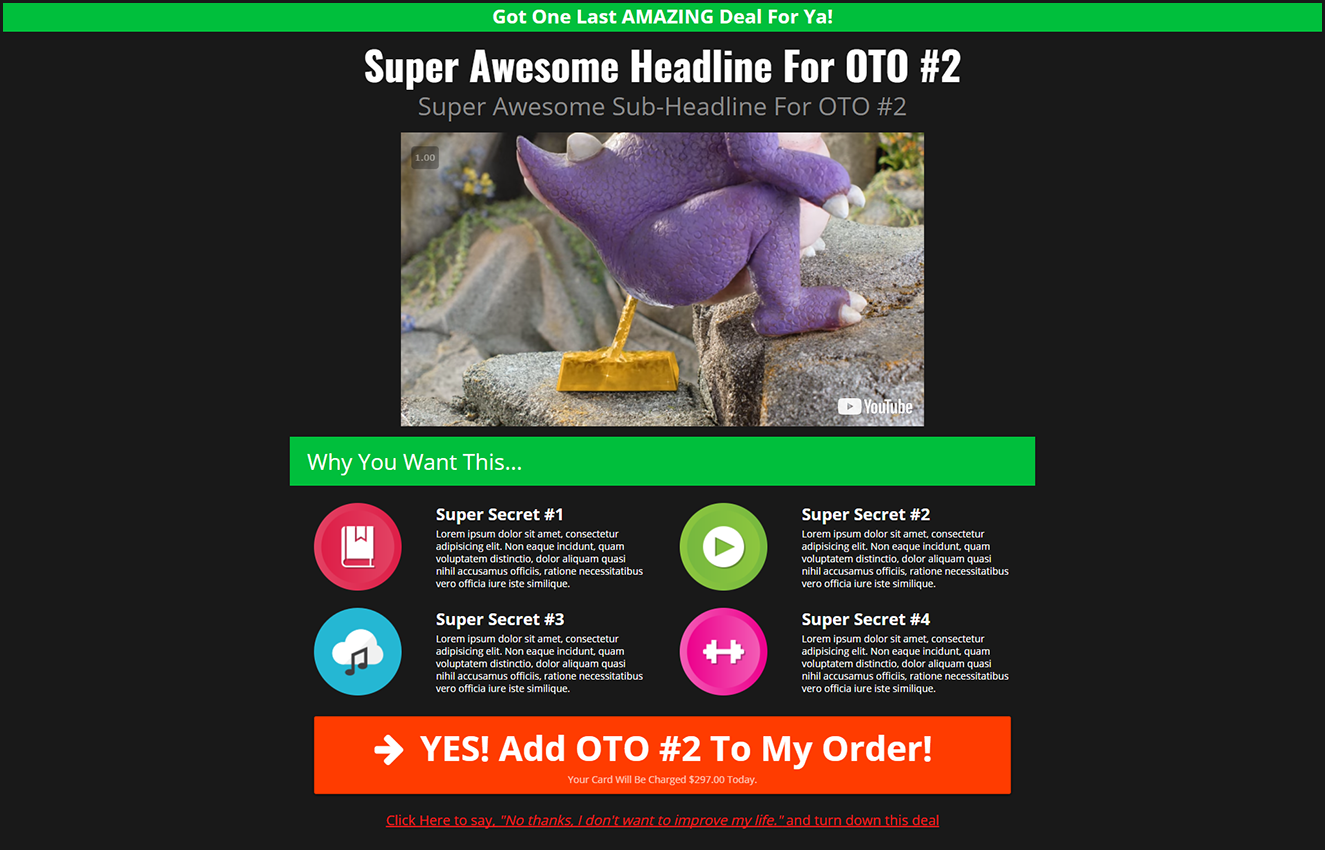
As you can tell, these pages are nearly identical with the exception of the very top bar and the colors (and, obviously you will offer different products on each page as well… but, the design shouldn't really change).
So, let's quickly break these pages down:
- “Top Bar”: The bar across the very top of the page
- OTO 1: It's red to capture the customers attention and it reads, “NOTICE: You Have Successfully Purchased [Product Name]; However, Your Order Is Not Complete… Please Check Out This Exclusive Offer!”
- Funnels are still pretty new and not everyone has experienced one before so they may not realize their order isn't complete the moment they click the submit button on the Sales Page… hence, why we tell them right away!
- OTO 2: It's green and lets people know they're on the last step
- OTO 1: It's red to capture the customers attention and it reads, “NOTICE: You Have Successfully Purchased [Product Name]; However, Your Order Is Not Complete… Please Check Out This Exclusive Offer!”
- Headline & Sub-Headline: Pulls people into the video
- 3-5 Minute Video: A short video to sell your OTO (Note: you don't need to use video, you could have a regular text sales page; however, videos tend to perform much better for OTOs)
- Here's a video structure you can follow:
- Confirm initial purchase
- Introduce OTO as a special offer that will enhance their initial purchase
- Can also say how this offer isn't available anywhere else and it's only for those who purchased the initial product (if true)
- How OTO product will help them (benefits)
- Mention your guarantee
- Briefly hit on some reviews/testimonials
- Give a Call-To-Action (CTA) to hit the big orange button below to add [OTO product] to their order
- Here's a video structure you can follow:
- A Breakdown Of The Key Features/Benefits: Briefly summarize what the OTO is and why they want it via some pretty bullets
- Yes! Button: Clicking this button will add the OTO to their order and move them to the next OTO or step in the funnel
- No! Link: Clicking this link will not add the OTO to their order and move them to the downsell or the next step in the funnel
The Downsell Page
The Downsell page is the page an individual sees if they turn down OTO 1. (Note: you can have a downsell page after any OTO page, but don't get too carried away or you will annoy your customers)
Some typical downsell ideas include:
- Offer A Lesser Version: As the name “downsell” implies, if they say “No” to the first product, offer a less expensive version that still accomplishes the same task… just maybe not as well. For example, if you sell knives, OTO 1 could be a really nice $100 knife and if they turn it down, the downsell could be a $30 knife. Both products are knives, but one is a better, more expensive product
- Offer A Discount: If they say “No” at first, you could discount the product in order to get them to say “Yes”
- Offer A Bonus: If they say “No” at first, you could incentivize the product with a bonus (additional product, free shipping, digital asset, etc.) in order to get them to say “Yes”
- Offer A Payment Plan: If your OTO is expensive, by offering a payment plan your customers might be more likely to take you up on your offer
- Are You Sure?: Sometimes, all you need to do is ask “Are You Sure You Don't Want [OTO Product]?” and reiterate the fact it's a limited time offer
Downsell Page Design

Click Here To View A Live Version Of This Page
Simple enough, right?
Big, bright red page that captures their attention and gives them a second chance to say “Yes” to your OTO.
The Order Confirmation Page
The final page of the funnel is the Order Confirmation Page.
This page lists out all the products the individual purchased while going through your funnel.
You will also want to include links to support and other products you offer.
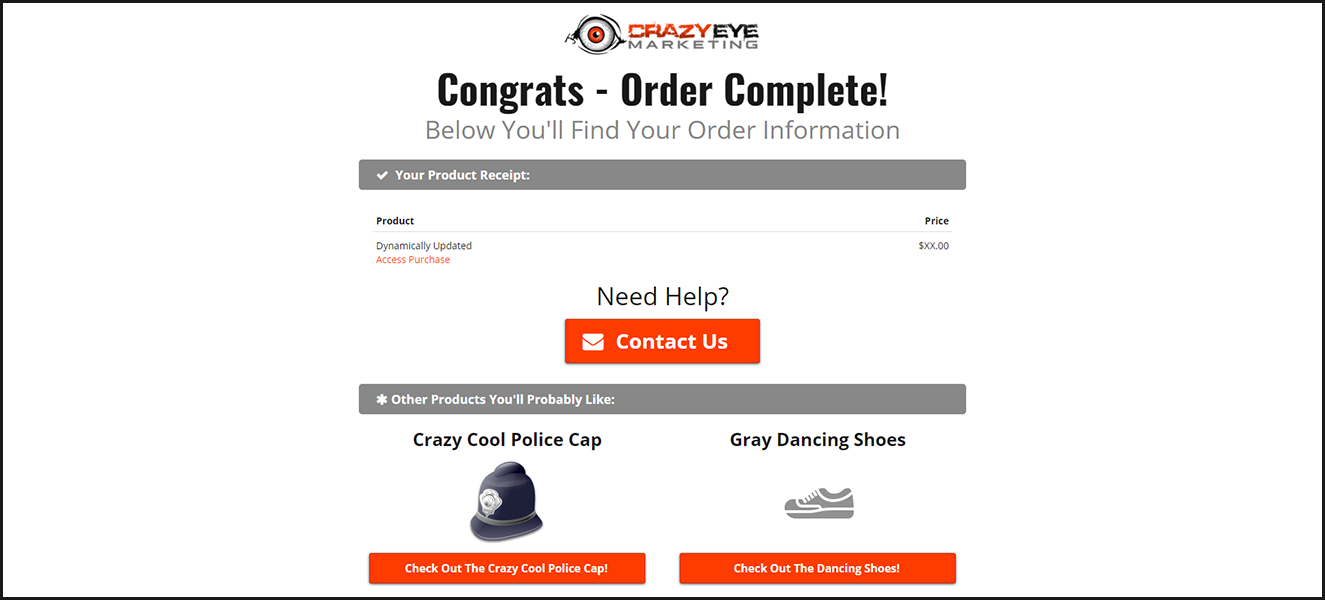
Click Here To See A Live Version Of This Page
How To Connect ClickFunnels To Shopify
Alrighty, so… we just spent a good amount of time talking about the Sales Funnel… what the pages look like and the strategy behind each.
Now we need to connect ClickFunnels to Shopify… but, how?!?!
This is THE million dollar question!
There are several ways to do it and, unfortunately, none of them are perfect.
Below, I list and include video instructions for three of the ways I connect ClickFunnels to Shopify:
- 5% Automated/ 95% Manual: Free up to a certain point then starts around $20/mo (so you might as well go with the 80/20 method below), and you have full control over everything.
- 80% Automated/ 20% Manual: Starts around $20/mo, and you have full control over everything.
- 99% Automated / 1% Manual: Starts around $40/mo, and there are a few issues.
5% Automated/ 95% Manual
This method uses the free version of Zapier and Google Sheets.
80% Automated / 20% Manual
Until the 99/1 method outlined below is updated to support CF Cart Mode, this 80/20 method is my favorite because I have full control. (it's been updated as of 7DEC2017! Can't recommend AppTrends enough!)
This method uses the paid version of Zapier and Google Sheets.
99% Automated / 1% Manual – AppTrends
There's a tool on the market called AppTrends that's pretty freakin' sweet and does about 99% of the heavy lifting for you.
After setting it up and syncing your products, it's nearly 100% automated… it will create a new customer in Shopify, create an order, and add products to that order. All you have to do is fulfill it, unless you have autofulfill on… then, you don't even have to worry about that!
I do have a few issues with this tool… (as of 07DEC2017, these issues are non-existent and I highly, highly, highly, recommend AppTrends!)
First, it seems a bit sketchy. There's no “contact us” or support options anywhere that I can find. Also, the site contains a lot of broken links and it seems kind of sloppy. That being said, the tool does what it's supposed to… so, I imagine they're more focused on development than marketing, but it still seems a little “weird”. (as of 07DEC2017, still no “contact us” on the site; however, I was able to get in touch with the two guys who run the tool via Facebook Messenger… they're a good couple of guys that are just grinding hard. Here's Michael's (CEO) Facebook profile, if you need to message him.)
Second, it doesn't support the CF Cart Mode tool that comes with CF Pro Tools. I use this tool A LOT so, it's kind of a deal breaker for me; however, if you don't use this tool, then I highly recommend checking out AppTrends. (as of 07DEC2017, their tool supports CF Cart Mode!)
Note: They have several tutorials on their site; no reason to recreate them here.
99% Automated/1% Manual – Orderlytics
Another way to automate the entire process is with a tool called Orderlytics.
Here's a video on how to set it all up:
Click here to view the support article I reference in the video.
Get My Shopify Sales Funnel!
You've seen my Shopify Sales Funnel, the strategy behind the pages, and know how to make the connection between ClickFunnels and Shopify!
Now, you can go and create your own funnel that mimics mine above – and that's cool, go for it!
But, if you want to save time, effort, and energy…
And you want…
- A copy of my sales funnel…
- Over-the-shoulder training where I show you how to set the whole thing up (over 2 hours of step-by-step video instruction!)…
- Premium support…
AND Limited Time Bonuses…
For a limited time, I'm also including…
- 2 more sales page variations
- a standalone order form page
- a squeeze page
- a pre-sell page

Get The Funnel, Training, & Bonus Pages TODAY!
Do you want…
The Shopify Sales Funnel + the 5 bonus pages
An over-the-shoulder training (Over 2 hours of step-by-step video instruction) on how to set the whole thing up
Premium support
2 Payment Options…
1) FREE – Join ClickFunnels through our affiliate link by clicking here. Then, forward your welcome email to support@crazyeyemarketing.com and let us know you want Lifetime Access to The Shopify Sales Funnel Course. We'll add you to the course ASAP!
2) Lifetime access to the course, funnel, updates, and support! Click here to join the course.