How To Build Your Own Landing Page Platform
Being able to develop beautiful, mobile responsive, high converting landing pages on the fly is a necessary part of online marketing.
There are a bunch of tools to help you do this; however, they tend to be overpriced, limited, overrated, and unnecessary.
In this step-by-step tutorial, I show you how to setup your own, self-hosted, landing page platform that you 100% own and control!
>> Click here to download this post in PDF format
BONUS!
I just turned this blog post into a free video course on YouTube and I also put together a part 2 that can be found here!
Comparison Chart
As previously stated, there are tons of landing page builders on the market and each one has its own list of benefits and features that make it “unique”; however, at the end of they day they all solve the same problem – help you easily create great looking pages.
Below you'll find a breakdown of the setup I'm about to show you compared to its closest competition.
| Category | This Setup | LeadPages | Instapage | Unbounce |
|---|---|---|---|---|
| Annual Price | $281.58 (*probably less) | $297.00 | $348.00 | $588.00 |
| # Visitors | Unlimited | Unlimited | Unlimited | 5,000 |
| # Pages | Unlimited | Unlimited | Unlimited | Unlimited |
| Split Testing | Yes, w/ Google Analytics | Yes, w/ Google Analytics | Yes, w/ Google Analytics | Yes |
| Tracking | Yes, w/ Google Analytics | Sometimes | Yes | Yes |
| Secure Hosting (SSL) | Yes | Yes | Yes | No |
| Custom Domain/Branding | Yes | No | No | No |
| Digital Asset Delivery (Memberships) | Yes (huge!) | No | No | No |
* Probably Less – 9 times out of 10, you likely have a host already and won't require a new one; if so, you can subtract $164.58 from the price mentioned above, bringing the new annual price to $117.
** ALSO! – The renewal fee for OptimizePress drops from $97/yr to $39/yr after the first year – so, you can likely run this for less than $100/year!
Step #1: Domain, Hosting, and SSL
Domain
You'll want your self-hosted landing page platform on its own domain because you're going to streamline it for one thing and one thing only – building landing pages.
This way you don't accidentally bloat it with a bunch of unnecessary files and plugins that will slow down your site.
You want this baby fast!
When it comes to choosing a domain, I recommend something generic – especially if you'll have landing pages for different businesses, niches, or industries.
For example, I wouldn't want NathansGardening.com and then to create a landing page for fitness because this will cause inconsistencies; people will get confused.
I also recommend avoiding the words “marketing” or “sales” (or anything similar) in the domain as it may “scare” some people off.
My top trick for picking a generic domain is to pick a word or name and attach “media” at the end.
For example:
- crazyeyemedia.com
- williamsmedia.com
- framedmedia.com
Those could mean anything and aren't niche specific.
When it comes to registering your domain, I recommend NameCheap.
They offer a very clean domain registration process unlike GoDaddy that tries to up-sell you on a bunch of “protection” you don't need.
If you use NameCheap, I recommend checking out http://www.namecheapcoupons.com/ before you buy; they usually have a coupon that'll save ya a buck!
Anyway, the domain registration process is pretty straightforward and I think you can handle it without a bunch of pretty pictures. But, my one piece of advice is to NOT add anything to your domain (ie. protection, hosting, email, social boost, etc. [these are all crappy up-sells used to take advantage of people that don't know any better]). other than WhoisGuard.
I recommend WhoisGuard if you don't want people to know the physical address you used when you registered your domain. For example, your personal residence.
Hosting
You do not want to skimp on hosting. Having a slow website will hurt your conversions.
Being that the sole purpose of your landing page platform is to get conversions … we can't allow it to be slow!
If you're going to send between 0 and 2,500 people a day, the below setup will be great for you.
If you'll be sending more than that, you'll likely want to upgrade to a VPS or dedicated solution.
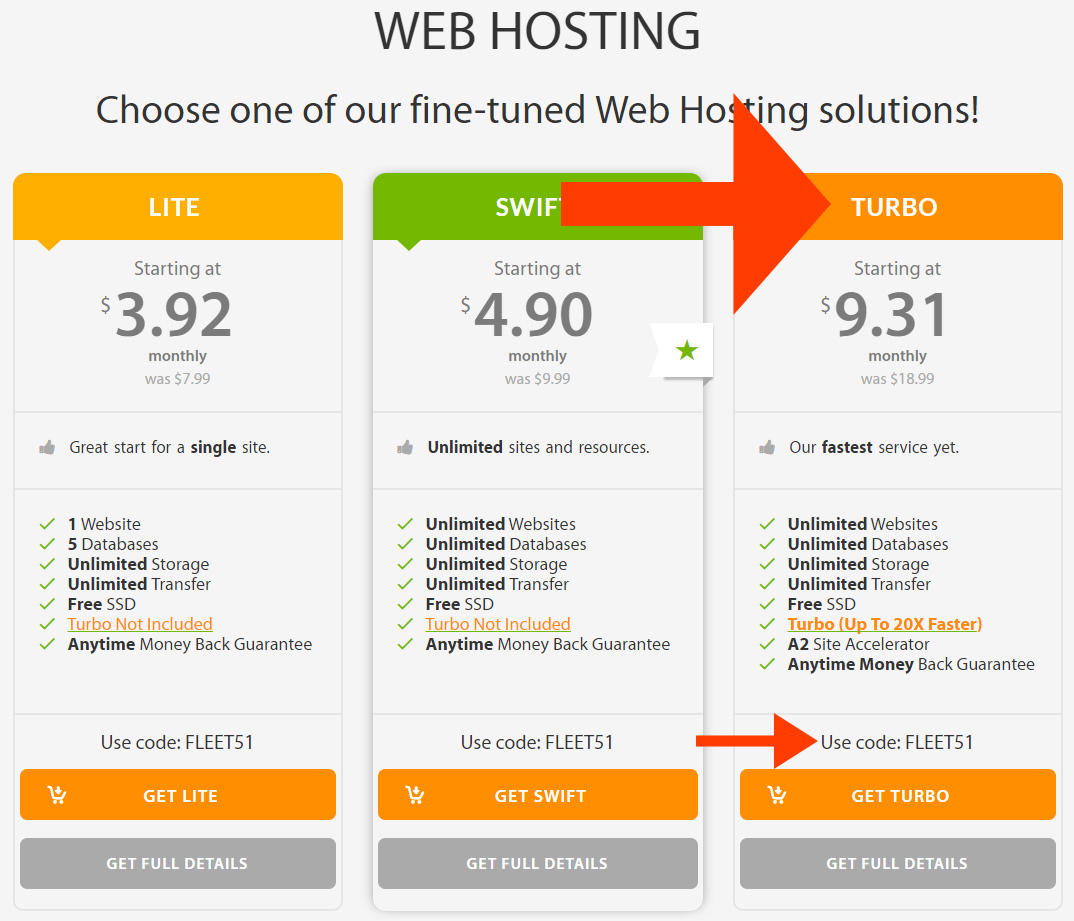
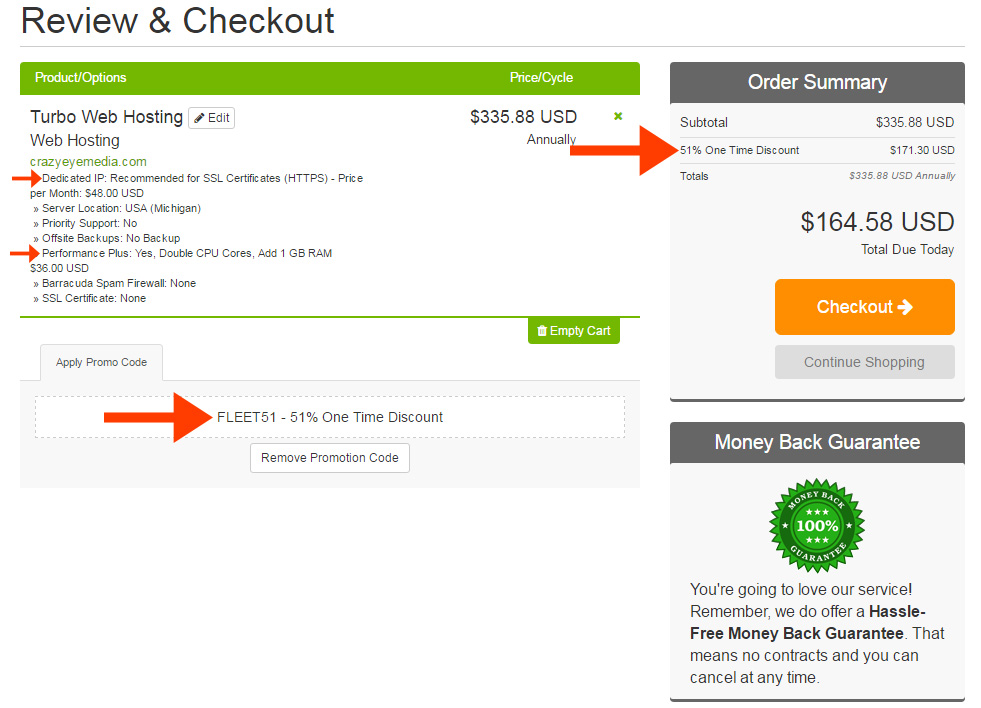
I recommend the Turbo package by a2Hosting.
Be sure to take note of the code at the bottom (ie. FLEET51). There's always a code for 51% off; however, it changes from time-to-time and they won't automatically apply it to your order … so, make sure you remember to add it!
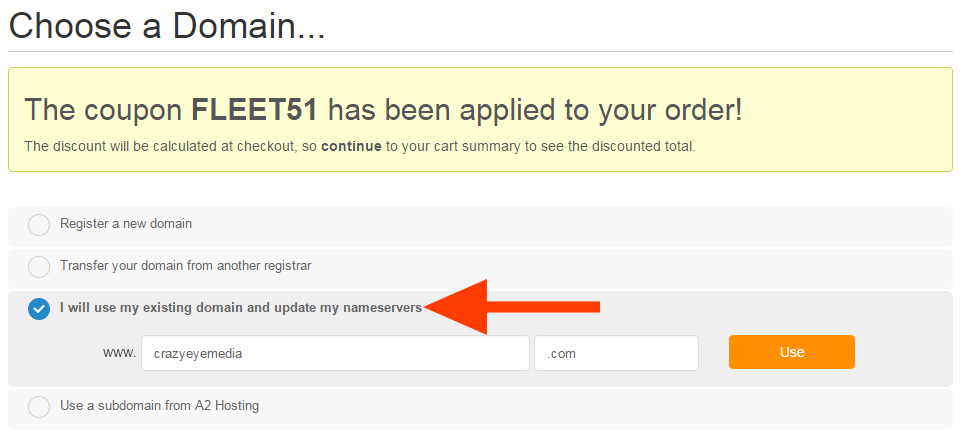
When it asks you to “Choose a Domain…” select the option “I will use my existing domain and update my nameservers”
- Choose your Billing Cycle – I recommend at least 12 months.
- Tick the box for a Dedicated IP.
- Server Location – pick where most of your customers reside.
- Priority Support – No.
- Offsite Backups – No.
- Performance Plus – Yes.
- Barracuda Spam Firewall – No.
- SSL Certificate – None.
- Auto-Install Application – None.
- CloudFlare Plan Plus Monthly – No (unchecked).
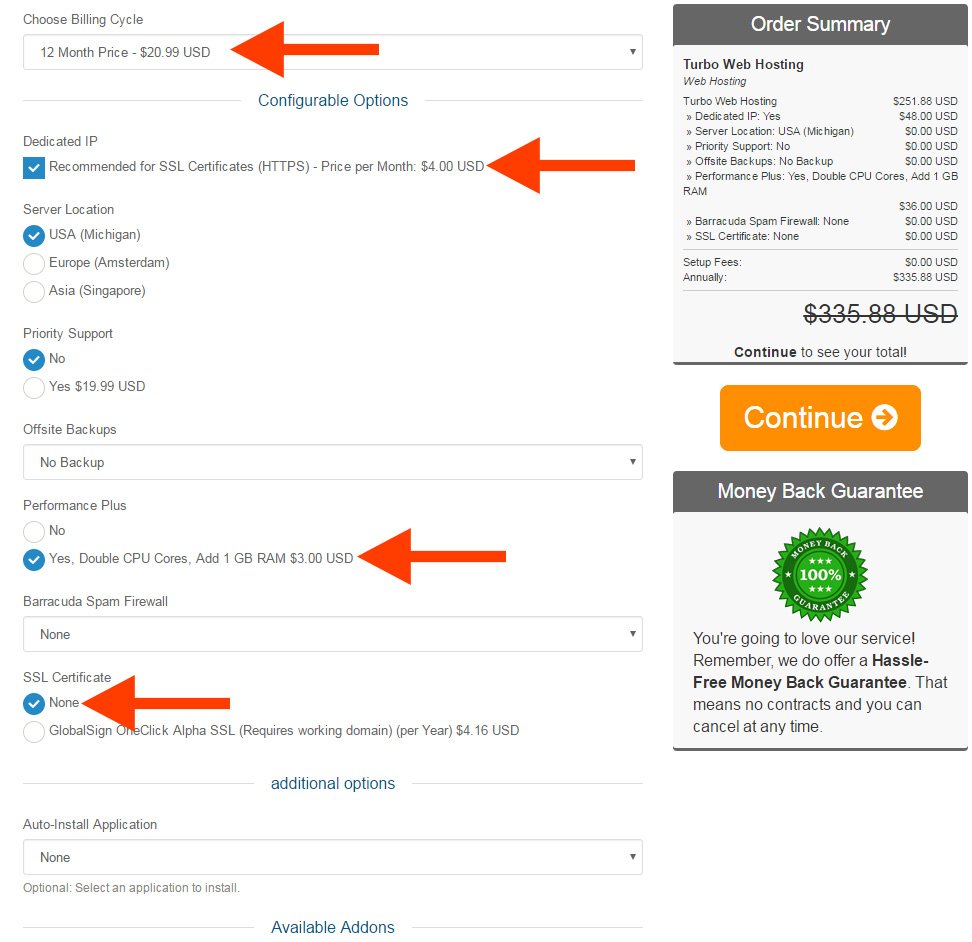
Review your order – make sure the coupon's been applied!!! (again, they don't always add it automatically!!!)
Also, double check the Dedicated IP and Performance Plus.
Complete your order and be on the lookout for an email that looks like this:
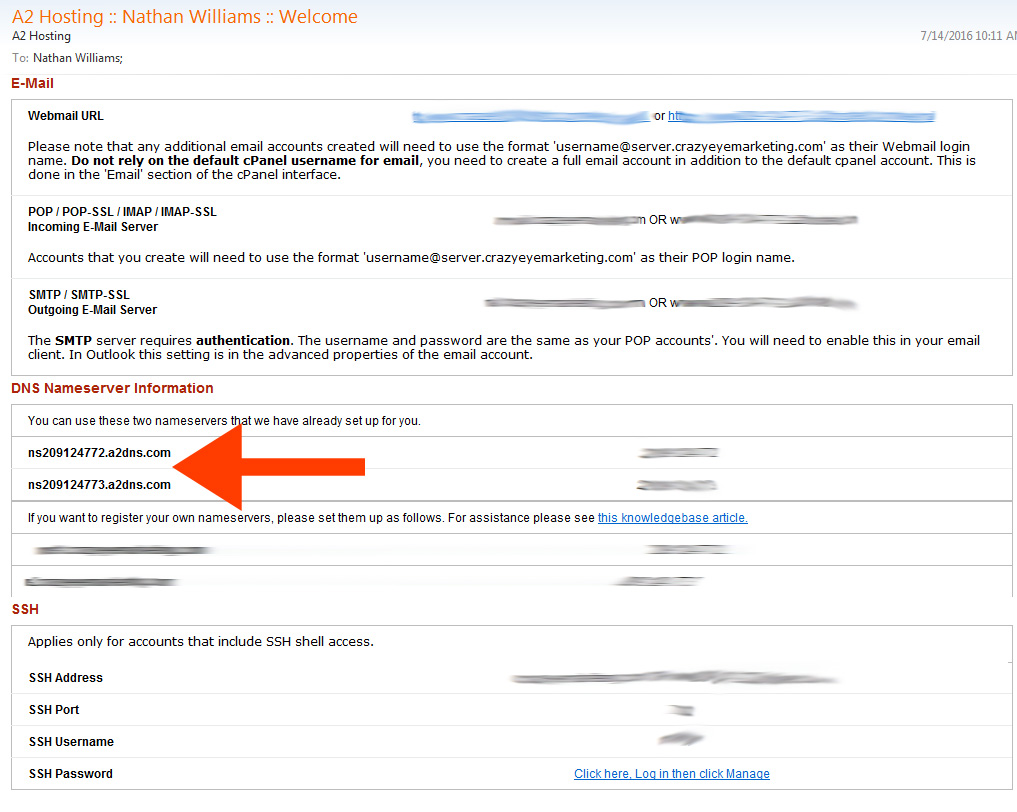
The info you're looking for is the DNS Nameserver Information.
You're going to take this information and plug it into NameCheap (or whatever domain registrar you use).
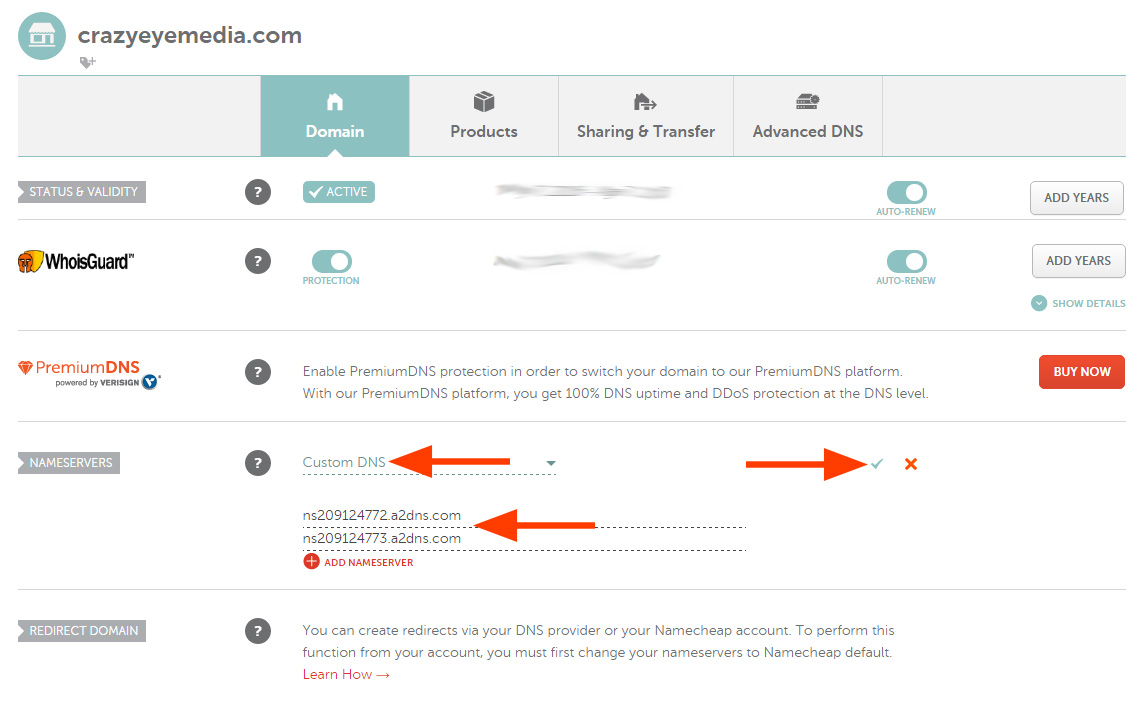
Head back over to NameCheap with your nameserver information in hand, find the domain for your self-hosted landing page platform and select “Manage”.
Now, in the “NAMESERVERS” area, select Custom DNS and paste in the nameserver information from the email … and don't forget to hit the little check mark!
Now, you'll have to wait until you start seeing an error message when you go to your domain.
Something like this:

Sometimes this happens instantly, other times you have to wait a couple days.
But, once you see some form of error message as opposed to a “pretty” NameCheap page – you're ready to move on!
SSL
Once your hosting and domain are finally connected, it's time to secure your site.
Why do you want to secure your site with SSL?
A few reasons:
- People look for it and it makes your site more trustworthy
- Google likes it. Not that you're necessarily trying to get Google love for these pages, but if Google likes it, other places generally do too.
- So you can accept payments via Stripe (if you intend to do that) .
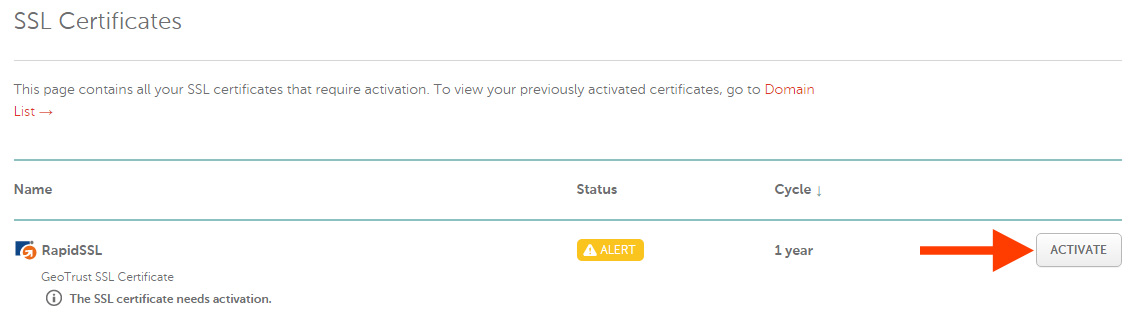
You can buy your SSL Certificate from NameCheap. You can pick any; however, I use and recommend RapidSSL.
Go through the checkout process (it's self-explanatory) and click “Activate”.
Now it's time to generate your CSR (Certificate Signing Request).
Start by logging into your cPanel and navigating to SSL/TSL Manager.
(The cPanel is part of your hosting service and is generally found at http://your-landing-page-domain.com:2082. If you're having trouble finding it, check the email your host sent you when you registered with them.)
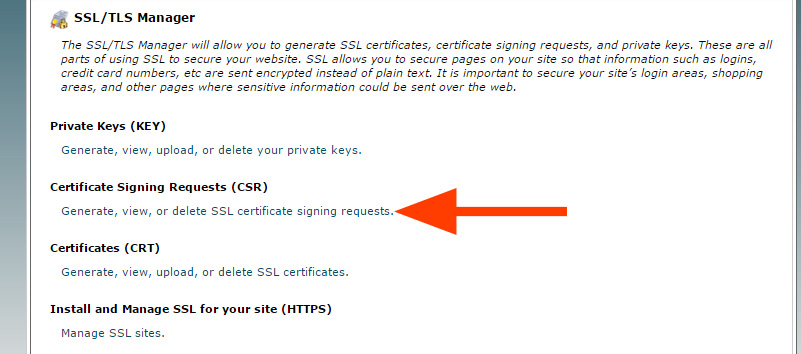
Click “Generate, view, or delete SSL certificate signing requests.”
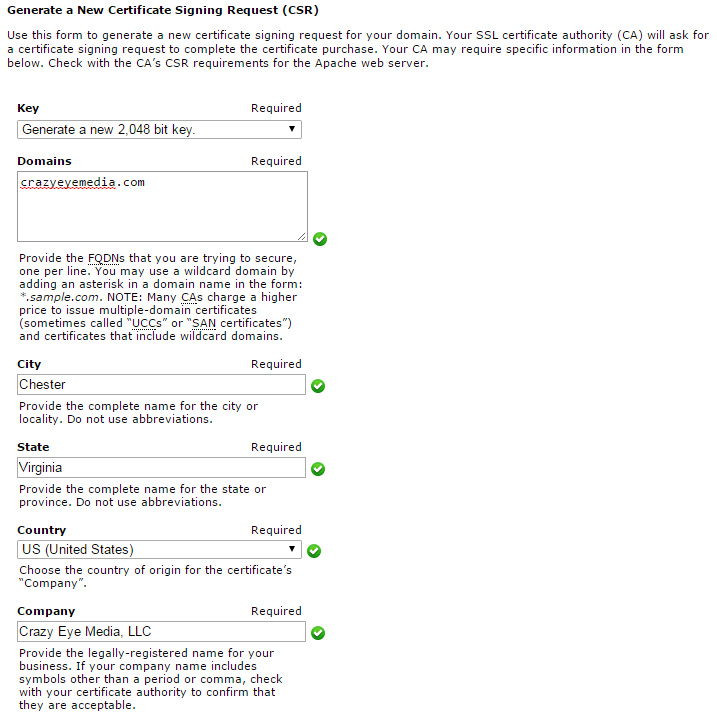
Fill in the info it requests and click “Generate”.
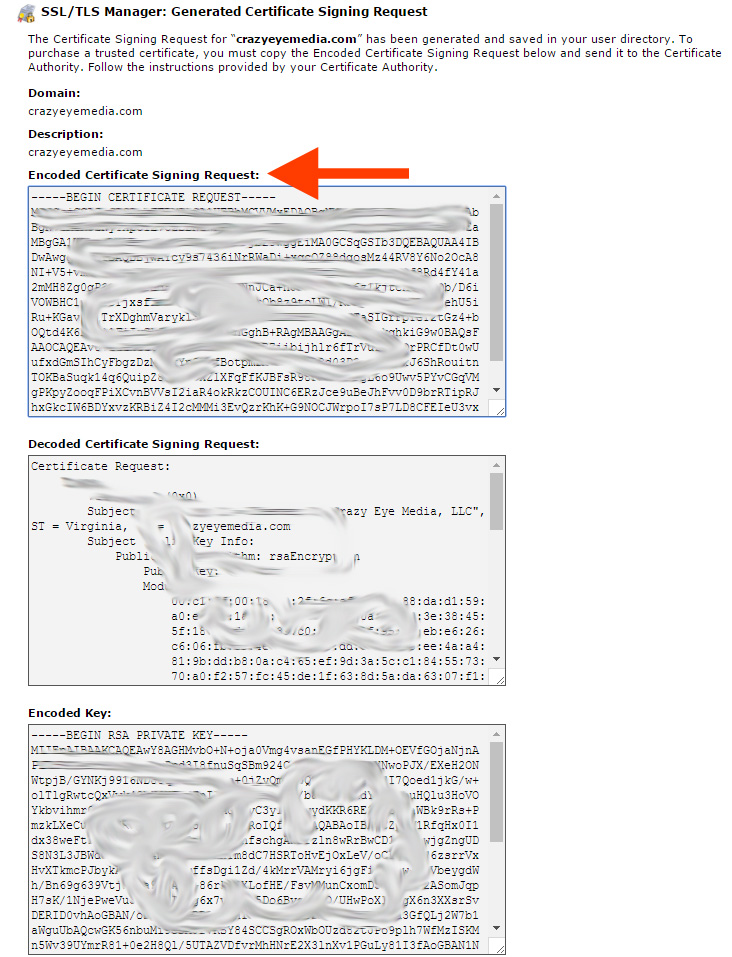
Copy the “Encoded Certificate Signing Request”.
Go back to NameCheap and paste the code into the box that says “Enter CSR” and select your Server Type (probably Apache, Nginx, cPanel or other).
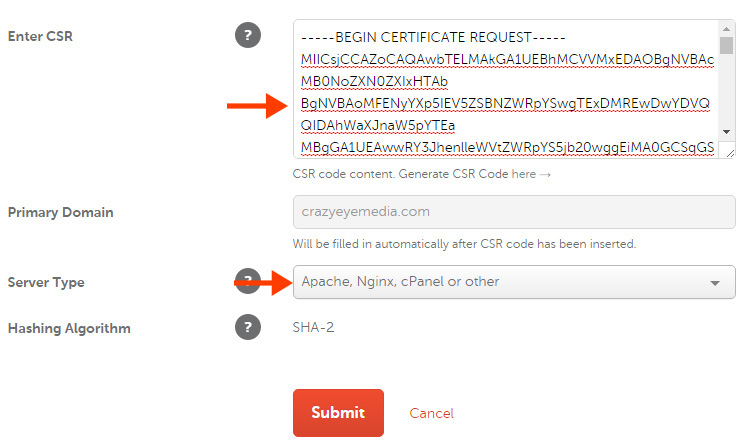
It'll ask you to verify the information, make sure it's correct and hit “Next”.
Now, we need to go back to cPanel and setup an email forwarder.
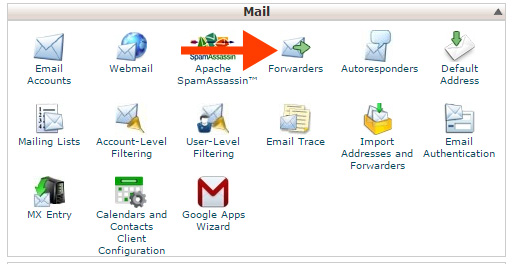
Make one forward from admin@your-landing-page-domain.com to youremail@yoursite.com.
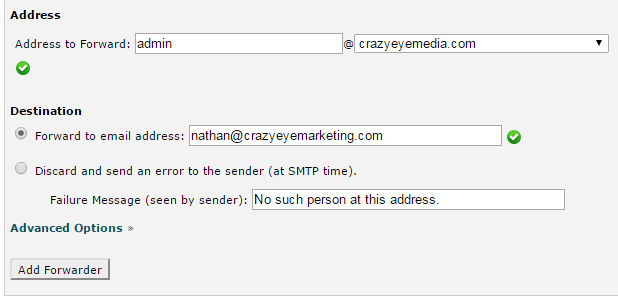
Once the forwarder is setup, be sure to test it by sending an email to admin@your-landing-page-domain.com and ensure it's actually delivered. Sometimes it takes a few minutes for the forwarding to kick-in; you want to make sure it's working before moving to the next step.
Go back to NameCheap and select “Email” for DVC Method and admin@your-landing-page-domain.com for Approver Email.
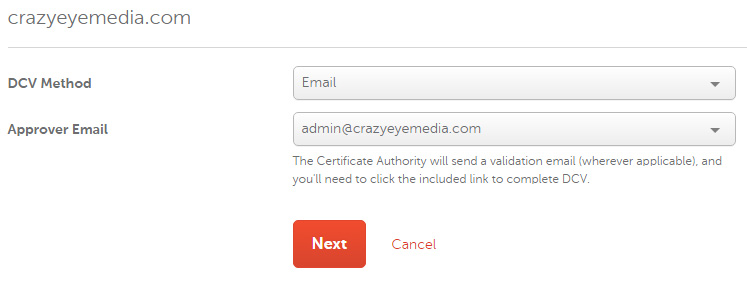
It will request more information, fill it out. It's self-explanatory.
It will then ask you to confirm your information, click “Confirm”.
Wait for an email that looks like this and click the link the arrow is pointing to:
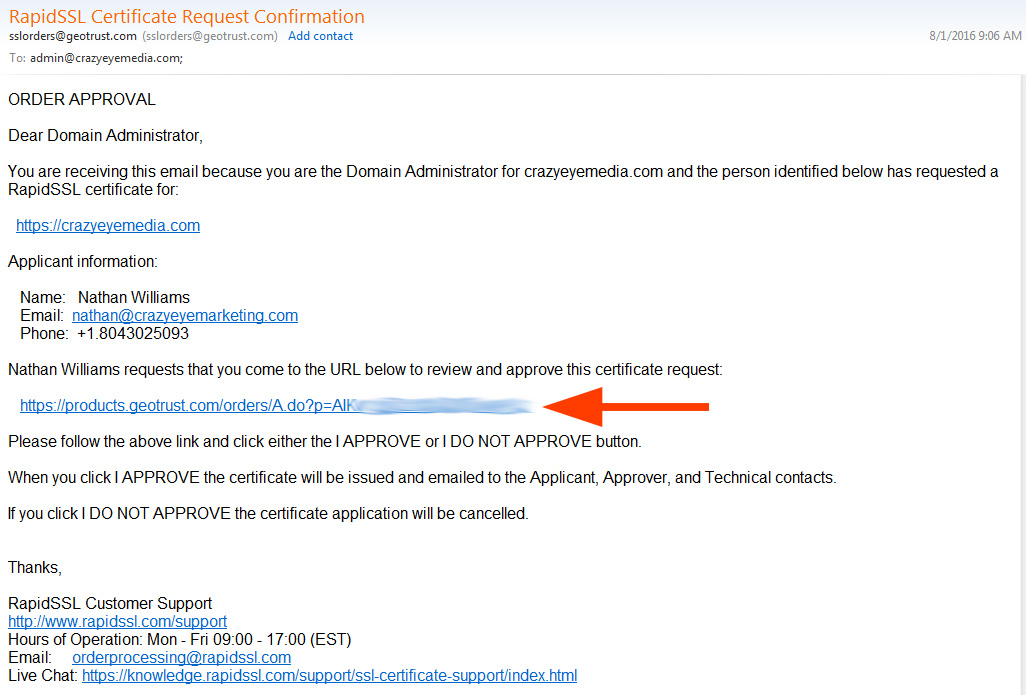
On the page it takes you to, click “I Approve”.
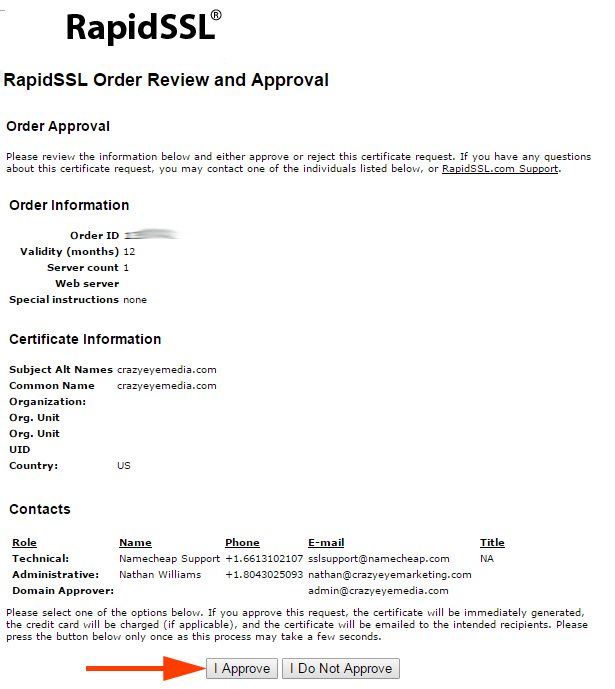
You will see a message about it being approved.
You will then receive another email that looks something like this:
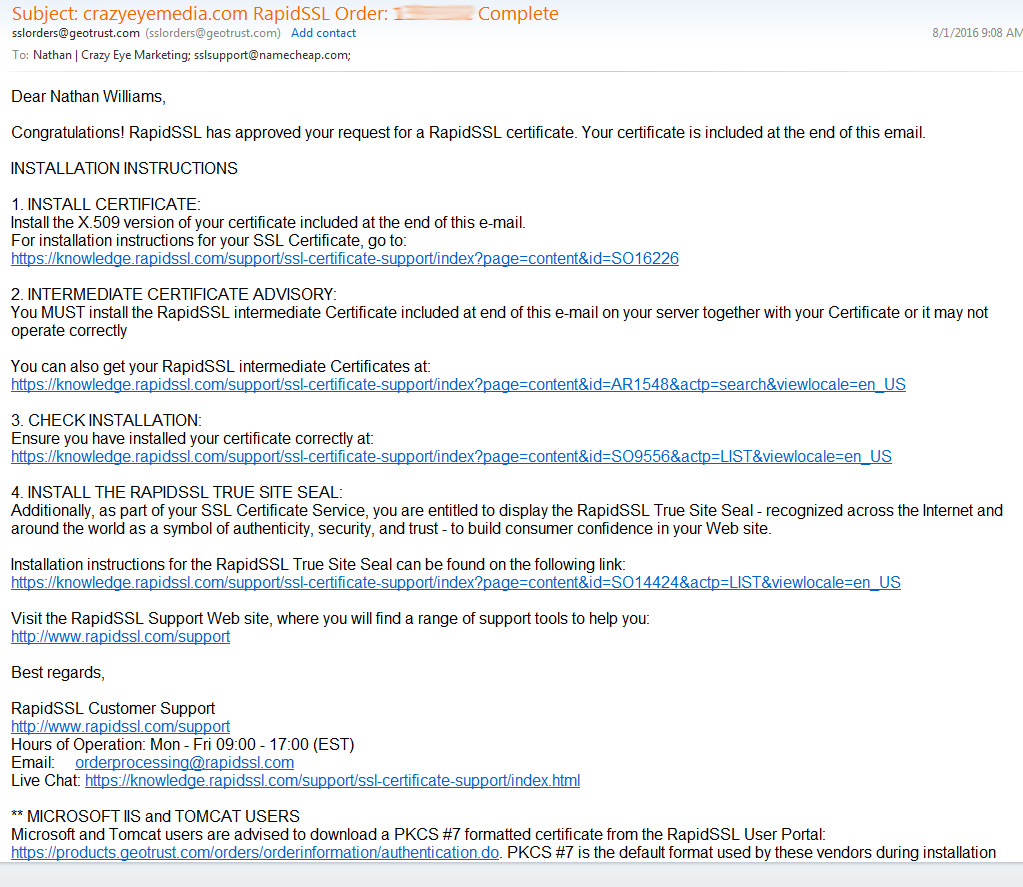
NOTE: If you don't receive this email within an hour, contact support at https://www.rapidssl.com/. There's the option to “Chat” at the top – start a chat. There have been instances where they've needed to verify my ID on the phone before they could issue the certificate. You may need to do that too, if you don't receive the email within the hour.
Assuming you receive the email, look for “—–BEGIN CERTIFICATE—-” and copy through it to the end “—–END CERTIFICATE—–”
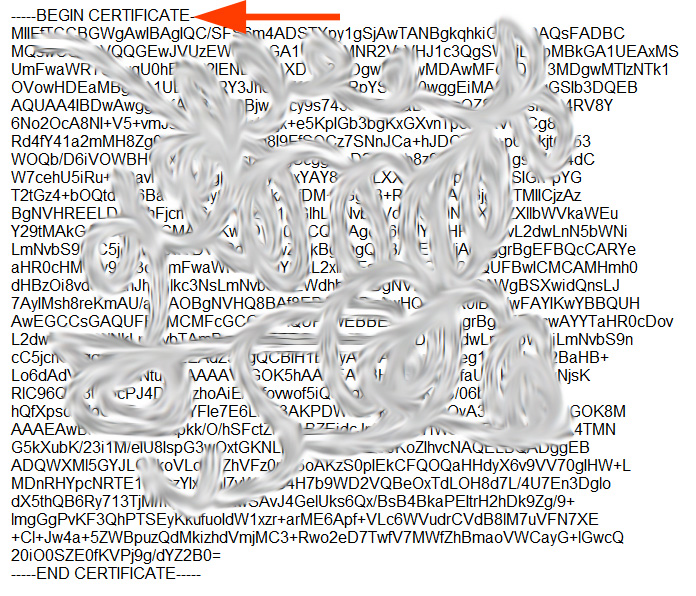
Go back to your cPanel, back to “SSL, TSL Manager” and this time click on “Manage SSL sites.”
Browse for the Domain you're installing the SSL Cert on.
Paste in the code you just copied from your email.
A button that says “Autofill by Certificate” will magically appear. Click it and it will auto-populate everything else.
Tick “Enable SNI for Mail Services”
And finally, “Install Certificate”
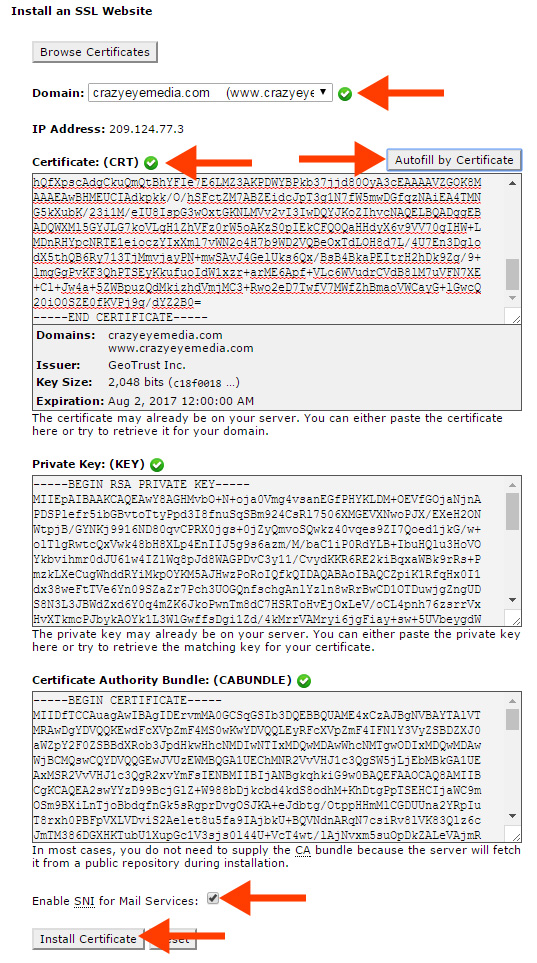
You should see this …
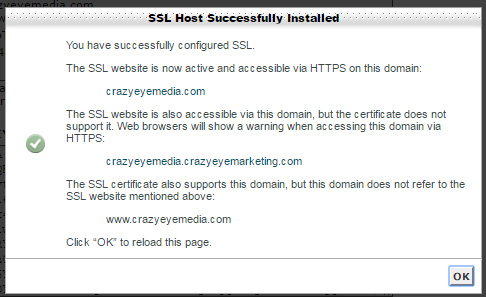
YAY – your site is now secure!
>> Click here to download this post in PDF format
Step #2: WordPress and OptimizePress
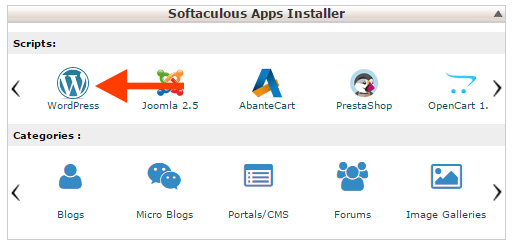
Install WordPress
Go to your cPanel and locate the option for WordPress.
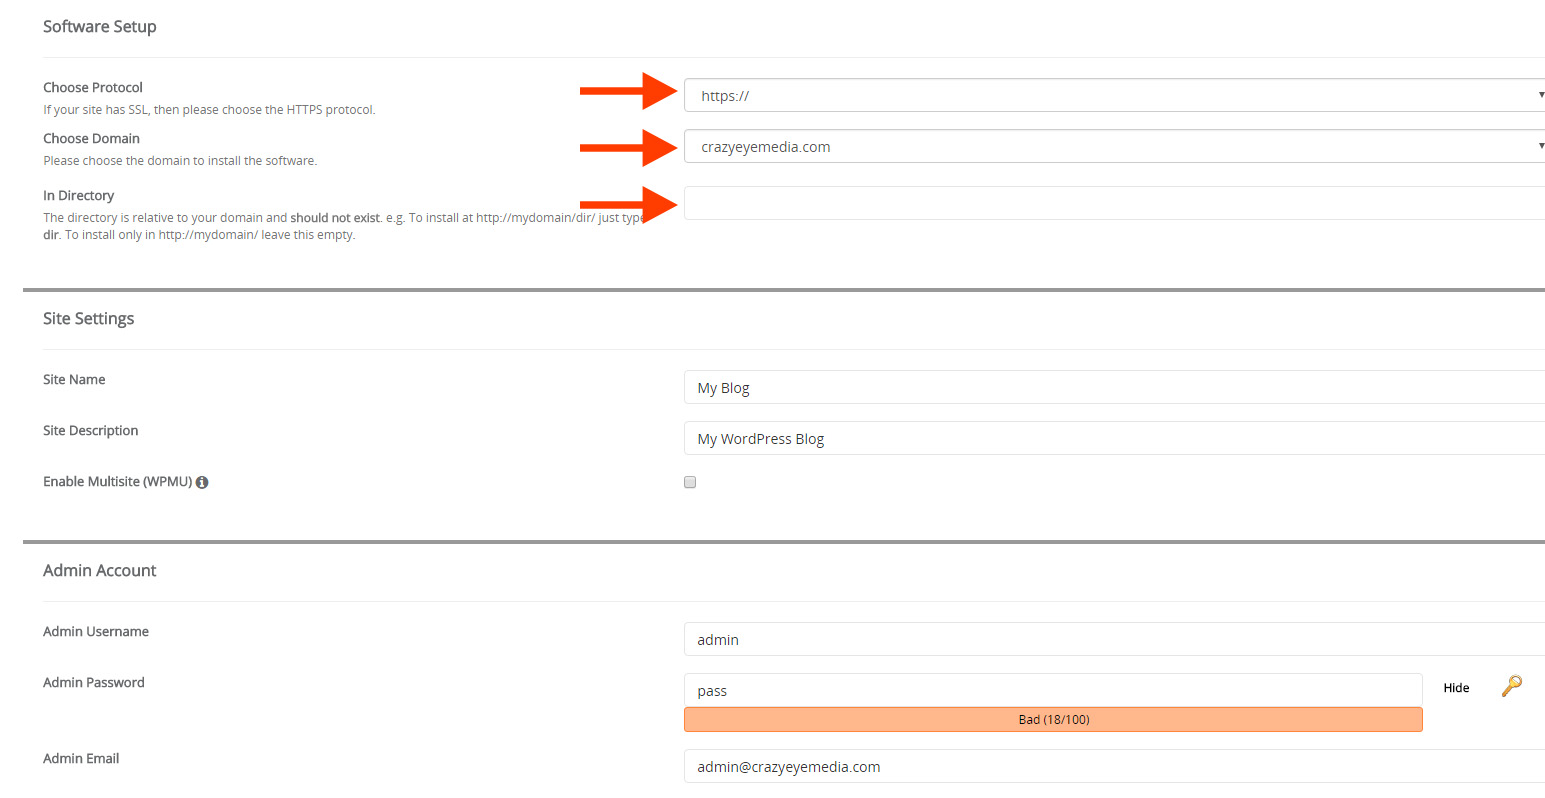
For Protocol, choose https://
Choose your Domain
In Directory, make it blank. (it's important that this be blank! You want your self-hosted landing page platform on the Root Domain.)
The rest of the info is pretty self explanatory; however, I recommend NOT activating any “special” plugins, themes, or options they offer as they tend to be sloppy and unnecessary. Go as bare bones as possible unless you have a specific reason to do otherwise.
After clicking “Install,” you'll have a beautiful, securely hosted, WordPress Website!
Get and Install OptimizePress
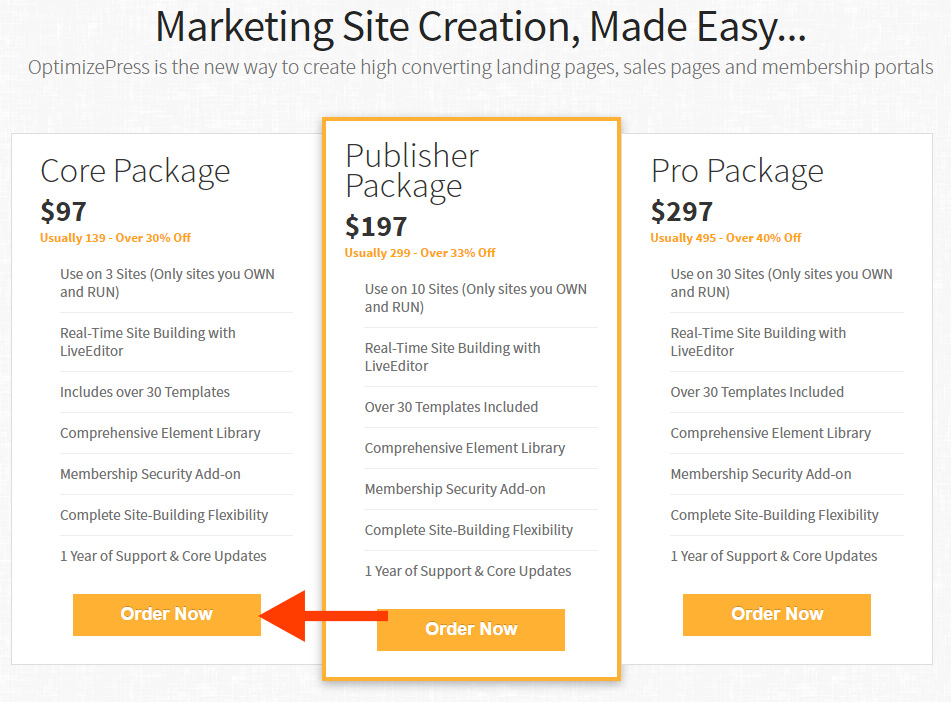
The first thing you need to do is purchase OptimizePress. It offers an outstanding page builder with a TON of features; it's the tool you'll be using.
Select your package. More than likely, you only need the Core Package. You will only be running OptimizePress (OP) on this site that is dedicated to landing pages.
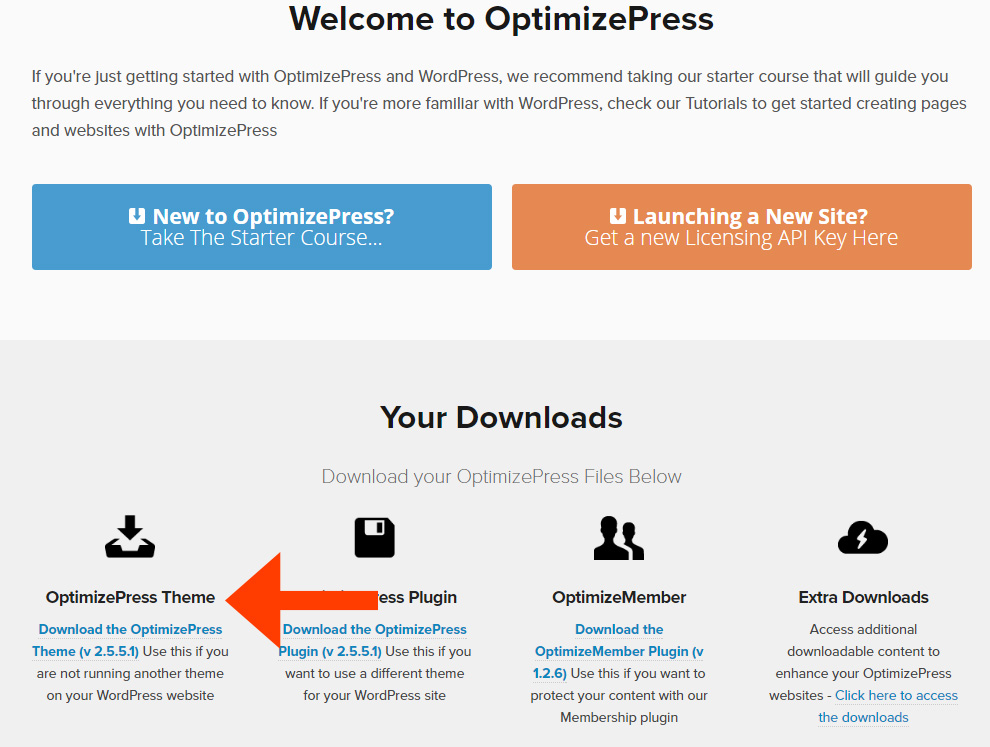
After purchase, you'll be able to enter the members' area where you can download the OptimizePress Theme. (Make sure you download the THEME, not just the plugin.)
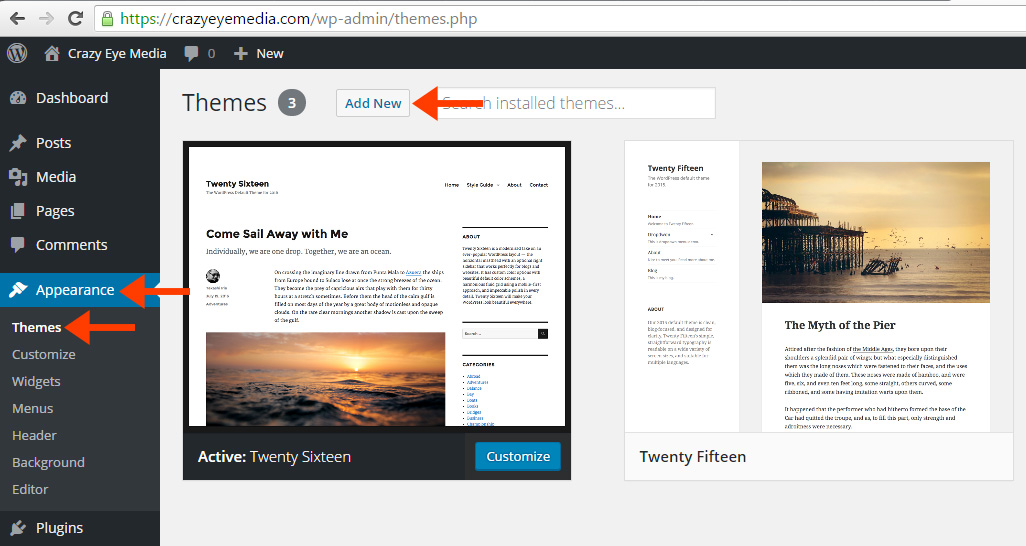
Go back to your WordPress website and into the Admin Dashboard.
Navigate to Appearance, Themes, and Add New.
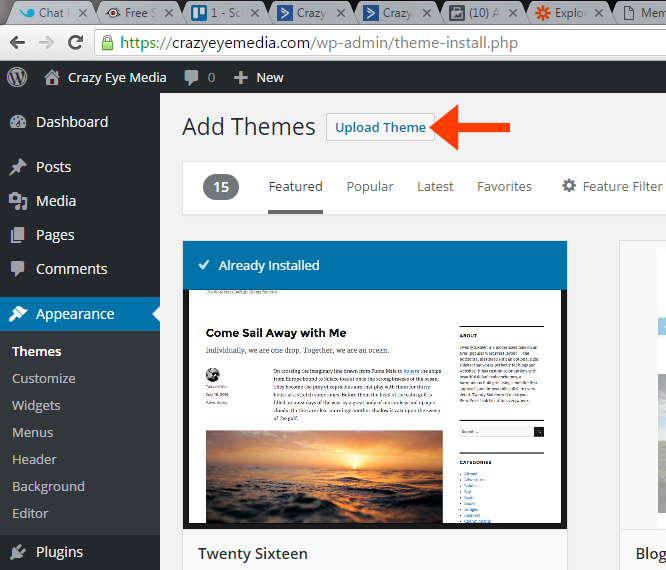
Click “Upload Theme”, browse to the OP Theme you just downloaded and select “Install Now”.
After install, click “Activate”.
You'll now have to input your API Key. Go back to the OP Members' Area and select “Licensing” in the navigation menu at the top.
Scroll down until you see “Registered API Keys” and copy one of them to your clipboard.

Go back to your site, paste your API key in the box, and click “Save settings”.

You'll land on something that looks like this:
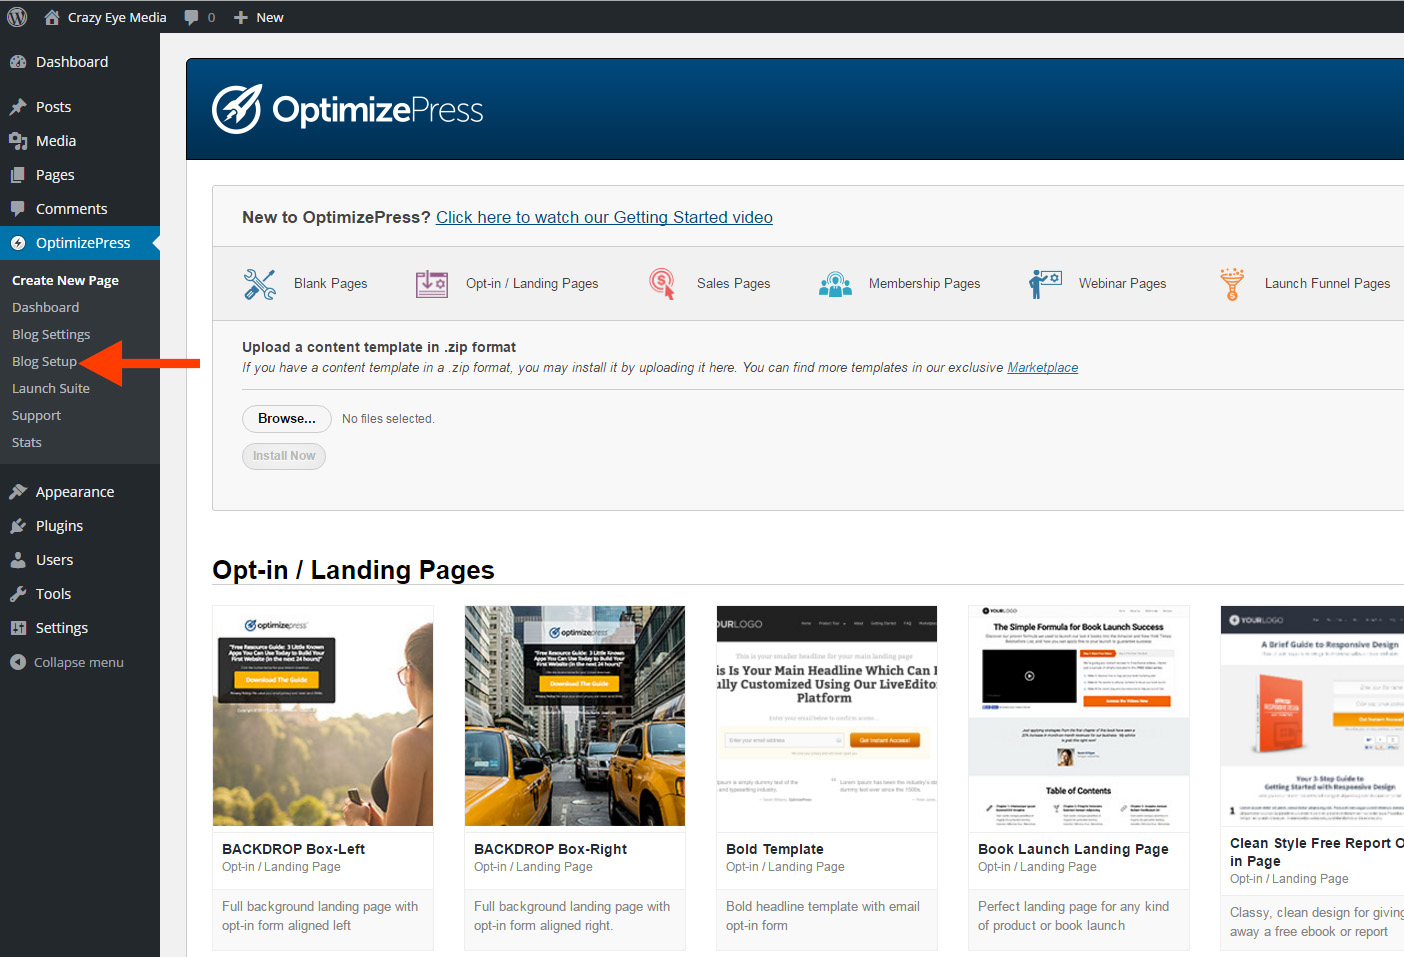
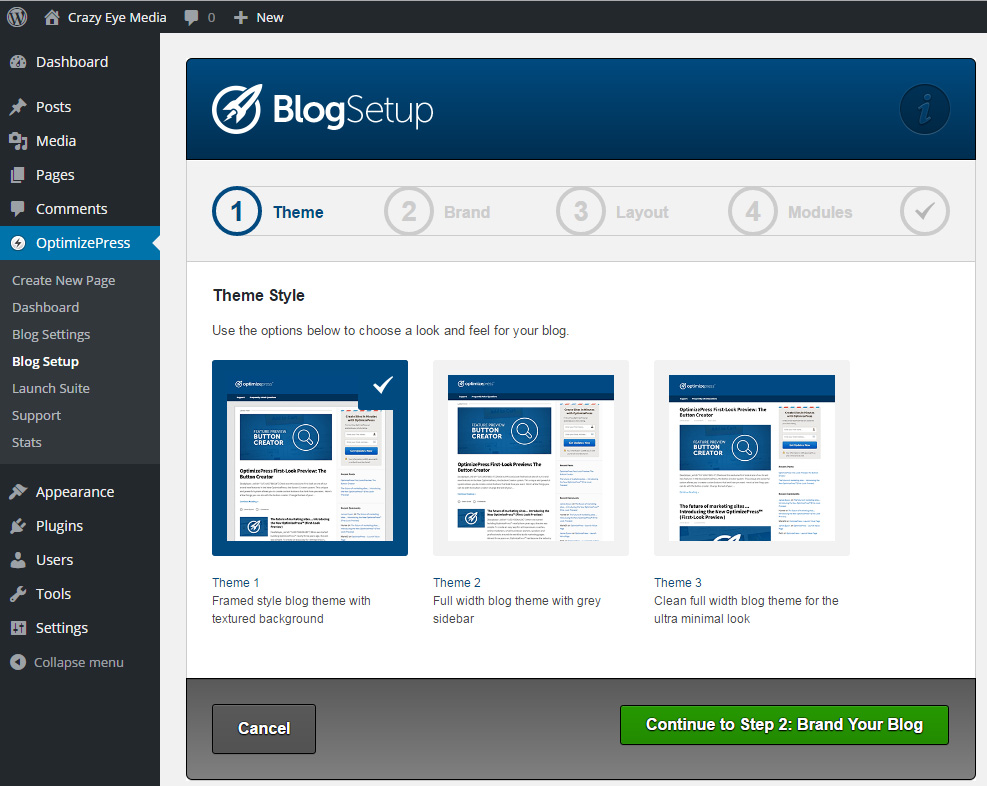
Click “Blog Setup”.
This part doesn't matter too much because you won't be using this site as a blog. Remember, this is your landing page platform … it isn't your “site”.
So, you can select whatever makes you the happiest! (I typically select “Theme 1” and then just click “Continue to Step X” without changing any options … but, feel free to customize it the way you want.)
>> Click here to download this post in PDF format
Step #3: Speed Boost!
I've said it before and I'll say it again, speed is important!
Don't think speed is that important? Check out this infographic by Kissmetrics to see what only a 1 second delay does to your conversion rates!
Install Autoptimize
Autoptimize is a WordPress plugin that “squishes” your site, making it smaller, and thus – faster.
Login to your WordPress admin panel, navigate to Plugins, Add New, and search for “autoptimize”.
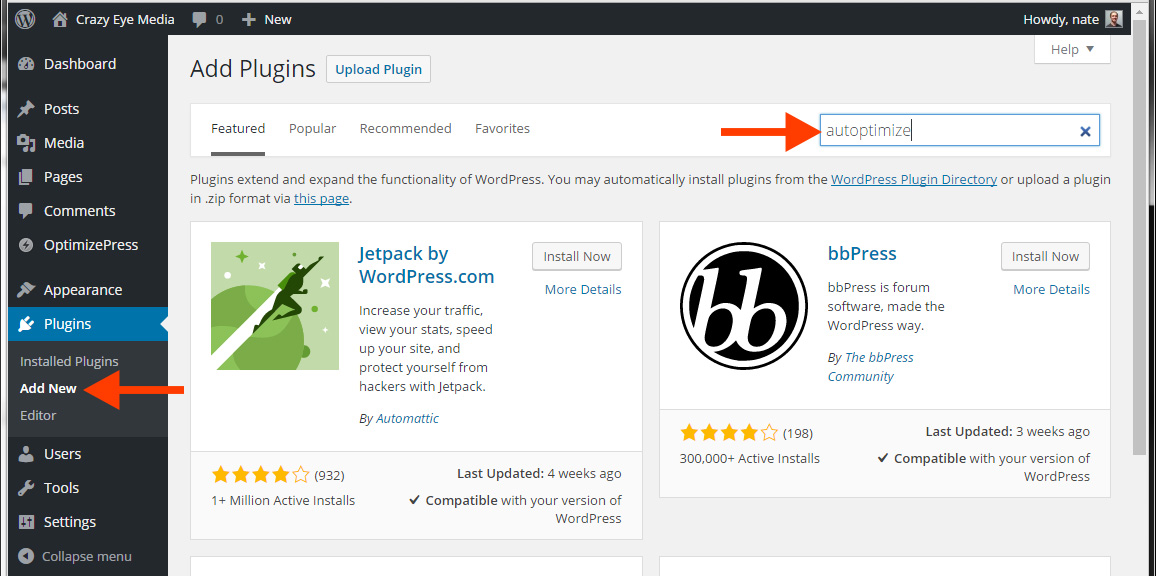
It should be the first result, if not scroll until you find it and click “Install Now”.
Make sure you click “Activate Plugin” after it's been installed.
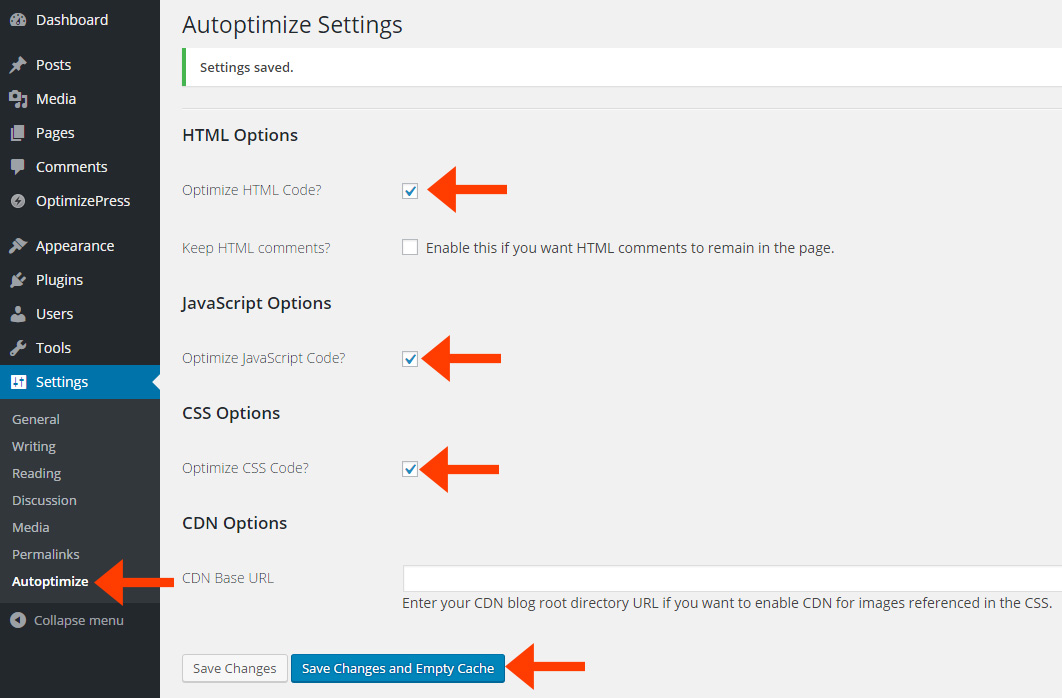
Now, open up the Autoptimize Settings and turn on:
- Optimize HTML Code
- Optimize JavaScript Code
- Optimize CSS Code
Then, click Save Changes and Empty Cache.
Check out the before and after!
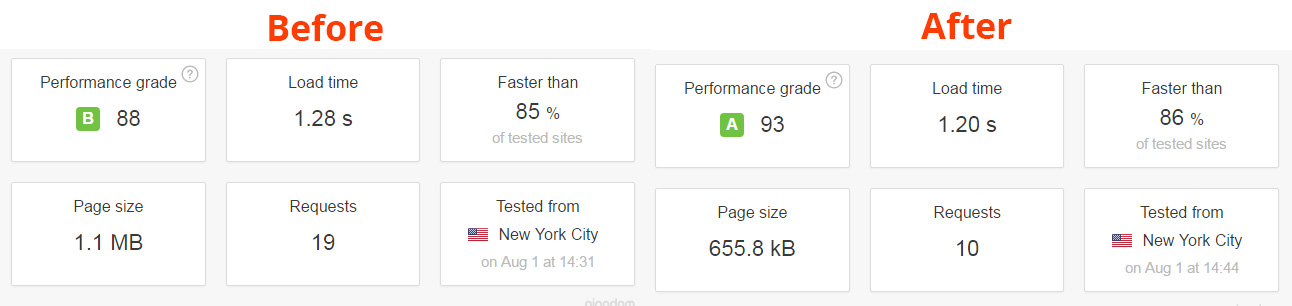
The Load Time difference is negligible at .08s – I don't think the human eye could actually detect that; however, checkout “Page Size” and “Requests” – those numbers have nearly halved!
These size and request differences will make a massive impact on load time once you have a fair amount of traffic hitting the server.
So, while there's no real difference in speed right now, if a few hundred people are on the site at once … the Autoptimized site will outperform every time!
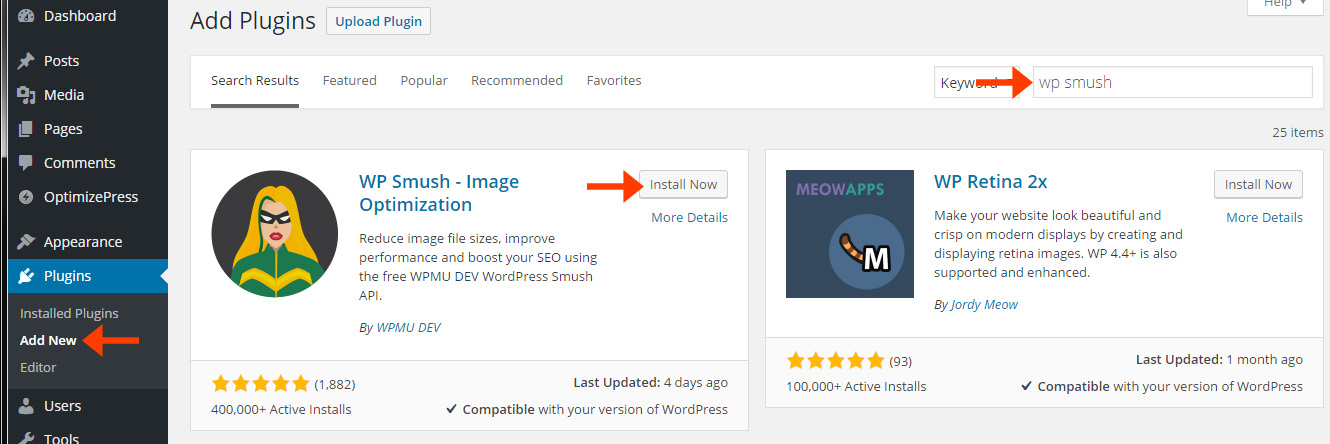
Install WP Smush – Image Optimization
Your source code, CSS, and JS have been “squished” … it's now time to “smush” your images!
Enter into your WordPress admin panel, navigate to Plugins, Add New, search for “wp smush”. Then, Install and Activate it.
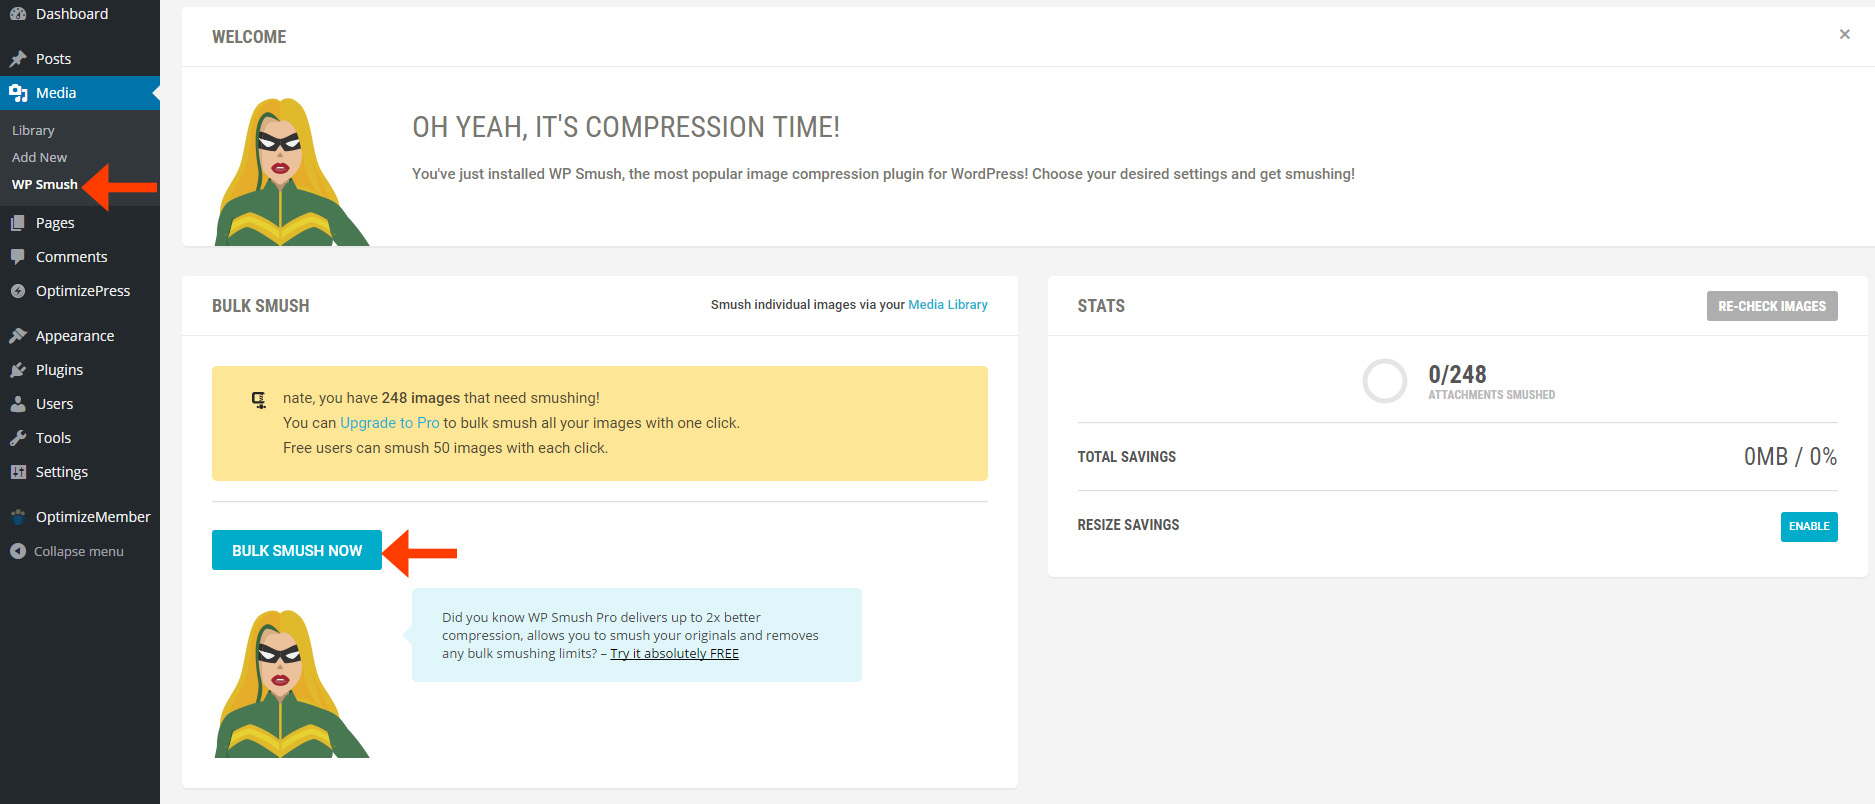
The nice part about this plugin … it basically comes out of the box ready to run!
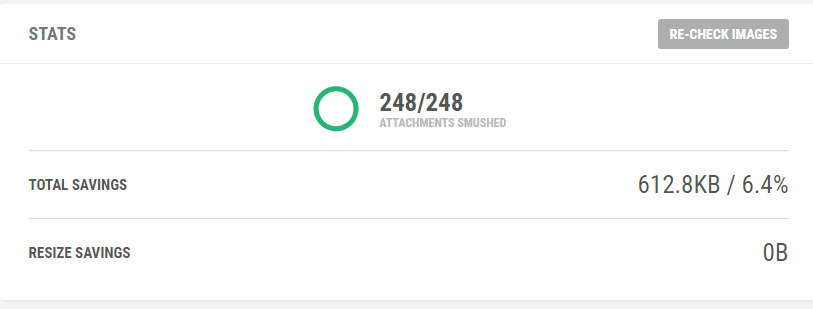
More than likely you will want to “smush” the images you currently have.
Unless you upgraded to the paid version, you'll only be allowed to “smush” 50 images at a time. If you're working with a new website, you won't likely have that many images to worry about; it should be a relatively painless process!
Woo! Saved 6.4%!
SUPER Boost With A CDN
Ok, this part is optional. It will likely result in a few additional bucks per month; however, if you feel the need for speed, it's worth doing!
CDN stands for Content Delivery Network which is essentially a network of computers that delivers static files (images, scripts, css, etc.) very, very fast.
They're very fast because they perform based on geographic location and don't have to process (think) anything like your website server does … all they have to do is deliver what's already there. Hopefully that makes sense.
Anyway, we'll use Amazon's CloudFront CDN because it's fast and cheap.
The first thing you need to do is sign up for or into the Amazon Web Services Management Console.
Once you're in, you will come to a crazy screen like this:

Find CloudFront and select it.
Click “Create Distribution” and it will ask “Web” or “RTMP” – you want “Web”.
In the “Origin Domain Name” text box, enter your full URL (ie. https://your-landing-page-domain.com).
Press “tab”.
Everything will auto-populate.
The only change you need to make is with “Origin Protocol Policy” – change it to “Match Viewer”.
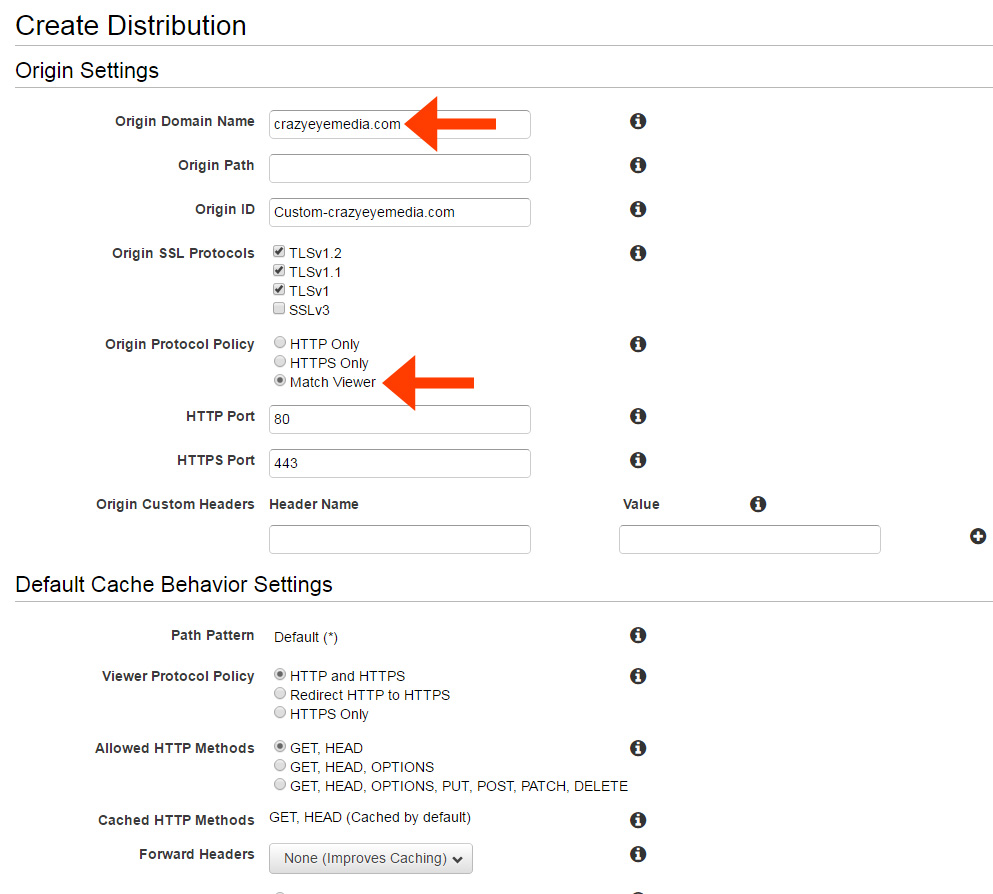
Scroll all the way to the bottom and click “Create Distribution”.
You'll see a little spinny thing and it will take roughly 30 minutes to finish what it's doing.
Take a break. Go grab yourself some coffee or beer; come back in a little while!
![]()
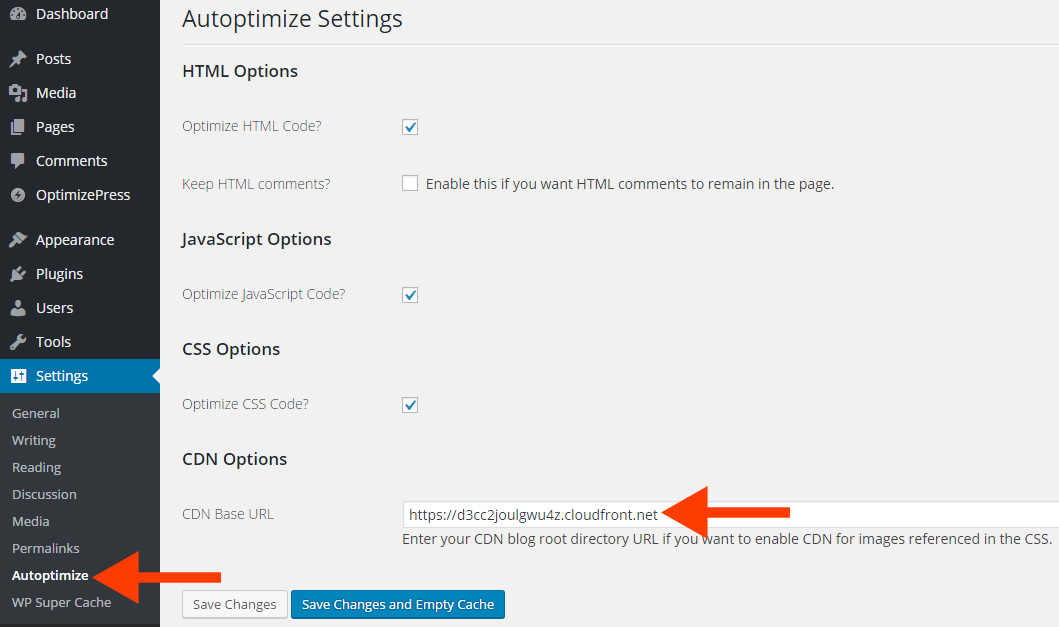
After the spinning stops, grab your CDN's link – ie. d3cc2joulgwu4z.cloudfront.net and head back over to your WordPress admin panel, go to Settings, Autoptimize, and find the CDN Base URL.
Enter your CDN's link, don't forget to add https:// and click Save Changes and Empty Cache.
Now select “Plugins”, “Add New”, and search for “wp super cache” … then install and activate it.

Ok, I'll be honest here – there are a lot of settings inside WP Super Cache that I don't quite understand … but, that's alright – because I know what works!
Find your way to the WP Super Cache Setting section and turn it on!
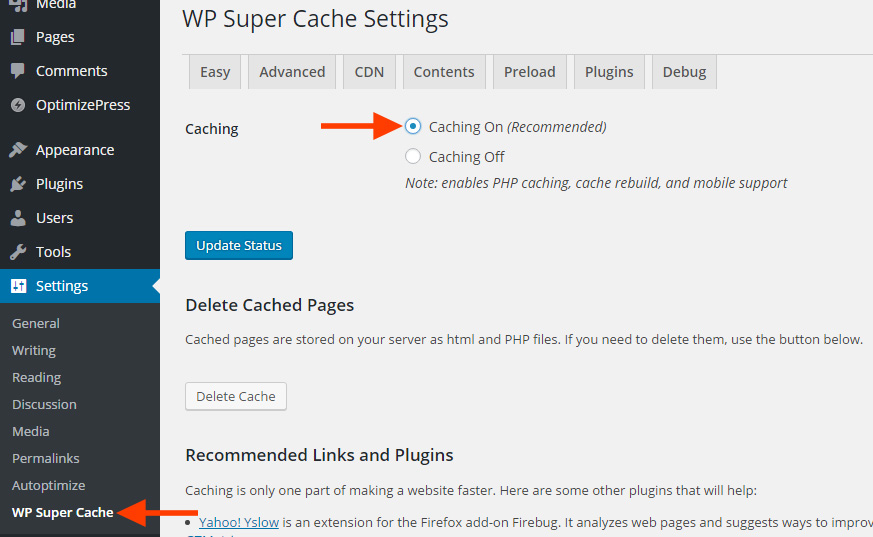
Under the Advanced Tab, leave everything they way it is with the exception of ticking the “Don't cache pages for known users. (Recommended)” box. Be sure to click “Update Status”.

Navigate to the CDN tab.
Enable CDN Support and paste in the URL of your CDN. Make sure you add the https:// to the beginning! (ie. https://d3cc2joulgwu4z.cloudfront.net).
Click “Save Changes”.
You're done!
If you feel brave, you can tick other boxes inside WP Super Cache; however, every time I do, things start to break.
Check out the load speeds now 😛
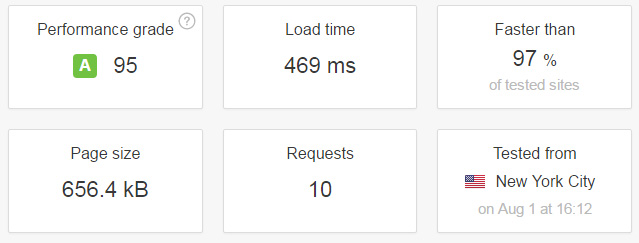
>> Click here to download this post in PDF format
Membership, Digital Asset Delivery, and Taking Payments
This section is also optional; it only applies if you're wanting to take payments, run a membership portal, and/or deliver digital products.
NOTE: OptimizeMember is essentially the same thing as s2Member which means it's a really good membership plugin; however, it lacks one key feature when it comes to building funnels – the 1-click up-sell.
There are ways around this. For example, if you use ClickBank for your payment processor, you can do 1-click up-sells and it also offers built-in affiliate support – so, that's certainly an option.
You can also integrate with other platforms like SamCart, which add the 1-click up-sell functionality.
Finally, you may not even care about 1-click up-sells. You will still be able to offer One-Time-Offers (OTOs) and other up-sells … they just won't be 1-click!
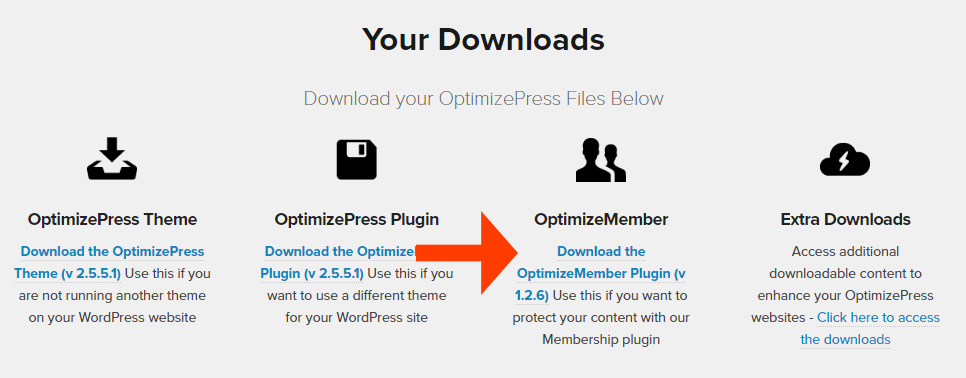
I'm not going to show you how to build a membership site in this post as it's a separate topic … but, I'll get you pointed in the right direction.
Head over to your OptimizePress Members' Area, navigate to your downloads, and this time download OptimizeMember:
Go back to your WordPress admin panel, navigate to Plugins, click Upload Plugin, and upload, install, and activate the OptimizeMember plugin you just downloaded.
After it's activated, you will see a warning message …
![]()
BUT before we do what it says, go to Pages, Add New, call it “Join”, and click Publish.
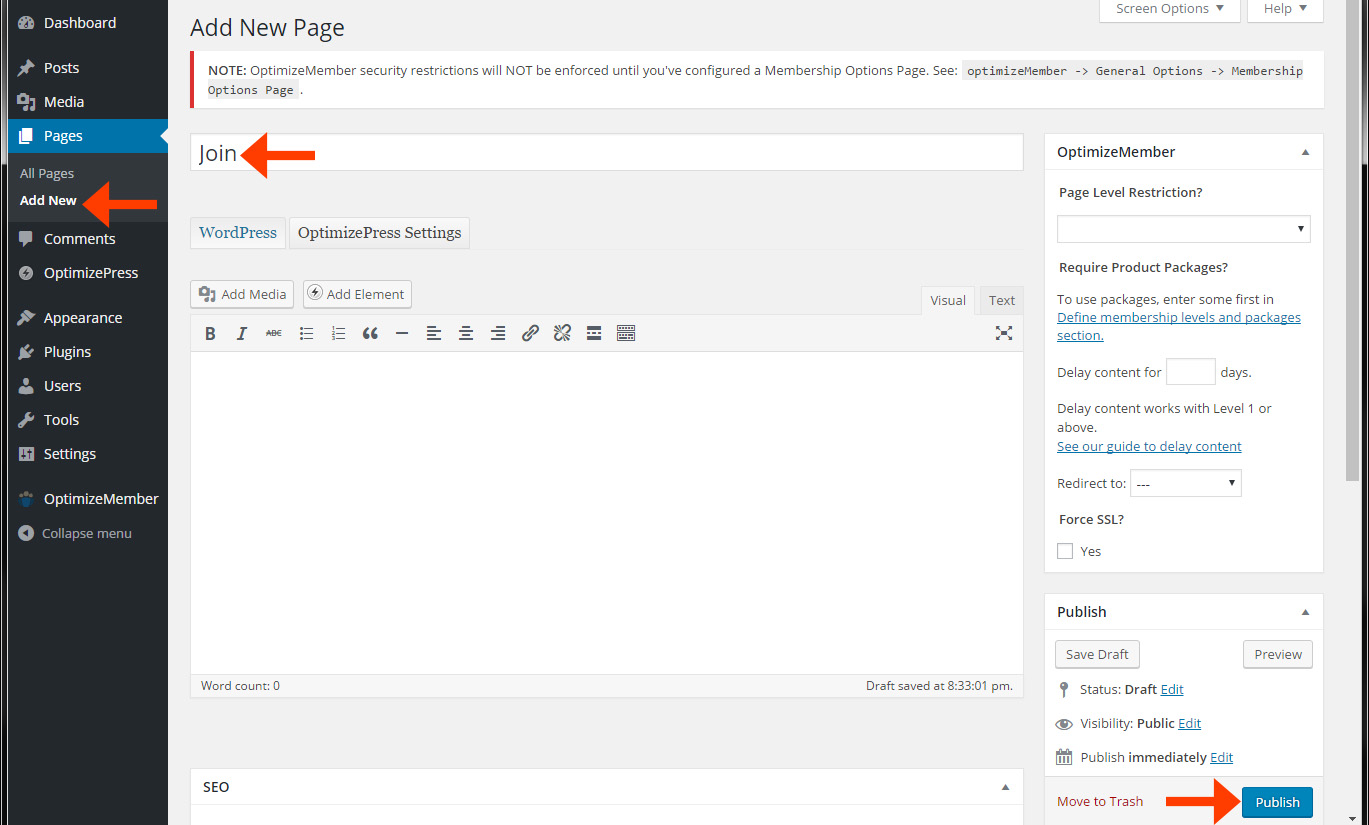
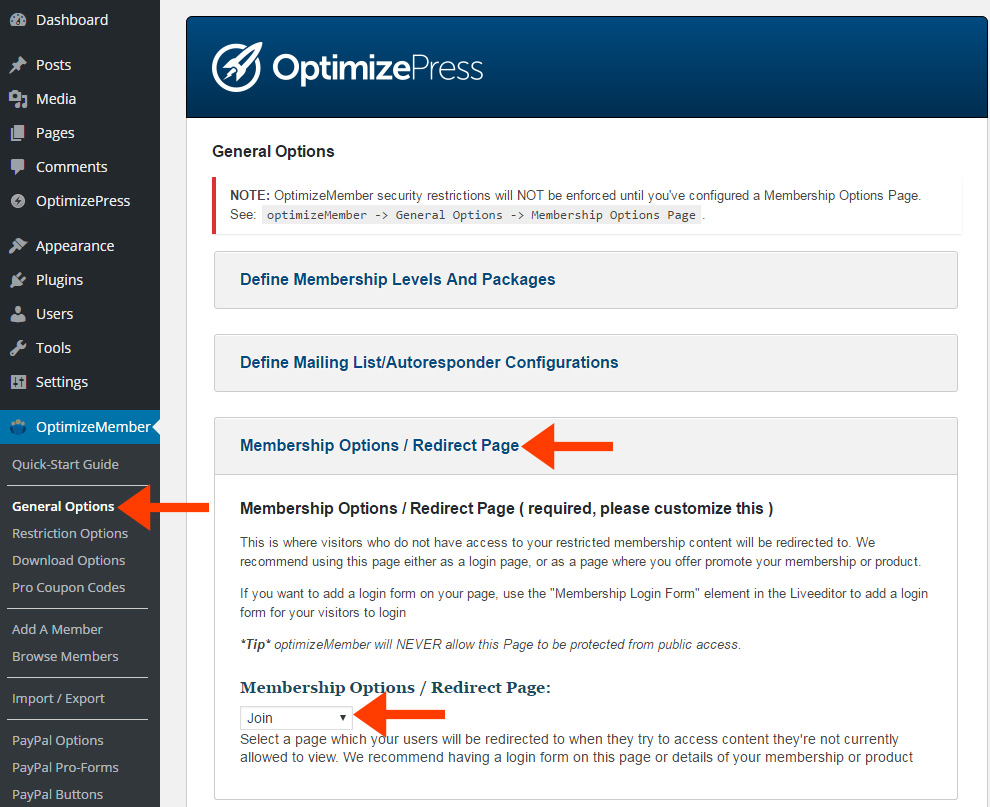
Now follow the directions presented in the warning message. Select the “Join” page you just created from the drop down menu.
Okie dokie!
That's all for right now!
Summary
At this time, you should have an insanely badass, self-hosted landing page platform!
One that goes above and beyond the competition.
One that is 100% under your control!
One that can integrate seamlessly with a bunch of autoresponder tools to include my favorite, ActiveCampaign.
Not to mention, it comes with a top-notch membership portal that can accept payments, deliver assets, and make you money all in one place!
You can't beat it!
>> Click here to download this post in PDF format
Moving Forward
Ok. I showed you how to setup your own landing page platform in the most efficient way I know.
Now, you need to learn how to actually use it!
The good news is it's an easy tool to learn and far easier than LeadPages (I don't understand why so many people recommend that tool, but I digress).
Of course, the folks at OptimizePress want you to be successful with their tool, so they have a bunch of tutorials.
I've also created an OptimizePess mini-course that will show you how to build an opt-in funnel with two different squeeze pages, a split test, and a Facebook pixel.
- How To Connect OptimizePress to ActiveCampaign
- How To Build A Page Using A Pre-Built Template In OptimizePress
- How To Build A Page From Scratch With OptimizePress
- How To Make A Thank You Page In OptimizePress
- How To Make A Split Test With Google Analytics And OptimizePress
- How To Add A Facebook Pixel To OptimizePress
Don't Forget Strategy!
Finally, having a badass platform and knowing how to “technically” do everything can't fix a poor strategy.
For this reason, I highly recommend you take my free sales funnel training series!