Nathan

About Nathan

This author has not yet filled in any details.
So far Nathan has created 137 blog entries.

How To Build A Sales Funnel In ClickFunnels

ClickFunnels is, hands down, the best Micro Sales Funnel building tool I've ever used.

Of course, with all nifty marketing tools – there's a learning curve.

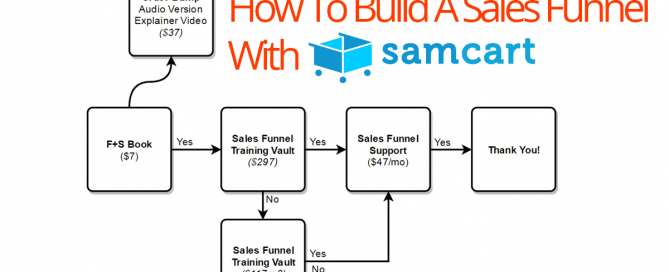
In an effort to help you overcome this learning curve faster, I've put together a step-by-step video tutorial on how to build a “Classic” Sales Funnel in ClickFunnels.

>> Try ClickFunnels, FREE For 14 Days! <<

Links:

  1. The Ultimate ClickFunnels Training Course
  2. Shared Funnel – sorry, I deleted it :/
  3. ClickFunnels Support
  4. How To Handle Stripe Subscriptions

Key Takeaway:

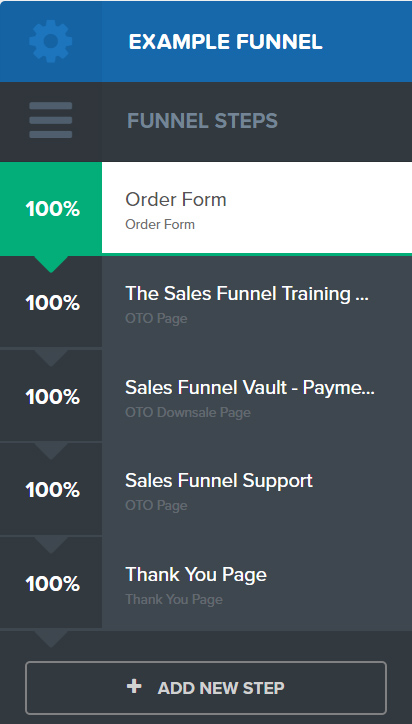
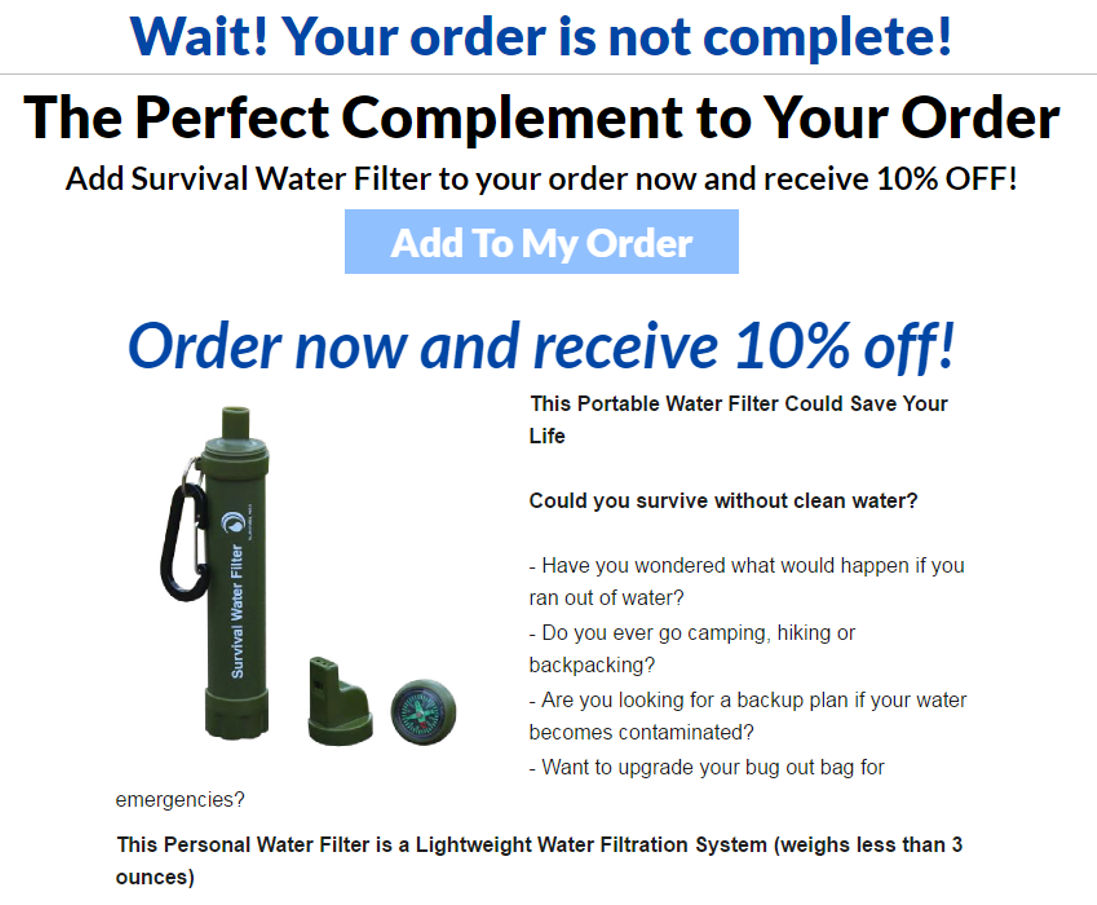
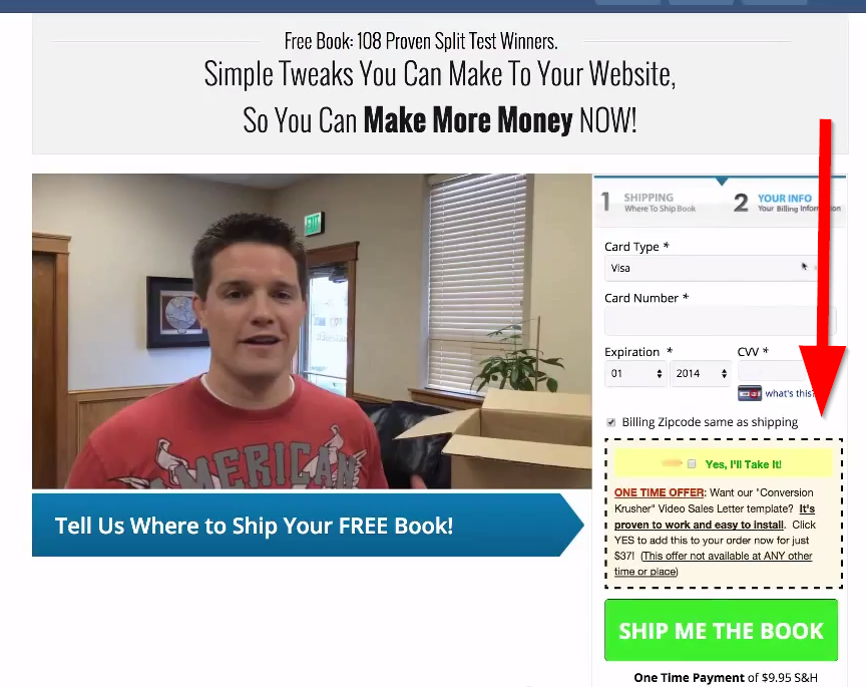
The key takeaway from this training is to make sure choose the correct page type – ie. OTO Page vs OTO Downsale Page.

Each page type has a very specific purpose.

Back to the OTO Page vs OTO Downsale page – the OTO Downsale Page is only shown AFTER the OTO Page IF they didn't purchase the OTO. If the person purchased to OTO, they'll move onto the next OTO Page.

Here's the correct order for the Funnel Steps for this particular tutorial:

page-flow

How To Build A Sales Funnel In ClickFunnels2016-10-24T19:08:25+00:00

How To Build A Sales Funnel With SamCart

SamCart is a shopping cart platform that has built-in 1-click up-sell and down-sell functionality. This functionality makes it a great tool for building Micro Sales Funnels.

Now, typically, I don't recommend SamCart because I think it's overpriced for what it offers; however, if you know nothing about technology and want something simple, SamCart may be a good fit for you.

If you think SamCart may be a good fit for you and your business – that's great! They offer a lot of resources to help you get started at http://support.samcart.com/.

Although most of the training they provide is great, they don't really teach you how to setup a sales funnel with their platform.

But, it's OK! That's why I created this step-by-step video tutorial to show you how to build a sales funnel with SamCart:

>> Try SamCart, FREE For 30 Days! <<

General Outline:

  1. Setup your products
  2. Create up-sells by assigning products as up-sells
  3. Structure your funnel
  4. Assign your funnel to your initial offer
    1. Assign the order bump as well (if applicable)
  5. Test your funnel
  6. Set it live!
How To Build A Sales Funnel With SamCart2016-10-14T18:29:04+00:00

An Honest SamCart Review

Being that I spend all day, every day, building sales funnels … I'm always checking out new tools to make my life easier.

I first heard about SamCart over a year ago; however, within the last few months they've done some massive promotions and I decided to give it a shot.

After playing around with it for a few weeks, I've come to the following conclusion:

I wouldn't recommend SamCart in its current form and price point of $99/mo for most people. (I would pay $20/mo in its current form)

[as of 20SEP2016] 

It really hurts me to say that because I like what Brian Moran (founder) has done in the past and I really wanted to love this tool, but I can't.

The only time I might recommend it is if you are a complete beginner. If you've never put together a website, never setup a shopping cart, never setup any kind of payment processor, never done anything technical – SamCart might be a good fit for you because it's super simple to use.

This simplicity is probably why I don't really recommend it because it makes me feel like my hands are tied when I know there are other tools that are less restrictive, albeit they're more complex.

Having said that, I have high hopes for the future of this tool and believe it will be top-notch six months from now.

Why I Can't Recommend SamCart Right Now

1) No Page Builder

You are forced to use pre-designed templates, something I absolutely hate.

Having to cram my marketing message into a pre-determined box drives me freakin' nuts and makes me feel like a caged animal.

For this reason alone, I can't recommend SamCart right now.

Plus, you have almost ZERO say in what goes into the up-sell pages … they give you one video, a text box, and wish you luck.

Fortunately, they're adding a page builder.

2) Limited Cart Abandonment Functionality

Cart abandonment is a big deal; the latest results from the Baymard Institute found the average cart abandonment rate to be 68.63%. [source]

While you can manually setup cart abandonment functionality by hosting an alternate sales page elsewhere and then using SamCart to process the payments, it's a “sloppy” setup and not one I like doing, unless absolutely necessary.

By not having this functionality built-in, SamCart is directly hurting a business' bottom line.

Fortunately, they're fixing this.

3) You Can Only Offer 2 Payment Options

You're only able to offer 2 payment options to your customers.

This may not be a limiter for businesses offering digital products because they don't typically need more than two payment options.

But, for businesses that offer physical products, this is a huge limitation.

Here's why – one of the products I was trying to add was a supplement and the business wanted to give customers the option to buy 1, 2, and 3 months worth with varying price breaks.

Unfortunately, since SamCart only allows 2 payment options, we weren't able to set it up how they wanted.

Of course, we could offer greater quantities on the up-sell pages; however, this was not ideal in this particular situation.

4) Limitations On How Quantity Is Presented

Like #3 above, this deals more with physical products.

Customers are able to order more than one product at a time; however, they make their selection based on a simple drop-down menu where they can select to order 1 thru 10.

This selection method is way too simple and businesses should be afforded more control.

For example, what if I had bundles of 1, 3, 5, and 10? I wouldn't want someone to select 4 because it would mess up my flow and possibly result in two separate shipments of 1 and 3.

Also, I feel I should be able to offer price breaks based on these quantities. Unfortunately, I cannot with SamCart.

5) Poor Digital Asset Delivery

The digital asset delivery feature for SamCart is super simple.

You upload a file to their system, if someone buys it, a download link is presented to them …. and that's it.

There's minimal personalized experience. No membership area. Nothing. Just a, “Here's your file, thanks.”

Of course, this can be circumvented by using an integration with a membership platform (which you probably want anyway); however, at $99/mo … I'd expect more. Even a super simple membership portal would be better than what they currently have.

6) Lackluster 3rd Party Tracking (Google Analytics & Facebook Ads)

Tracking is absolutely critical for successful marketing.

While the built-in tracking SamCart offers is great, what it offers for 3rd parties is poor.

They don't currently support Ecommerce tracking within Google Analytics – and it doesn't look like that's going to change anytime soon.

Facebook Ads tracking is also poor; they don't offer the option for dynamic values, ie. how much someone spent. What if they selected one payment option over the other or a different quantity? What if they checked the Order Bump box? You won't be able to tell this via Facebook tracking which means you won't be able to properly assess ROI from ads. Ouch!

Also, the up-sell pages don't have unique URLs which makes creating custom audiences based on pages viewed, dang near impossible.

7) Zapier Integration?

Zapier integration is a must. I'd say 9 out of 10 funnels I build utilize Zapier in one way or another.

While SamCart doesn't “officially” integrate with Zapier at this time (they will soon), there is another way …

Why I Have High Hopes For SamCart

1) They're Fairly Receptive To User Input

They're looking for user feedback and appear to actually act on it: https://samcart.uservoice.com/

2) It's Very Easy To Use

SamCart is super easy to use. Pretty much anyone with a computer, the Internet, and something to sell could list a product online within as little as 30 minutes.

3) Their Blog Articles & Resources Are Top-Notch

They're constantly publishing in-depth articles on their blog at http://blog.samcart.com/. This shows me they know what they're doing and have a full understanding of the “hows” and “whys” a shopping cart platform can and should help a small business.

Also, their webinars and other Lead Magnets are full of useful information, whether you use SamCart or not.

4) They're Growing Fast!

The popularity of the SamCart platform has exploded in the last few months. With this increased popularity comes more money and resources … typically resulting in a better end product for the consumer.

In Closing

While I can't recommend SamCart in its current form and price point, I think within 6 months time, it's going to be a really solid platform. I look forward to seeing how it progresses!

An Honest SamCart Review2016-10-14T18:29:05+00:00

Email Autoresponder Sequence For Gauging Interest

I served in the Army for four years, and the ingredients for success were simple: be in the proper place, at the proper time, and in the proper uniform.

If I did those three things (plus my job of course) … I would stand out from my peers. Believe it or not – most people can't do those three simple things.

Anyway, to bring this around to marketing, here's a quote by Jim Yu, CEO BrightEdge:

“The key is to present the right content to the right users at the time they need it in an engaging manner.”

Same freakin' concept as my Army days: right content, right users, and at the right time.

Three simple ingredients to standing out from the crowd and being successful.

And, you guessed it – most people and businesses can't do those three simple things.

You'll be able to after reading this article!

Where Does This Email Autoresponder Sequence Go?

The overall concept for this autoresponder sequence is to send a variety of content to our list in an attempt to figure out what each individual is interested in.

Everyone on our list is different. Some are young, some are old, some are single, some are married, some are employees, some are employers, some want to learn and do, while others want you to do it for them.

If you offer a variety of products and services, your list is going to be an even larger hodgepodge; having a system, like I'm about to show you, in place is a requirement.

By gauging interests, we're able to send more relevant and engaging content that ultimately results in more sales.

The left hand side (Straight Line Sales Funnel / Main Series) of the diagram below shows you where this autoresponder series resides:

The Interest Driven Sales Funnel

As you see, it goes in a straight line, one email after the other, while simultaneously tracking how individuals interact with particular emails.

For example, if I send an email on the topic of Facebook ads, and the individual clicks the link to the article, I can assume they're interested in Facebook ads. From there, I can pause the “Straight Line Sales Funnel” (interest gauging series), and automatically enter the subscriber into a Micro Sales Funnel (Product/Service Sales Funnel) where I go into more detail about Facebook ads and make an offer or two.

Email Autoresponder Sequence: Weekly “Pushes”

While there are many ways to structure your interest gauging autoresponder series, I'm going to give you a framework that works very well.

I call this framework “Weekly ‘Pushes'”.

Why? Because every week you're trying to sell (push) a different product or service to your list.

Instead of making random offers and sending random emails depending on your mood, you spend an entire week on the same topic. This gives people more opportunity to see what you're offering and act, while not being overbearing and “burning” them out.

The Weekly “Pushes” Framework

The goal of this framework is to get the person on the sales page. If the individual views the sales page, we know they're interested in what we have to offer.

Step 1: Pick a widget to sell.

Step 2: Follow the pattern below for that single widget.

  • Pattern: 3 and 2 (M, T, W, F, S)

Send 4 to 5 emails on the same topic, for the same widget, during each “push”. In general, it's good to break up these emails to give people a little time to react, rather than bombarding them every day. For this reason, I recommend sending 3 daily emails, take a day off, send 2 more daily emails, take a day off, and then repeat with a new “push”.

  • Email 1: Fun/personal story
    • Relate to widget
    • PS goes to sales page

People connect with stories. People enjoy stories. We want people to both connect with us and enjoy hearing from us, which is why we must share a story! Now, it doesn't necessarily have to be a personal story; you can share a success story from a client or customer or even a well known individual, like a celebrity, just shared in a different light.

At the end of the story, close out (soft sell) with a simple PS line that takes them to the sales page where they can learn more, if they wish.

  • Email 2: Promotion of widget
    • Use a marketing formula: Problem-Agitate-Solve, Feature-Benefits-Advantages, Before-After-Bridge
    • CTA goes directly to the sales page – “Click Here To Buy”

While stories are great and help us connect, sometimes a good old fashioned sales letter converts best … especially when they have the story from the previous email rolling around in their head! In this 2nd email, pitch your widget. You can use a marketing formula to help structure your message or do whatever you think is best.

The call-to-action should be straight forward and to the point with no mystery behind it, “If you're interested in this widget, click here”. (How much more “interest gauging” can you get?! If the person clicks that link, we know they're interested in our offer and they'll enter one of our Micro Sales Funnels.)

  • Emails 3-4: Content on topic of widget
    • Link to a blog post that's entertaining and/or educational
    • Include CTAs in both the PS line of the email and within the article itself which go to your widget's sales page

After sharing a story and a “hard” pitch, it's time to ease back a little bit and just share some more information with them. Send links to articles, videos, and other resources they'll find helpful, interesting, and entertaining on the same topic as the widget you're trying to sell.

Include links to your widget's sales page in your email PS line and throughout the particular article so they can easily navigate to the sales page, if they're interested in learning more.

  • Email 5: Content OR Promotion (discount)

Email 5 is optional. If the individual hasn't visited your sales page after 4 emails on the same topic for the same widget … they may simply not be interested in that offer. So, use some discretion here. If you feel like this 5th email is “too much”, don't use it.

If you do use Email 5, you can send another piece of content like emails 3 & 4 OR you can make a last-ditch effort to sell your widget by sending another “hard” sales email and/or by offering a discount.

That is the Weekly “Pushes” framework! Rinse and repeat with a new product the following week!

Getting Content To Send

The Weekly “Pushes” framework requires you to send a fair amount of content, sometimes 3 pieces a week.

This can be a lot, especially for a small business or a new business that hasn't started producing copious amounts of content.

It's OK, there's a way you can share other people's content and STILL bring people back to your site.

You can do this by using a tool that adds a bar, bubble, slide-in, popup, etc. to any link you recommend.

There are a handful of tools that allow you to do this, but my favorite is snip.ly.

And, here's an example.

They teach you how to use the tool on their site. It's certainly handy and can make up those content “gaps” until you get your own stuff produced!

Conclusion

The way to stand out to your subscribers, leads, and customers is simple…

“The key is to present the right content to the right users at the time they need it in an engaging manner.” – Jim Yu, CEO BrightEdge

By using frameworks like the Weekly “Pushes” outlined above, figuring out what people are interested in becomes a piece of cake that can be automated!

Ready to take it to the next level and learn several other frameworks for gauging interest?

Click here to check out The Vault!

Email Autoresponder Sequence For Gauging Interest2018-04-05T11:53:34+00:00

8 Opt-In Form Examples You Can Implement With Ease

Most people have a love/hate relationship with opt-in forms.

As a visitor to a website, they can be incredibly annoying … especially when they keep popping over what you're trying to read.

But, as the site owner, we know those pop-up opt-in forms tend to work. So, we keep showing them.

This creates an interesting dichotomy, but that's beyond the scope of this particular article.

In this article we'll talk about opt-in form tools, triggers, and types.

Related Course: How To Build Opt-in Forms And Landing Pages That Convert

Opt-in Form Tools

You really only need one opt-in form tool and the one you use is determined by your platform.

WordPress | Thrive Leads

If your website is powered by WordPress, the best opt-in form plugin you can grab is Thrive Leads.

Why? It's incredibly powerful.

It allows you to build any type of opt-in form you can imagine, conduct split tests, page targeting, and beyond.

Click here to check out their sales page and to learn more about their features.

Any Other Platform | OptinMonster

If your website is powered by anything other than WordPress (ie. Shopify, Big Commerce, custom coded, etc.), the best opt-in form tool you can grab is OptinMonster.

It's essentially just like ThriveLeads; however, it can work anywhere … which is great for sites that aren't powered by WordPress!

Click here to check out their sales page and to learn more about their features.

Note: Since OptinMonster works anywhere, it will work on WordPress too. If you run sites on multiple platforms, it would be best to just get OptinMonster.

Display Triggers

Both, Thrive Leads and OptinMonster have very similar triggers. While the particular name of the trigger may change – SmartExit+ vs. Exit Intent Technology – the general function of the trigger remains the same (ie. display upon exit).

Below are the four triggers functions both opt-in tools offer.

Timed Triggers

From immediately to 30 seconds or more, you can choose when your opt-in form shows itself.

If you don't have a reason to have your opt-in form display immediately, a good rule of thumb is to give the visitor about 10 seconds to get into your material before greeting them with the opt-in form.

Exit Triggers

An exit trigger can only occur on desktop and it's when a visitor's cursor leaves the browser window.

Typically, the only reason the cursor would leave the browser window is because they're about to hit the “back” button or navigate off your site.

As a last-ditch effort, you can display an opt-in form to try and collect the visitor's contact information.

Click Triggers

Click triggers are really popular because they show intent, which typically leads to much higher conversion rates.

Instead of blindly displaying an opt-in form after 10 seconds, a click triggered opt-in form is displayed after an individual clicks a link, button, or image.

Scroll Triggers

Scroll triggers are used to display opt-in forms after an individual has scrolled down a percentage of a page or past a certain point.

For example, you could have an opt-in form display after the visitor has scrolled down 75% of the page. Ideally, this means they've read 75% of the page, are therefore highly interested in what you're talking about, and more apt to opt-in.

Types Of Opt-In Forms

Pop-up LightBox

The “classic” opt-in form.

Although they're kind of annoying, you see this type of opt-in form everywhere … because they work!

Example From Charles NGO

Example From Charles NGO

In-Line / After Post

These opt-in forms “blend” in with the content.

They're nice because they don't hinder the visitor's experience, yet they still provide an easy way to opt-in for your lead magnet.

Example From Side Hustle Nation

Widgets / Side Bar

Very similar to in-line opt-in forms because they're “just there.” They don't pop-in or slide, but are “just there” in the sidebar or widget area of a site.

Ribbons/Bar

These opt-in bars or ribbons go across the top or bottom of the page and are typically “locked in place” (they scroll with the page).

These are great because they allow you to share your Lead Magnet without being obnoxious by popping up a lightbox or a screen overlay.

Example From ProBlogger

Example From ProBlogger

Slide-In

This type of opt-in form “slides” into view. They're typically in the corners of pages; however, they can take over an entire side too!

These are great because they can be fairly unobtrusive while still catching people's attention.

Example From ConversionXL

Example From ConversionXL

Screen Overlays/Takeovers

This type of opt-in form takes over the entire page, leaving the individual two options – to opt-in or to close it.

These tend to work very well because you can't miss 'em.

This example from BACKLINKO

Example From BACKLINKO

Scroll/Welcome Mats

This type of opt-in form is similar to a screen overlay/takeover in that it consumes the entire page; however, it's different because you can either opt-in or scroll down (as opposed to close it).

Scroll/welcome mats give visitors the ability to scroll down which makes the opt-in form a little less obtrusive; they don't have to “hunt” around for a close button … they just have to scroll down.

Example From Matthew Woodward

Example From Matthew Woodward

Content Locks

This type of opt-in form is pretty cool because it allows you to protect a piece of content until the individual enters their email address.

This is a great way to offer “content upgrades” to blog posts.

Example From OptinMonster

Example From OptinMonster

Conclusion

Now that you know the tools, triggers, and types of opt-in forms … what's stopping you from getting started?

Related Course: How To Build Opt-in Forms And Landing Pages That Convert

8 Opt-In Form Examples You Can Implement With Ease2016-11-17T16:03:33+00:00

How To Split Test LeadPages Drag & Drop Page Builder

A few months ago, LeadPages launched their drag & drop builder.

It's a fine tool, granted they should have had a page builder eons ago instead of forcing people to cram their marketing messages into pre-built templates … but, that's a moot point.

They have a page builder now and it lacks one core feature – the ability to conduct split tests.

This post will show you how to split test the pages you build using the LeadPages' page builder.

Related article: How to build your own landing page platform

Step #1: Build Your Pages

You need at least 3 pages in order to properly conduct a split/multivariate test:

  1. Version A (Original)
  2. Version B (Variation 1)
  3. Thank You Page

Both, versions need to “land” on the same Thank You Page upon successful opt-in.

If you don't have these pages built already, build them now.

Step #2: Add Google Analytics To Pages

If you don't have a Google Analytics account already – go get one.

Now, snag your Google Analytics tracking code. You can find it under “Property”, “Tracking Info”, and “Tracking Code”.

It looks like this:

Google Analytics Tracking Code

Head over to LeadPages and open one of your three pages in the editor.

On the left hand side,  click the option for “SEO & Analytics”, then select the “Analytics” tab.

In the “Head Section Tracking Code” text box, paste in your Google Analytics tracking code:

Add Google Analytics Tracking Code To LeadPages

Don't forget to save your changes and click “Update”!

Add the Google Analytics code to the rest of your pages.

Step #3: Create A Goal In Google Analytics

In order for Google Analytics to keep track of your split test, you need to tell it what your goal is.

In the case of squeeze pages, the goal is usually the Thank You Page; the only way for someone to land on a Thank You Page is by opting in.

So, you need to tell Google Analytics that a goal is reached when someone lands on your Thank You Page.

In your Google Analytics account, navigate to your “View”, select “Goals”, and “New Goal”:

Google Analytics New Goal

Under “Goal setup”, select “Custom”, then click “Continue”:

Custom Goal

Name your goal, leave “Goal slot ID” alone, select “Destination” for Type, then click Continue:

Goal Destination

For “Destination” choose “Begins with” and enter the path to your Thank You Page. Leave “Value” and “Funnel” off and click “Save”:

Goal Details

Great! Your goal is setup.

Step #4: Start A Google Experiment

It's now time to setup an “Experiment” in Google Analytics to test which landing page results in the best conversion rate.

In Google Analytics, click the “Reporting” tab, then “Behavior”, and “Experiments”:

Experiments

Click the “Create experiment” button.

Name your experiment, select the goal you just created, and select 100% of traffic to experiment.

Open the “Advanced Options” area and turn on “Distribute traffic evenly”, minimum of 2 weeks, and 95% confidence threshold.

Note: You don't have to select the settings I mentioned above if you'd prefer others. There are reasons to have different settings; however, if you're unsure why you'd want different settings … just follow what I've laid out.

Click “Next Step”:

New Google Experiment

Insert the URLs to the Original and Variant(s).

At this point, it doesn't matter which page you want to consider the “Original” – you could even rename them to Versions A & B if you want. However, on the next step, you'll have to add some extra code to whichever page you considered the “Original” – so, keep track.

Google Analytics will also pull in screenshots of your landing pages to help you verify you have entered the correct URLs.

Click “Next Step”:

New Google Experiment - 2

Select “Manually insert the code”, copy the code, and head back over to LeadPages to edit whichever page you told Google Experiments was the “Original”:

New Google Experiment - 3

Navigate to where you pasted the Google Analytics code (On the left hand side,  click the option for “SEO & Analytics”, then select the “Analytics” tab.)

Paste the Experiment code ABOVE the analytics code:

Add Google Experiment Code To LeadPages

Don't forget to save and update!

Go back to Google Analytics and “Review and start”. You'll want to validate your experiment code and get 2 check marks:

New Google Experiment - 4

If you don't see 2 check marks, Google Analytics will tell you why there's an issue. For example, “Can't find Experiment code” – in which case, you need to make sure the code is on your “Original” page and that you've both saved and updated the page.

Once you have 2 check marks, click “Start Experiment”:

New Google Experiment - 5

Step #5: Send Traffic!

Now that the experiment is setup, it's time to send tons of traffic to your “Original” landing page! (the one you told Google Experiments was your “Original” and the one you added the extra experiment code to.)

Google Analytics/Experiments will automatically send half your visitors to the “Original” page and half to the variation. (unless you selected different options during the setup, in which case, it'll spread traffic how you told it to)

Now sit back and collect data to see which one is the winner!

Experiment Results

As you can see in the example above, Variant 1 is performing 69.57% better than the original, awesome! Of course, the experiment isn't over yet because the statistical significance (probability of outperforming original) hasn't been met yet … but, it appears the new version is performing well!

Conclusion

This same split testing concept can be applied to more pages and platforms than just LeadPages!

For example, here's a video of the same concept being applied to OptimizePress.

Click here to learn how to build your own landing page platform with OptimizePress!

How To Split Test LeadPages Drag & Drop Page Builder2016-10-14T18:29:05+00:00

5 Smart Ways To Increase Order Size

A sales funnel is a complex beast with lots of moving parts. Strategy, tactics, and technical expertise are required in order to “make it work” well.

  1. You have to get the right people into your sales funnel, at the lowest possible cost, through advertising and copious amounts of split tests.
  2. You have to convert those leads into paying customers by forming some kind of relationship or making offers in a way that really “connects” with them.
  3. You then have to focus on keeping your customers coming back again, and again, and again.

Obviously, a lot goes into all three of those areas …

However, don't let the complexity scare you because there are things you can do TODAY to dramatically improve your revenue.

Imagine making a few tweaks to your checkout process that could 2X, 3X, 4X+ your customers' order size!

That would be nice, wouldn't it?

So, what are these tweaks?

Well, that's what this article is all about!

1) Pricing Tiers, Packages, & Bundles

Pricing tiers, packages, and bundles are great ways to increase a customers' order size.

By using a bit of pricing psychology, you're able to present offers in a way that appear “too good to be true” while simultaneously increasing the amount of money a customer is about to hand you.

Take a look at this example from a2Hosting:

Pricing Tiers Example

The “Swift” package is a no-brainer … for less than a $1/mo more you get unlimited everything.

Why would anyone turn that down? No one would.

How about the “Turbo” package? It's nearly twice as much as the “Swift” package; however, it offers 20X faster speeds and the A2 Site Accelerator!

We all know speed is important and it's still less than $10/mo … so, I might as well swing it, right?

Here's an example of a bundle of physical products:

Bundle Picture

If you're doing laundry, you typically need detergent, dryer sheets, and maybe a little fabric softener every now and then!

Plus, if you purchased these items individually, it would cost roughly 30% more which makes the bundle a no-brainer!

2) 1-Click Up-Sells

A 1-click up-sell is an offer presented immediately AFTER the customer has purchased something.

This makes the 1-click up-sell incredibly powerful because the individual has already inserted their payment information and all it takes is “1 click” to add another product/service to their order.

Here's an example:

1-Click Up-Sell Example

This is the page and offer an individual is presented with immediately after purchasing a survival folding knife.

The individual is already in the mindset of “I need survival gear” and has already purchased one item, so when they're presented with another item that's discounted no-less, it's a no-brainer!

3) Order Bump

The infamous “order bump” has risen in popularity over the last year or so due to the fact it works!

It's so simple too, which makes it a no-brainer to implement.

Here's an example of an order bump:

Order Bump Example

It's simply an additional, complementary offer made at checkout.

That's it!

The customer only has to tick a little box to add the product or service to their order.

It's actually quite similar to the 1-click up-sell; however, it's made right before the purchase as opposed to immediately after … but, they're both 1-click!

The Order Bump is typically easier to implement than the 1-click up-sell. If you're having a hard time figuring out a way to do the 1-click up-sell, try searching for a way to add an order bump to your checkout process!

4) Subscriptions

If you offer a product or service that needs to be replenished – offering a subscription can be a great way to increase order size because it will automatically keep the customer coming back for more!

Here's an example of a subscription from the Youpreneur membership site:

Youpreneur Subscription

In order to stay a member of the community, you're charged $59/mo or $599/yr (a bundle!).

Also note that the yearly subscription is incentivized by offering the equivalent of 3 months free, a free t-shirt, and discounted rates to live events!

Here's another subscription example:

Subscription Example

Each container of the supplement contains 30 servings, which makes the “Repeat Delivery Every 30 Days” option incredibly tempting because I won't have to remember to go order more and by offering an extra 5% off, it becomes a no-brainer.

5) Order Bonuses & Rewards

Ever been shopping online and seen a message like this:

“Spend just $5.91 more and get free shipping!”

Or …

Cart Bonus Example

These are order bonuses/rewards used to entice customers to increase their order size in order to receive the incentive!

These are typically super simple to implement and freakin' work!

How To Implement

Implementing these various tweaks is not as hard as you might think.

For example, offering a package/bundle is as simple as bundling products/services you already offer.

Other options, like the 1-click up-sell, will depend on your platform. A quick Google search will likely yield some answers.

Conduct searches like

[platform name] + 1-click up-sell or [platform name] + order bonuses. For example, shopify 1-click up-sell.

9 times out of 10, there is a plugin or add-on that will make whatever you're trying to accomplish possible.

Finally, there are various shopping carts like SamCart and ClickFunnels that integrate with many other platforms to make these tweaks possible.

What To Offer

Beyond the tactics and technical aspects involved with increasing your customers' order size … you need some basic strategy.

The products and services you offer as up-sells, cross-sells, and down-sells should make sense to the customer.

The best way to do this is through the implementation of the Value Ladder.

Click here to learn more about Value Ladders.

Finally, there are times when you may not have additional products/services to offer your customers, but that doesn't mean you can't!

Click here to learn how to sell products and services you don't even have!

5 Smart Ways To Increase Order Size2016-11-17T15:44:20+00:00

How To Build Your Own Landing Page Platform

Being able to develop beautiful, mobile responsive, high converting landing pages on the fly is a necessary part of online marketing.

There are a bunch of tools to help you do this; however, they tend to be overpriced, limited, overrated, and unnecessary.

In this step-by-step tutorial, I show you how to setup your own, self-hosted, landing page platform that you 100% own and control!

>> Click here to download this post in PDF format

BONUS!

I just turned this blog post into a free video course on YouTube and I also put together a part 2 that can be found here!

Comparison Chart

As previously stated, there are tons of landing page builders on the market and each one has its own list of benefits and features that make it “unique”; however, at the end of they day they all solve the same problem – help you easily create great looking pages.

Below you'll find a breakdown of the setup I'm about to show you compared to its closest competition.

Category This Setup LeadPages Instapage Unbounce
Annual Price $281.58 (*probably less) $297.00 $348.00 $588.00
# Visitors Unlimited Unlimited Unlimited 5,000
# Pages Unlimited Unlimited Unlimited Unlimited
Split Testing Yes, w/ Google Analytics Yes, w/ Google Analytics Yes, w/ Google Analytics Yes
Tracking Yes, w/ Google Analytics Sometimes Yes Yes
Secure Hosting (SSL) Yes Yes Yes No
Custom Domain/Branding Yes No No No
Digital Asset Delivery (Memberships) Yes (huge!) No No No

* Probably Less – 9 times out of 10, you likely have a host already and won't require a new one; if so,  you can subtract $164.58 from the price mentioned above, bringing the new annual price to $117.

** ALSO! – The renewal fee for OptimizePress drops from $97/yr to $39/yr after the first year – so, you can likely run this for less than $100/year!

Step #1: Domain, Hosting, and SSL

Domain

You'll want your self-hosted landing page platform on its own domain because you're going to streamline it for one thing and one thing only – building landing pages.

This way you don't accidentally bloat it with a bunch of unnecessary files and plugins that will slow down your site.

You want this baby fast!

When it comes to choosing a domain, I recommend something generic – especially if you'll have landing pages for different businesses, niches, or industries.

For example, I wouldn't want NathansGardening.com and then to create a landing page for fitness because this will cause inconsistencies; people will get confused.

I also recommend avoiding the words  “marketing” or “sales” (or anything similar) in the domain as it may “scare” some people off.

My top trick for picking a generic domain is to pick a word or name and attach “media” at the end.

For example:

  • crazyeyemedia.com
  • williamsmedia.com
  • framedmedia.com

Those could mean anything and aren't niche specific.

When it comes to registering your domain, I recommend NameCheap.

They offer a very clean domain registration process unlike GoDaddy that tries to up-sell you on a bunch of “protection” you don't need.

If you use NameCheap, I recommend checking out http://www.namecheapcoupons.com/ before you buy; they usually have a coupon that'll save ya a buck!

Anyway, the domain registration process is pretty straightforward and I think you can handle it without a bunch of pretty pictures. But, my one piece of advice is to NOT add anything to your domain (ie. protection, hosting, email, social boost, etc. [these are all crappy up-sells used to take advantage of people that don't know any better]). other than WhoisGuard.

I recommend WhoisGuard if you don't want people to know the physical address you used when you registered your domain. For example, your personal residence.

Hosting

You do not want to skimp on hosting. Having a slow website will hurt your conversions.

Being that the sole purpose of your landing page platform is to get conversions … we can't allow it to be slow!

If you're going to send between 0 and 2,500 people a day, the below setup will be great for you.

If you'll be sending more than that, you'll likely want to upgrade to a VPS or dedicated solution.

I recommend the Turbo package by a2Hosting.

Be sure to take note of the code at the bottom (ie. FLEET51). There's always a code for 51% off; however, it changes from time-to-time and they won't automatically apply it to your order … so, make sure you remember to add it!

hosting - 1 v2

When it asks you to “Choose a Domain…” select the option “I will use my existing domain and update my nameservers”

hosting - 2

  • Choose your Billing Cycle – I recommend at least 12 months.
  • Tick the box for a Dedicated IP.
  • Server Location – pick where most of your customers reside.
  • Priority Support – No.
  • Offsite Backups – No.
  • Performance Plus – Yes.
  • Barracuda Spam Firewall – No.
  • SSL Certificate – None.
  • Auto-Install Application – None.
  • CloudFlare Plan Plus Monthly – No (unchecked).

hosting - 3

Review your order – make sure the coupon's been applied!!! (again, they don't always add it automatically!!!)

Also, double check the Dedicated IP and Performance Plus.

hosting - 4

Complete your order and be on the lookout for an email that looks like this:

hosting - 5

The info you're looking for is the DNS Nameserver Information.

You're going to take this information and plug it into NameCheap (or whatever domain registrar you use).

Head back over to NameCheap with your nameserver information in hand, find the domain for your self-hosted landing page platform and select “Manage”.

Now, in the “NAMESERVERS” area, select Custom DNS and paste in the nameserver information from the email … and don't forget to hit the little check mark!

hosting - 6

Now, you'll have to wait until you start seeing an error message when you go to your domain.

Something like this:

hosting - 7

Sometimes this happens instantly, other times you have to wait a couple days.

But, once you see some form of error message as opposed to a “pretty” NameCheap page – you're ready to move on!

SSL

Once your hosting and domain are finally connected, it's time to secure your site.

Why do you want to secure your site with SSL?

A few reasons:

  1. People look for it and it makes your site more trustworthy
  2. Google likes it. Not that you're necessarily trying to get Google love for these pages, but if Google likes it, other places generally do too.
  3. So you can accept payments via Stripe (if you intend to do that) .

You can buy your SSL Certificate from NameCheap. You can pick any; however, I use and recommend RapidSSL.

Go through the checkout process (it's self-explanatory) and click “Activate”.

cPanel - SSL - 5

Now it's time to generate your CSR (Certificate Signing Request).

Start by logging into your cPanel and navigating to SSL/TSL Manager.

(The cPanel is part of your hosting service and is generally found at http://your-landing-page-domain.com:2082. If you're having trouble finding it, check the email your host sent you when you registered with them.)
cPanel - SSL

Click “Generate, view, or delete SSL certificate signing requests.”

cPanel - SSL - 2

Fill in the info it requests and click “Generate”.

cPanel - SSL - 3

Copy the “Encoded Certificate Signing Request”.

cPanel - SSL - 4

Go back to NameCheap and paste the code into the box that says “Enter CSR” and select your Server Type (probably Apache, Nginx, cPanel or other).

cPanel - SSL - 6

It'll ask you to verify the information, make sure it's correct and hit “Next”.

Now, we need to go back to cPanel and setup an email forwarder.

cPanel - SSL - 8

Make one forward from admin@your-landing-page-domain.com to youremail@yoursite.com.

cPanel - SSL - 9

Once the forwarder is setup, be sure to test it by sending an email to admin@your-landing-page-domain.com and ensure it's actually delivered. Sometimes it takes a few minutes for the forwarding to kick-in; you want to make sure it's working before moving to the next step.

Go back to NameCheap and select “Email” for DVC Method and admin@your-landing-page-domain.com for Approver Email.

cPanel - SSL - 7

It will request more information, fill it out. It's self-explanatory.

It will then ask you to confirm your information, click “Confirm”.

Wait for an email that looks like this and click the link the arrow is pointing to:

cPanel - SSL - 10

On the page it takes you to, click “I Approve”.

cPanel - SSL - 11v2

You will see a message about it being approved.

You will then receive another email that looks something like this:

cPanel - SSL - 12

NOTE: If you don't receive this email within an hour, contact support at https://www.rapidssl.com/. There's the option to “Chat” at the top – start a chat. There have been instances where they've needed to verify my ID on the phone before they could issue the certificate.  You may need to do that too, if you don't receive the email within the hour.

Assuming you receive the email, look for “—–BEGIN CERTIFICATE—-” and copy through it to the end “—–END CERTIFICATE—–”

cPanel - SSL - 13

Go back to your cPanel, back to “SSL, TSL Manager” and this time click on “Manage SSL sites.”

Browse for the Domain you're installing the SSL Cert on.

Paste in the code you just copied from your email.

A button that says “Autofill by Certificate” will magically appear. Click it and it will auto-populate everything else.

Tick “Enable SNI for Mail Services”

And finally, “Install Certificate”

cPanel - SSL - 15

You should see this …

cPanel - SSL - 16

YAY – your site is now secure!

>> Click here to download this post in PDF format

Step #2: WordPress and OptimizePress

Install WordPress

Go to your cPanel and locate the option for WordPress.

WordPress - 1

For Protocol, choose https://

Choose your Domain

In Directory, make it blank. (it's important that this be blank! You want your self-hosted landing page platform on the Root Domain.)

The rest of the info is pretty self explanatory; however, I recommend NOT activating any “special” plugins, themes, or options they offer as they tend to be sloppy and unnecessary. Go as bare bones as possible unless you have a specific reason to do otherwise.

WordPress - 2

After clicking “Install,” you'll have a beautiful, securely hosted, WordPress Website!

Get and Install OptimizePress

The first thing you need to do is purchase OptimizePress. It offers an outstanding page builder with a TON of features; it's the tool you'll be using.

Select your package. More than likely, you only need the Core Package.  You will only be running OptimizePress (OP) on this site that is dedicated to landing pages.

OptimizePress - 1

After purchase, you'll be able to enter the members' area where you can download the OptimizePress Theme. (Make sure you download the THEME, not just the plugin.)

OptimizePress - 2

Go back to your WordPress website and into the Admin Dashboard.

Navigate to Appearance, Themes, and Add New.

OptimizePress - 3

Click “Upload Theme”, browse to the OP Theme you just downloaded and select “Install Now”.

OptimizePress - 4

After install, click “Activate”.

You'll now have to input your API Key. Go back to the OP Members' Area and select “Licensing” in the navigation menu at the top.

Scroll down until you see “Registered API Keys” and copy one of them to your clipboard.

OptimizePress - 5

Go back to your site, paste your API key in the box, and click “Save settings”.

OptimizePress - 6


You'll land on something that looks like this:

OptimizePress - 7

Click “Blog Setup”.

This part doesn't matter too much because you won't be using this site as a blog. Remember, this is your landing page platform … it isn't your “site”.

So, you can select whatever makes you the happiest! (I typically select “Theme 1” and then just click “Continue to Step X” without changing any options … but, feel free to customize it the way you want.)

OptimizePress - 8

>> Click here to download this post in PDF format

Step #3: Speed Boost!

I've said it before and I'll say it again, speed is important!

Don't think speed is that important? Check out this infographic by Kissmetrics to see what only a 1 second delay does to your conversion rates!

Install Autoptimize

Autoptimize is a WordPress plugin that “squishes” your site, making it smaller, and thus – faster.

Login to your WordPress admin panel, navigate to Plugins, Add New, and search for “autoptimize”.

Autoptimize - 1

It should be the first result, if not scroll until you find it and click “Install Now”.

Autoptimize - 2

Make sure you click “Activate Plugin” after it's been installed.

Now, open up the Autoptimize Settings and turn on:

  • Optimize HTML Code
  • Optimize JavaScript Code
  • Optimize CSS Code

Then, click Save Changes and Empty Cache.

Autoptimize - 3

Check out the before and after!

Autoptimize - 4

The Load Time difference is negligible at .08s – I don't think the human eye could actually detect that; however, checkout “Page Size” and “Requests” – those numbers have nearly halved!

These size and request differences will make a massive impact on load time once you have a fair amount of traffic hitting the server.

So, while there's no real difference in speed right now, if a few hundred people are on the site at once … the Autoptimized site will outperform every time!

Install WP Smush – Image Optimization

Your source code, CSS, and JS have been “squished” … it's now time to “smush” your images!

Enter into your WordPress admin panel, navigate to Plugins, Add New, search for “wp smush”.  Then, Install and Activate it.

WP Smush

The nice part about this plugin … it basically comes out of the box ready to run!

More than likely you will want to “smush” the images you currently have.

Unless you upgraded to the paid version, you'll only be allowed to “smush” 50 images at a time.  If you're working with a new website, you won't likely have that many images to worry about; it should be a relatively painless process!

WP Smush - 2

Woo! Saved 6.4%!

WP Smush - 3

SUPER Boost With A CDN

Ok, this part is optional.  It will likely result in a few additional bucks per month; however, if you feel the need for speed, it's worth doing!

CDN stands for Content Delivery Network which is essentially a network of computers that delivers static files (images, scripts, css, etc.) very, very fast.

They're very fast because they perform based on geographic location and don't have to process (think) anything like your website server does … all they have to do is deliver what's already there. Hopefully that makes sense.

Anyway, we'll use Amazon's CloudFront CDN because it's fast and cheap.

The first thing you need to do is sign up for or into the Amazon Web Services Management Console.

Once you're in, you will come to a crazy screen like this:

CloudFront

Find CloudFront and select it.

Click “Create Distribution” and it will ask “Web” or “RTMP” – you want “Web”.

In the “Origin Domain Name” text box, enter your full URL (ie. https://your-landing-page-domain.com).

Press “tab”.

Everything will auto-populate.

The only change you need to make is with “Origin Protocol Policy” – change it to “Match Viewer”.

CloudFront - 2

Scroll all the way to the bottom and click “Create Distribution”.

You'll see a little spinny thing and it will take roughly 30 minutes to finish what it's doing.

Take a break. Go grab yourself some coffee or beer; come back in a little while!

CloudFront - 3

After the spinning stops, grab your CDN's link – ie. d3cc2joulgwu4z.cloudfront.net and head back over to your WordPress admin panel, go to Settings, Autoptimize, and find the CDN Base URL.

Enter your CDN's link, don't forget to add https:// and click Save Changes and Empty Cache.

CloudFront - 3.5

Now select “Plugins”, “Add New”, and search for “wp super cache” … then install and activate it.

CloudFront - 4v2

Ok, I'll be honest here – there are a lot of settings inside WP Super Cache that I don't quite understand … but, that's alright – because I know what works!

Find your way to the WP Super Cache Setting section and turn it on!

CloudFront - 5

Under the Advanced Tab, leave everything they way it is with the exception of ticking the “Don't cache pages for known users. (Recommended)” box. Be sure to click “Update Status”.

CloudFront - 6

Navigate to the CDN tab.

Enable CDN Support and paste in the URL of your CDN. Make sure you add the https:// to the beginning! (ie. https://d3cc2joulgwu4z.cloudfront.net).

Click “Save Changes”.

You're done!

If you feel brave, you can tick other boxes inside WP Super Cache; however, every time I do, things start to break.

Check out the load speeds now 😛

CloudFront - 8

>> Click here to download this post in PDF format

Membership, Digital Asset Delivery, and Taking Payments

This section is also optional; it only applies if you're wanting to take payments, run a membership portal, and/or deliver digital products.

NOTE: OptimizeMember is essentially the same thing as s2Member which means it's a really good membership plugin; however, it lacks one key feature when it comes to building funnels – the 1-click up-sell.

There are ways around this. For example, if you use ClickBank for your payment processor, you can do 1-click up-sells and it also offers built-in affiliate support – so, that's certainly an option.

You can also integrate with other platforms like SamCart, which add the 1-click up-sell functionality.

Finally, you may not even care about 1-click up-sells. You will still be able to offer One-Time-Offers (OTOs) and other up-sells … they just won't be 1-click!

I'm not going to show you how to build a membership site in this post as it's a separate topic … but, I'll get you pointed in the right direction.

Head over to your OptimizePress Members' Area, navigate to your downloads, and this time download OptimizeMember:

OptimizeMember - 1

Go back to your WordPress admin panel, navigate to Plugins, click Upload Plugin, and upload, install, and activate the OptimizeMember plugin you just downloaded.

After it's activated, you will see a warning message …

OptimizeMember - 2

BUT before we do what it says, go to Pages, Add New, call it “Join”, and click Publish.

OptimizeMember - 3

Now follow the directions presented in the warning message. Select the “Join” page you just created from the drop down menu.

OptimizeMember - 4

Okie dokie!

That's all for right now!

Summary

At this time, you should have an insanely badass, self-hosted landing page platform!

One that goes above and beyond the competition.

One that is 100% under your control!

One that can integrate seamlessly with a bunch of autoresponder tools to include my favorite, ActiveCampaign.

Not to mention, it comes with a top-notch membership portal that can accept payments, deliver assets, and make you money all in one place!

You can't beat it!

>> Click here to download this post in PDF format

Moving Forward

Ok. I showed you how to setup your own landing page platform in the most efficient way I know.

Now, you need to learn how to actually use it!

The good news is it's an easy tool to learn and far easier than LeadPages (I don't understand why so many people recommend that tool, but I digress).

Of course, the folks at OptimizePress want you to be successful with their tool, so they have a bunch of tutorials.

I've also created an OptimizePess mini-course that will show you how to build an opt-in funnel with two different squeeze pages, a split test, and a Facebook pixel.

Don't Forget Strategy!

Finally, having a badass platform and knowing how to “technically” do everything can't fix a poor strategy.

For this reason, I highly recommend you take my free sales funnel training series!

How To Build Your Own Landing Page Platform2020-04-04T14:44:26+00:00

The Free Consultation / High End Sales Funnel

If you offer free consultations, or want to, this post is for you.

It'll give you an airtight strategy for scheduling more consultations and closing more sales.

Let's get into it – I present to you The Free Consultation / High End Sales Funnel ~

Free Consultation - High End Sales Funnel

Scenarios

I'll use a few scenarios throughout this post to help better illustrate the funnel:

  • Dental Surgeon (DS) – Dental implants
  • Financial Advisor (FA) – Full wealth management
  • Marketing Services (MS) – Sales funnel service

Traffic

While there are a million and one ways to drive traffic to your sales funnel, I'm only going to focus on three categories for this particular funnel:

“House” Traffic

People that are currently on your email/contact list. They already have a general idea of who you are and what you do.

Search PPC / Organic

People searching for the service/solution you provide and arriving on your site in the process. This includes both paid traffic and organic (“free”/SEO).

  • DS – Dental implants near Richmond VA
  • FA – Financial advisor near Richmond VA
  • MS – Sales funnel service

Facebook Ads / Other

People that don't know you, but likely have a problem you can solve.

  • DS – People with dentures
  • FA – Physicians in the “fellow” stage
  • MS – Ecommerce businesses

Collecting Contact Info

The particular traffic source will set the stage for “how” you'll collect an individual's contact information and/or get them to schedule a consultation.

“House” & Search Traffic

Since these people know you and/or know they have a problem, you're able to ask them to schedule a consultation right away. There's little point in waiting.

For this reason, you will direct them to a dedicated landing page where they can schedule a consultation with you; however, I recommend giving the option to request to only receive more info as they may not be ready for a consultation.

For example:

Free Consultation Landing Page

Upon entering their email, checking the “To schedule my FREE consultation” box, and clicking the submit button … two things happen:

  1. They'll be greeted with a form to fill out in order to schedule their consultation (I personally use and recommend https://youcanbook.me; however, there are a ton of similar services and I'm sure you'll find one that works for you).
    1. Note: Instead of going straight into the scheduling of a consultation you could instead implement an application process where you'll ask for more pertinent information to make sure they're the right candidate before scheduling a call.
  2. They'll be added to the autoresponder tool where they'll be tagged as “Wants a consultation”; however, this tag will trigger the “Don't Forget” Email Series in 24 hours, if they do not schedule their consultation. If they schedule their consultation within 24 hours, the “Wants a consultation” tag will be replaced with a “Scheduled consultation” tag, which will trigger the the “Consultation Prep” Email Series.

If the individual checks the “More information” box, they're added to the autoresponder tool with the tag ” Wants more information”. This will trigger the “Education” Email Series.

Facebook Ads / Other Traffic

You need to treat people that arrive on your site via Facebook and other traffic sources (other than your contact list and search traffic) differently for two main reasons:

  1. They probably don't know you, unless you're targeting your fans and/or are “recognized”
  2. They're not actively trying to solve their problem unlike when they are conducting searches on Google

Instead of hitting them with a “free consultation” offer, give them something else that re-iterates the fact they have a problem, to qualify them, and to establish yourself as an authority.

I'm talking about a Lead Magnet. Here are a few examples:

  • DS – Dentures vs Dental Implants – The definitive comparison.
  • FA – About to make the big bucks? Here are 5 investments you'll want in place before the cash starts rolling in!
  • MS – 7 sales funnel leaks 98% of Ecommerce stores have … and how to fix them!

Lead Magnet Tactics

There are two main ways you can handle the delivery of these Lead Magnets:

  1. Traditional – Make the Lead Magnet into a PDF or video, setup a squeeze page, and give it out in exchange for their email address
  2. Retargeting – Make the Lead Magnet a regular blog post or page on your site and run ads to your post. Then, retarget individuals that have seen your post with an offer to register for a free consultation and/or to receive more information (like the landing page example above). This method works because now they have a better idea of who you are, what you do, and the problem(s) they have.

Schedule On The Spot

As you see in the example Landing Page above, we only ask for their email and for them to check a box.

We don't ask them to schedule their consultation until after they've taken that first step.

Why?

Asking someone to schedule a call is a bigger “ask” than simply asking for their email. The individual will need to check their calendar to see when they're available, compare it to your calendar, then fill out a more in-depth form in order to schedule the consultation.

Because of all the extra “stuff” involved with scheduling a call, a lot of people won't set up the consultation right away.

They'll think to themselves, “I'll just do it later” … but, they wont … unless you remind them!

So, if someone says they want to schedule a consultation, but doesn't – follow up with a few reminder emails (“Don't Forget” Series) that direct them straight to the scheduling form.

Remember to re-iterate the benefits of the consultation, what they'll receive from the consultation, and how they have a problem that needs to be fixed.

While many people won't schedule the consultation right away – some will. Prep them with the “Consultation Prep” Series.

“Consultation Prep” Series

The “Consultation Prep” Series is a series of emails sent to an individual after they register for their consultation that “preps” them for the call.

You can give them something to read, ask them to fill out a survey that requests more information than what they gave when they scheduled the call, a read-ahead of questions you'll ask so they can have answers prepared, etc. Basically, whatever you need to send in order to make the consultation run smoothly.

“Consultation” List

The “Consultation” List is the list of individuals that have had a consultation with you. Ideally, the majority of these individuals will also be “buyers” and you'll have an established relationship with them. In this case, you'll have a normal client relationship that you'll need to maintain.

For the individuals that don't become “buyers” – treat them a little differently than the general public. They certainly know they want help in an area, but maybe they just weren't ready or maybe they didn't feel like YOU were the right person for them. Whatever the reason – they didn't commit.

And, while not everyone will be a perfect fit for YOU, they're serious enough to schedule a consultation and you can still help them get pointed in the right direction. Who knows, maybe that particular service wasn't a good fit for them; it doesn't mean the next problem they face wont require your services. Or, they may refer someone else to you if you help them the best you can.

“Education” Series / Article

The Education Series is a series of emails for the individuals that don't know you, what you offer, or their problems as well – the intent of the series is to educate them on those points.

This is accomplished by sending content that makes them aware of the problem(s) they're facing, the result of fixing those problems, handling objections like time and money, case studies, and other educational material that's helpful, informative, and motivates them to think the same way you do.

The point is to show the person they have a problem and you're the solution.

The call-to-action (CTA) is then to schedule a free consultation with you where you'll close the deal.

“House” List

No matter how hard you try, even with all the fancy email series and autoresponders, most people will not schedule a consultation with you. (If you happen to prove this wrong, let me know!)

It's OK, don't take it personally.

It doesn't mean they never want your help.

People are busy. People forget. People get distracted.

The ultimate point here is they've at least shown some interest in you, your business, the service(s) you offer, the problem they have … something … and you don't want to just let them wander off into the sunset.

For this reason, add them to your “House” List where you send more generalized content, recommend other products/services you offer, and continue building and maintaining a relationship with them.

Who knows, maybe six months down the road they will finally decide to fix the problem and schedule that free consultation!

Want More?

Do you want more awesome sales funnels like this one? Check out the Sales Funnel Training Vault!

The Free Consultation / High End Sales Funnel2016-10-14T18:29:10+00:00

Case Study: Why You Need To Segment Your Email List

I'm probably not the first person to tell you that you need to segment your email list.

But, if I am … cool! Here's a list of reasons why you need to:

  • Increased open rates
  • Increased click-through rates (CTR)
  • Increased earnings per click (EPC)
  • Decreased unsubscribes
  • Decreased complaints

Overall, you'll have happier subscribers because you're sending them stuff they care about and you'll receive better results (ie. more sales).

This is all relatively obvious; people will are more interested in opening and reading emails that apply to them.

But, how much more interested?

As it would turn out … a lot!

basicist-funnel-results

If you're unfamiliar with the Interest Driven Sales Funnel concept, I recommend you read this post.

If you decide not to read that post right now, here's what you need to know:

  • Main Series: Our general autoresponder series that everyone goes through. The point of it is to build and maintain a relationship while gauging interests based on the actions individuals take.
  • Action Series (AS): Once an interest in a particular topic or product is shown, we'll send a few emails on that topic.

For example, an email is sent concerning how to grow your email list. We can assume, most people that click the link in that email are interested in learning how to grow their email list. We'll send more information on that topic and try to sell a product or service that helps them accomplish that goal (Action Series).

If the individual doesn't click the link, we'll assume they're not interested in growing their email list at this time; they continue down the Main Series and we introduce the next topic, ie. Facebook Ads. If interest is shown, we send more relevant content about advertising on Facebook.

And so on.

Back to the results:

The Main Series average Open Rate, CTR, and EPC is 15.26%, 3.58%, and $0.01 respectively. (which is about average for an ecommerce store, the type of email list I'm evaluating here, according to MailChimp's benchmark report)

But, if you take a look at the various Action Series (AS) the Open Rates, CTRs, and EPCs are MUCH better! Up to 259.31%, 632.68%, and 58,600% increase in Open Rate, CTR, and EPC, respectively!

That's like 2.5X more people opening the emails, 6.3X more people clicking the links, and 586X more money spent – that's HUGE!

Of course, not all Action Series performed quite that well; however, they all outperformed the Main Series, which is the key takeaway here.

Bottom line: Segment your list!

* Note: The EPC % looks insane here. This is because the Main Series isn't generating much revenue, and it's not supposed to – it should primarily be used to gauge interest (not sell). The key point is that the Action Series (AS) are obviously doing a good job selling (as they should!).

How You Should Segment Your Email List

This is where the majority of people tend to stop.

They know they should segment their email list (evident in the results above); however, it can be overwhelming because there are so many ways to do it.

The overall concept is to only segment what TRULY matters, and no more.

But, what does that mean?

Does gender matter? Maybe.

Does location matter? Possibly.

How about age? Depends.

Where Segmentation ALWAYS Matters

Do you want to know where segmentation ALWAYS matters?

Do ya?! 😛

It always matters based on actions (ie. purchases, opt-ins, clicks, pages viewed, etc.)

If someone makes a purchase, you know beyond a shadow of a doubt they're interested in that topic, product, and/or solving that particular problem. They've gone so far as to open their wallet. If you ignore this action, you can rest assured you're leaving money on the table.

If someone opts-in for a specific lead magnet or reason, you know exactly what they're interested in.

If someone clicks a link in an email or views a particular page on your site, you know what they're interested in.

When people take these actions, they're showing interest and possibly intent.

You should be ready for this.

You should have triggers in place for these actions.

Actions are what you need to focus on first.

Then, down the line, if your list is large enough or there is enough reason to do so – go ahead and add in some segmentation based on demographics, location, etc.

Conclusion

You MUST segment your list. There's undeniable proof that segmentation works. Not just the example I used, but other studies show the same results. Like here.

The most significant way to segment your email list is based on actions – purchases, opt-ins, clicks, page views, etc.

After you've segmented based on actions, then you can segment based on other factors such as demographic info and geographic location.

Case Study: Why You Need To Segment Your Email List2016-10-14T18:29:12+00:00