Search results for: business

Need a new search?

If you didn't find what you were looking for, try a new search!

How To Build Your Own Landing Page Platform

Being able to develop beautiful, mobile responsive, high converting landing pages on the fly is a necessary part of online marketing.

There are a bunch of tools to help you do this; however, they tend to be overpriced, limited, overrated, and unnecessary.

In this step-by-step tutorial, I show you how to setup your own, self-hosted, landing page platform that you 100% own and control!

>> Click here to download this post in PDF format

BONUS!

I just turned this blog post into a free video course on YouTube and I also put together a part 2 that can be found here!

Comparison Chart

As previously stated, there are tons of landing page builders on the market and each one has its own list of benefits and features that make it “unique”; however, at the end of they day they all solve the same problem – help you easily create great looking pages.

Below you'll find a breakdown of the setup I'm about to show you compared to its closest competition.

Category This Setup LeadPages Instapage Unbounce
Annual Price $281.58 (*probably less) $297.00 $348.00 $588.00
# Visitors Unlimited Unlimited Unlimited 5,000
# Pages Unlimited Unlimited Unlimited Unlimited
Split Testing Yes, w/ Google Analytics Yes, w/ Google Analytics Yes, w/ Google Analytics Yes
Tracking Yes, w/ Google Analytics Sometimes Yes Yes
Secure Hosting (SSL) Yes Yes Yes No
Custom Domain/Branding Yes No No No
Digital Asset Delivery (Memberships) Yes (huge!) No No No

* Probably Less – 9 times out of 10, you likely have a host already and won't require a new one; if so,  you can subtract $164.58 from the price mentioned above, bringing the new annual price to $117.

** ALSO! – The renewal fee for OptimizePress drops from $97/yr to $39/yr after the first year – so, you can likely run this for less than $100/year!

Step #1: Domain, Hosting, and SSL

Domain

You'll want your self-hosted landing page platform on its own domain because you're going to streamline it for one thing and one thing only – building landing pages.

This way you don't accidentally bloat it with a bunch of unnecessary files and plugins that will slow down your site.

You want this baby fast!

When it comes to choosing a domain, I recommend something generic – especially if you'll have landing pages for different businesses, niches, or industries.

For example, I wouldn't want NathansGardening.com and then to create a landing page for fitness because this will cause inconsistencies; people will get confused.

I also recommend avoiding the words  “marketing” or “sales” (or anything similar) in the domain as it may “scare” some people off.

My top trick for picking a generic domain is to pick a word or name and attach “media” at the end.

For example:

  • crazyeyemedia.com
  • williamsmedia.com
  • framedmedia.com

Those could mean anything and aren't niche specific.

When it comes to registering your domain, I recommend NameCheap.

They offer a very clean domain registration process unlike GoDaddy that tries to up-sell you on a bunch of “protection” you don't need.

If you use NameCheap, I recommend checking out http://www.namecheapcoupons.com/ before you buy; they usually have a coupon that'll save ya a buck!

Anyway, the domain registration process is pretty straightforward and I think you can handle it without a bunch of pretty pictures. But, my one piece of advice is to NOT add anything to your domain (ie. protection, hosting, email, social boost, etc. [these are all crappy up-sells used to take advantage of people that don't know any better]). other than WhoisGuard.

I recommend WhoisGuard if you don't want people to know the physical address you used when you registered your domain. For example, your personal residence.

Hosting

You do not want to skimp on hosting. Having a slow website will hurt your conversions.

Being that the sole purpose of your landing page platform is to get conversions … we can't allow it to be slow!

If you're going to send between 0 and 2,500 people a day, the below setup will be great for you.

If you'll be sending more than that, you'll likely want to upgrade to a VPS or dedicated solution.

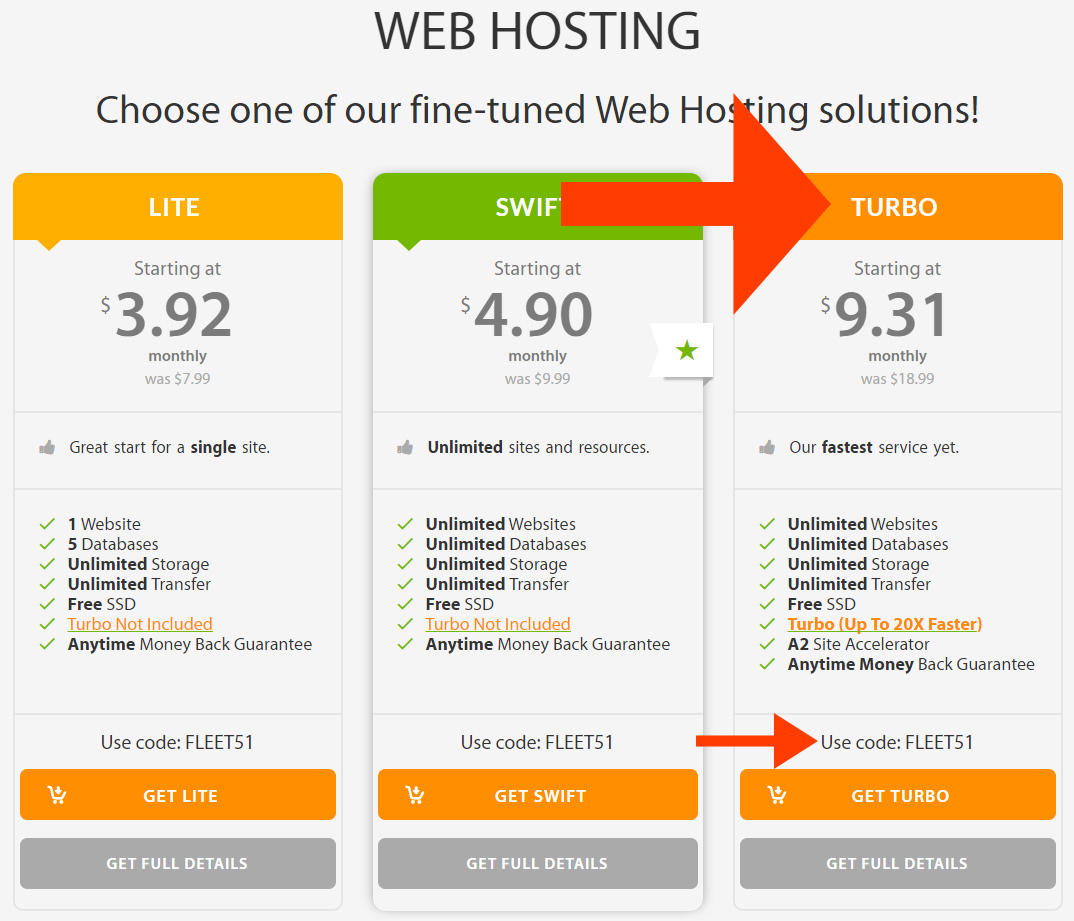
I recommend the Turbo package by a2Hosting.

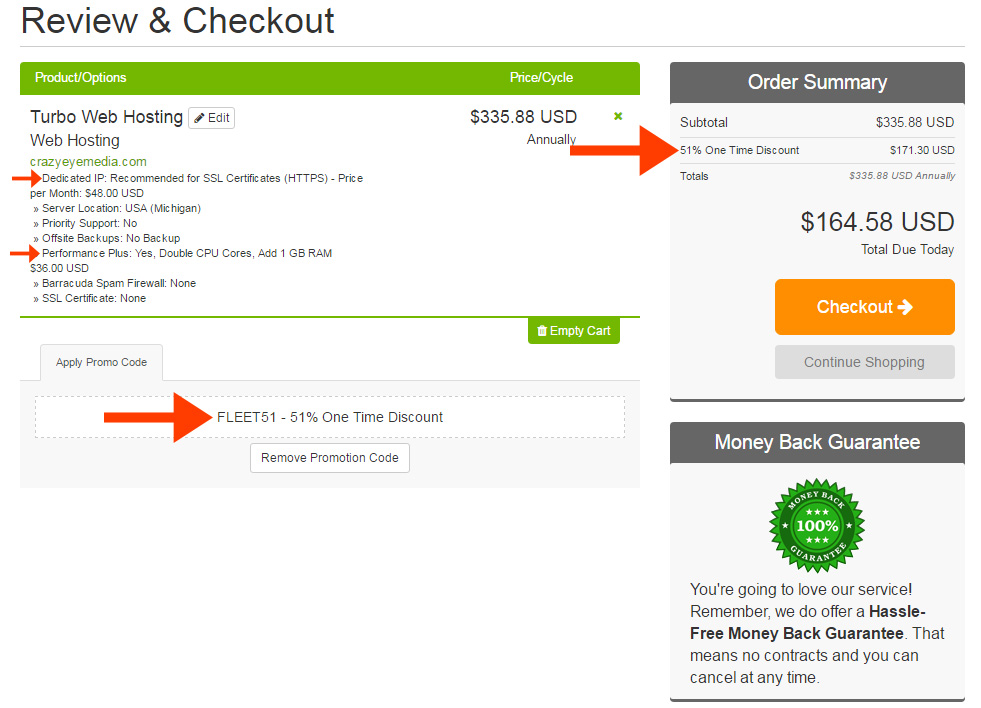
Be sure to take note of the code at the bottom (ie. FLEET51). There's always a code for 51% off; however, it changes from time-to-time and they won't automatically apply it to your order … so, make sure you remember to add it!

hosting - 1 v2

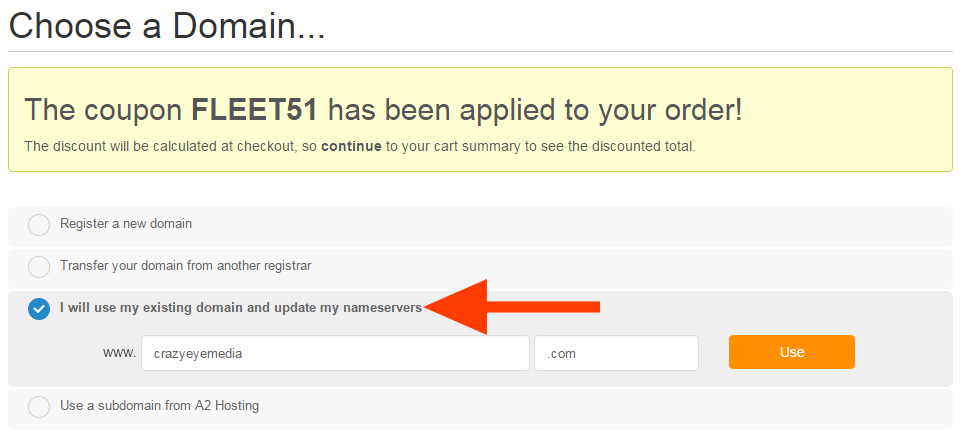
When it asks you to “Choose a Domain…” select the option “I will use my existing domain and update my nameservers”

hosting - 2

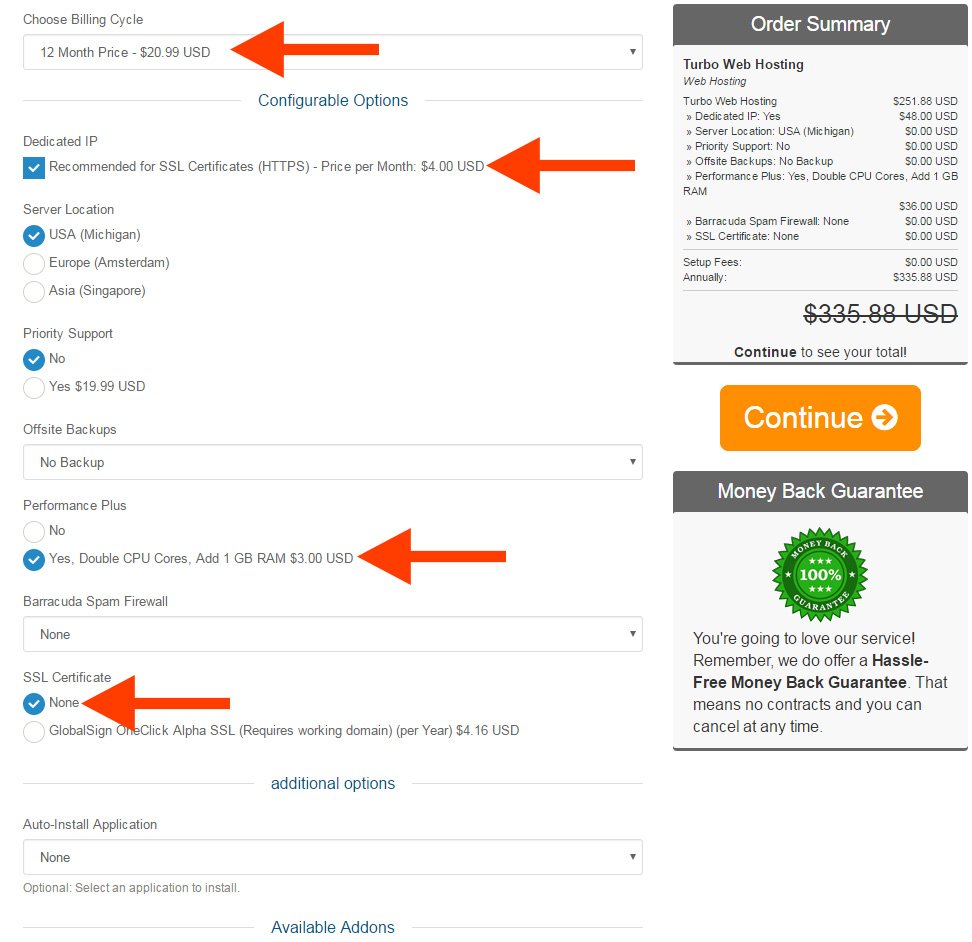
  • Choose your Billing Cycle – I recommend at least 12 months.
  • Tick the box for a Dedicated IP.
  • Server Location – pick where most of your customers reside.
  • Priority Support – No.
  • Offsite Backups – No.
  • Performance Plus – Yes.
  • Barracuda Spam Firewall – No.
  • SSL Certificate – None.
  • Auto-Install Application – None.
  • CloudFlare Plan Plus Monthly – No (unchecked).
hosting - 3

Review your order – make sure the coupon's been applied!!! (again, they don't always add it automatically!!!)

Also, double check the Dedicated IP and Performance Plus.
hosting - 4

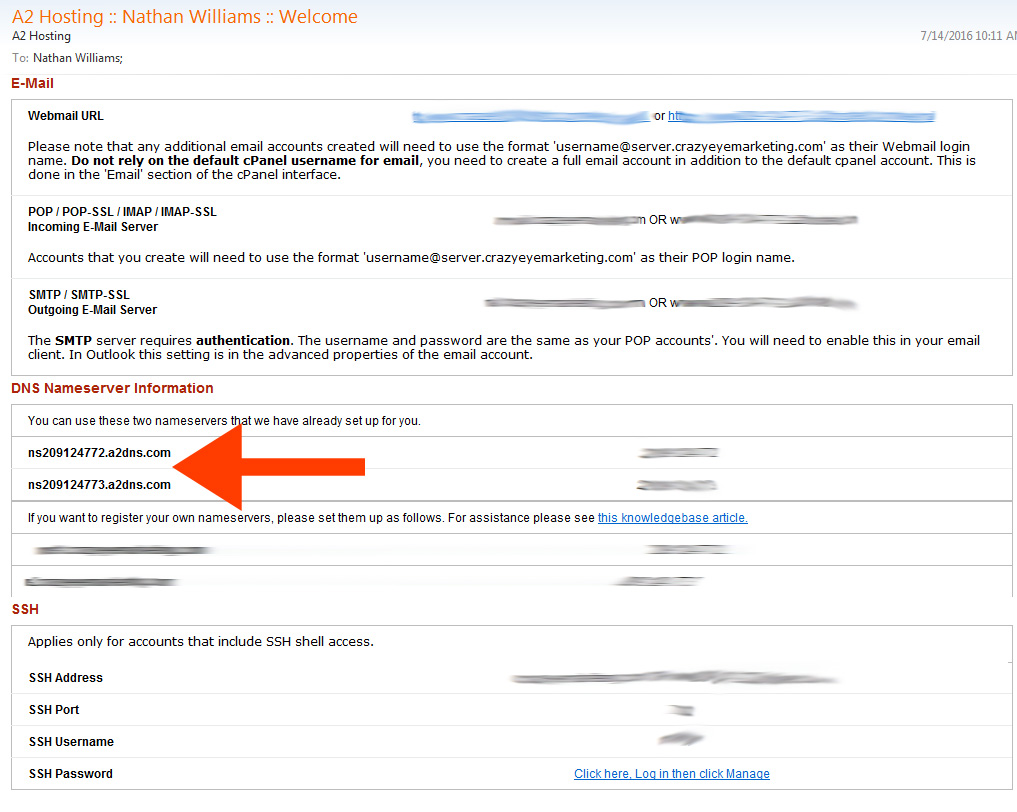
Complete your order and be on the lookout for an email that looks like this:
hosting - 5

The info you're looking for is the DNS Nameserver Information.

You're going to take this information and plug it into NameCheap (or whatever domain registrar you use).

Head back over to NameCheap with your nameserver information in hand, find the domain for your self-hosted landing page platform and select “Manage”.

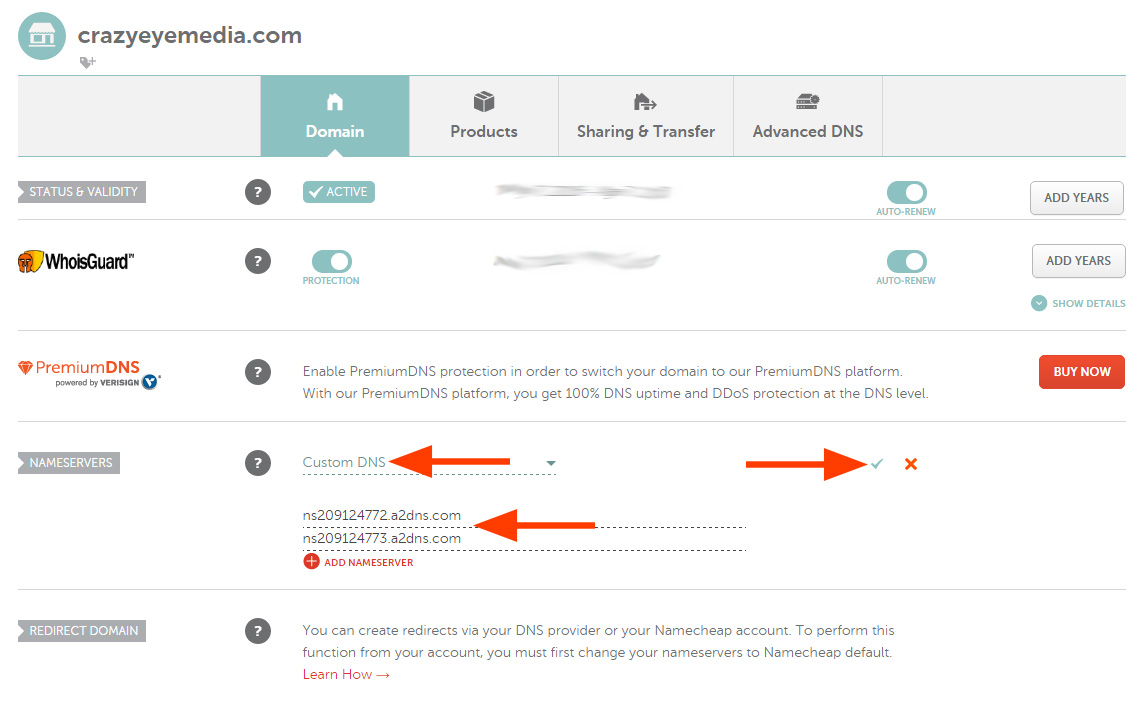
Now, in the “NAMESERVERS” area, select Custom DNS and paste in the nameserver information from the email … and don't forget to hit the little check mark!
hosting - 6

Now, you'll have to wait until you start seeing an error message when you go to your domain.

Something like this:

hosting - 7

Sometimes this happens instantly, other times you have to wait a couple days.

But, once you see some form of error message as opposed to a “pretty” NameCheap page – you're ready to move on!

SSL

Once your hosting and domain are finally connected, it's time to secure your site.

Why do you want to secure your site with SSL?

A few reasons:

  1. People look for it and it makes your site more trustworthy
  2. Google likes it. Not that you're necessarily trying to get Google love for these pages, but if Google likes it, other places generally do too.
  3. So you can accept payments via Stripe (if you intend to do that) .

You can buy your SSL Certificate from NameCheap. You can pick any; however, I use and recommend RapidSSL.

Go through the checkout process (it's self-explanatory) and click “Activate”.

cPanel - SSL - 5

Now it's time to generate your CSR (Certificate Signing Request).

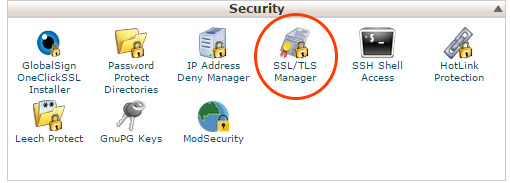
Start by logging into your cPanel and navigating to SSL/TSL Manager.

(The cPanel is part of your hosting service and is generally found at http://your-landing-page-domain.com:2082. If you're having trouble finding it, check the email your host sent you when you registered with them.)
cPanel - SSL

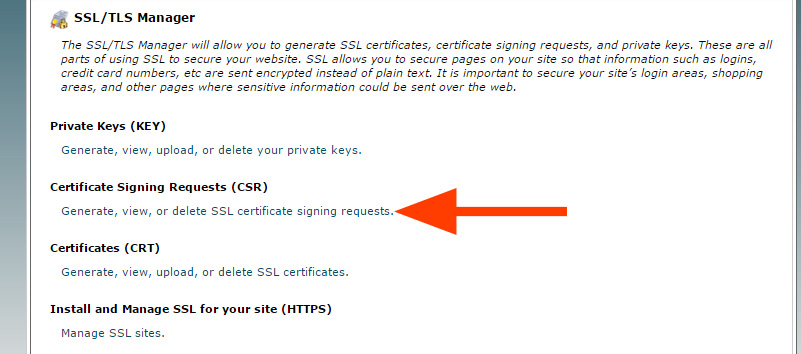
Click “Generate, view, or delete SSL certificate signing requests.”
cPanel - SSL - 2

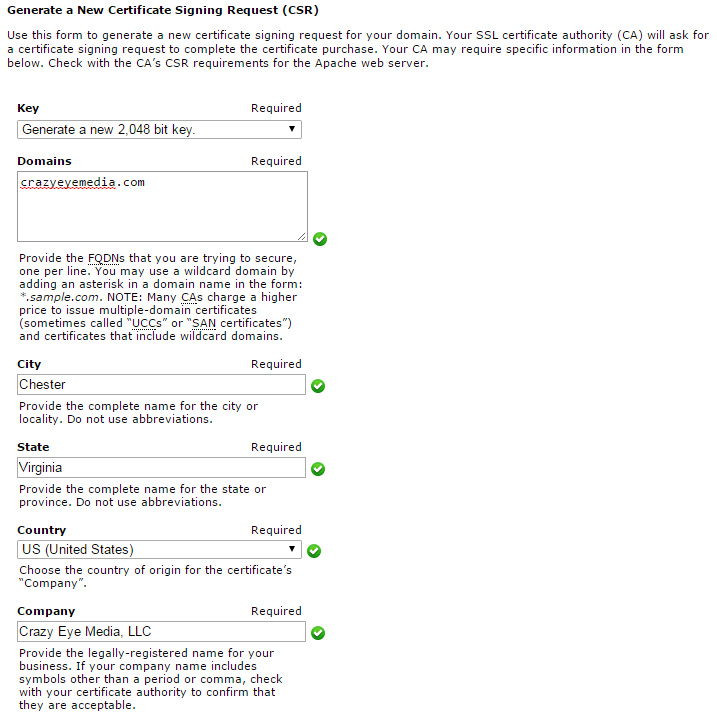
Fill in the info it requests and click “Generate”.
cPanel - SSL - 3

Copy the “Encoded Certificate Signing Request”.
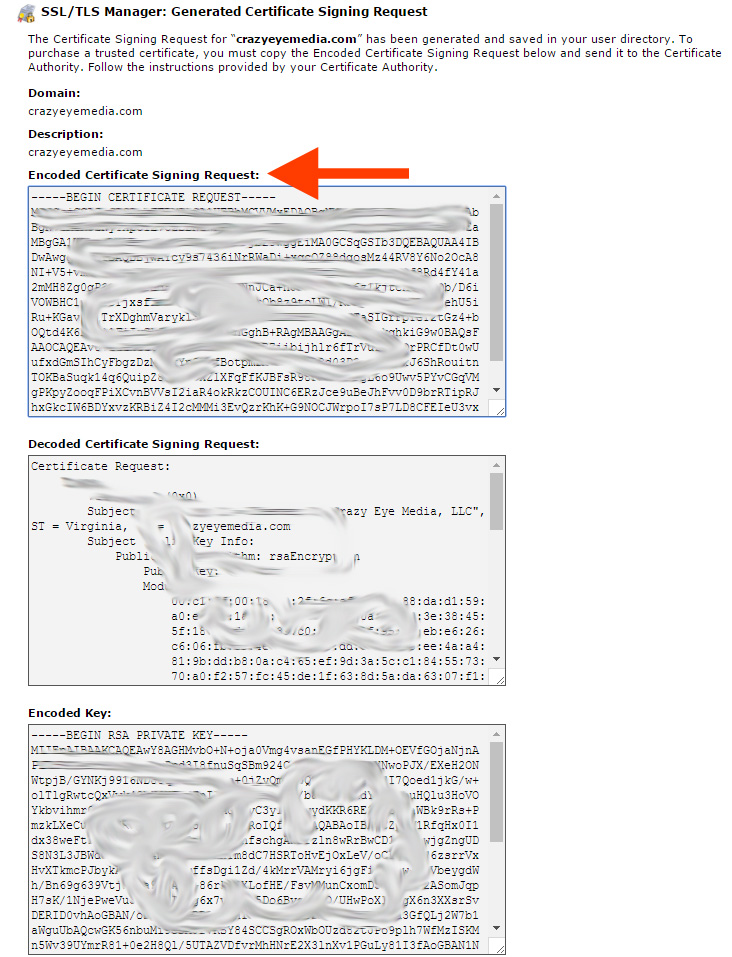
cPanel - SSL - 4

Go back to NameCheap and paste the code into the box that says “Enter CSR” and select your Server Type (probably Apache, Nginx, cPanel or other).
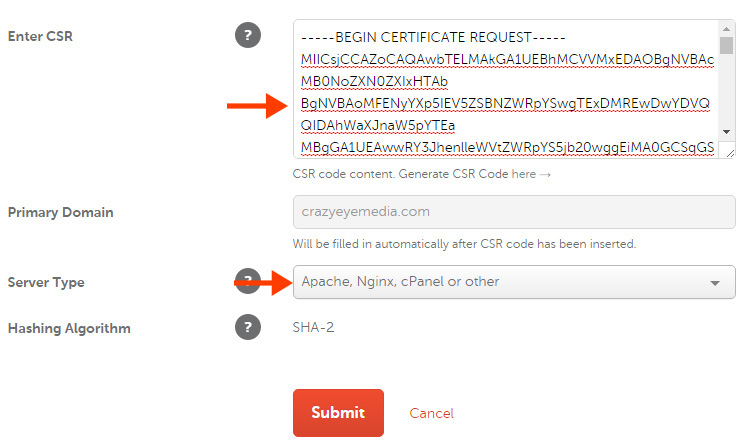
cPanel - SSL - 6

It'll ask you to verify the information, make sure it's correct and hit “Next”.

Now, we need to go back to cPanel and setup an email forwarder.
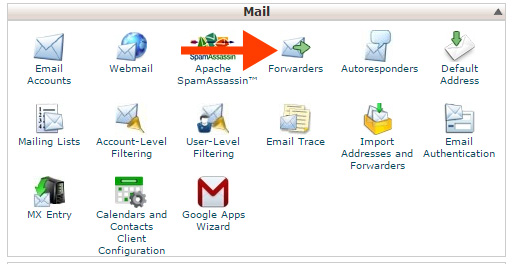
cPanel - SSL - 8

Make one forward from admin@your-landing-page-domain.com to youremail@yoursite.com.
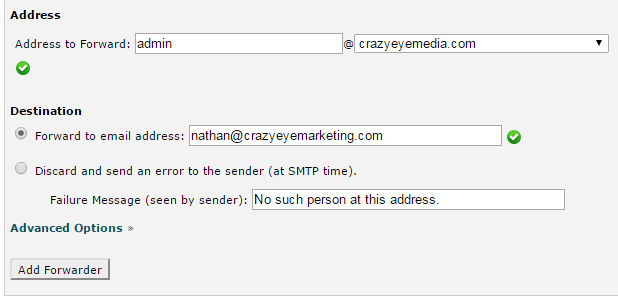
cPanel - SSL - 9

Once the forwarder is setup, be sure to test it by sending an email to admin@your-landing-page-domain.com and ensure it's actually delivered. Sometimes it takes a few minutes for the forwarding to kick-in; you want to make sure it's working before moving to the next step.

Go back to NameCheap and select “Email” for DVC Method and admin@your-landing-page-domain.com for Approver Email.
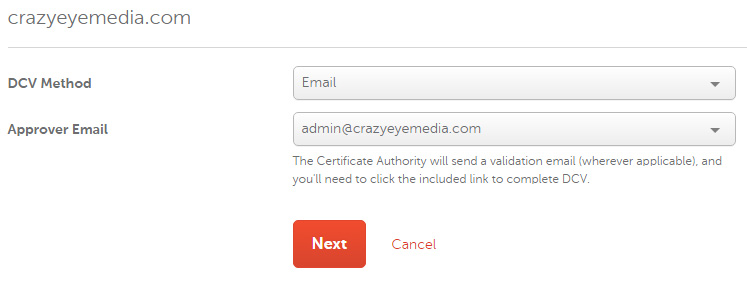
cPanel - SSL - 7

It will request more information, fill it out. It's self-explanatory.

It will then ask you to confirm your information, click “Confirm”.

Wait for an email that looks like this and click the link the arrow is pointing to:
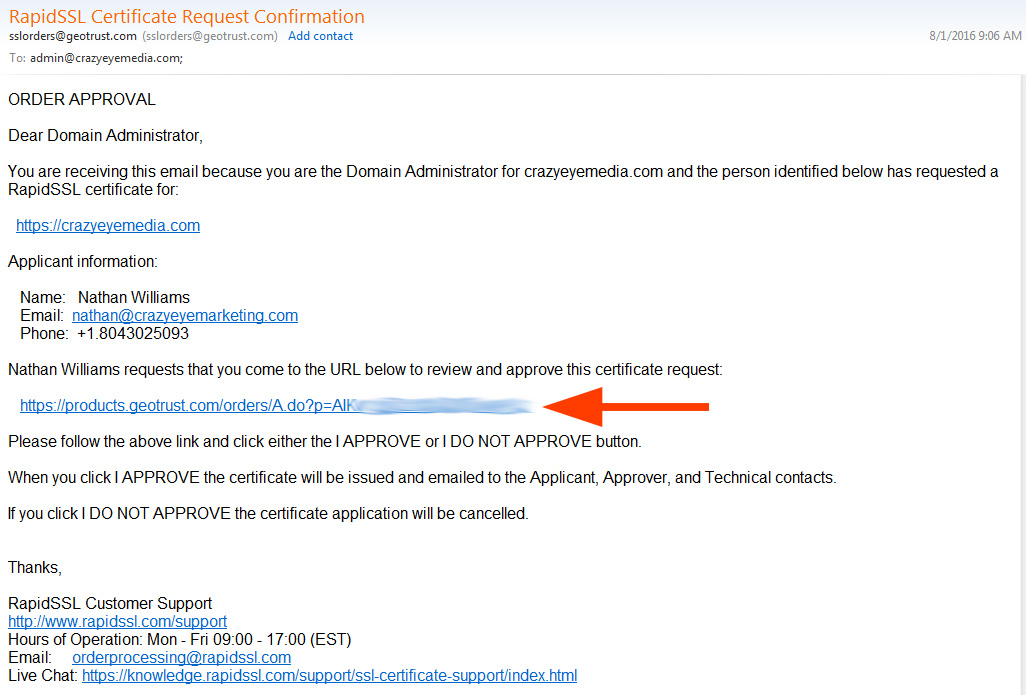
cPanel - SSL - 10

On the page it takes you to, click “I Approve”.
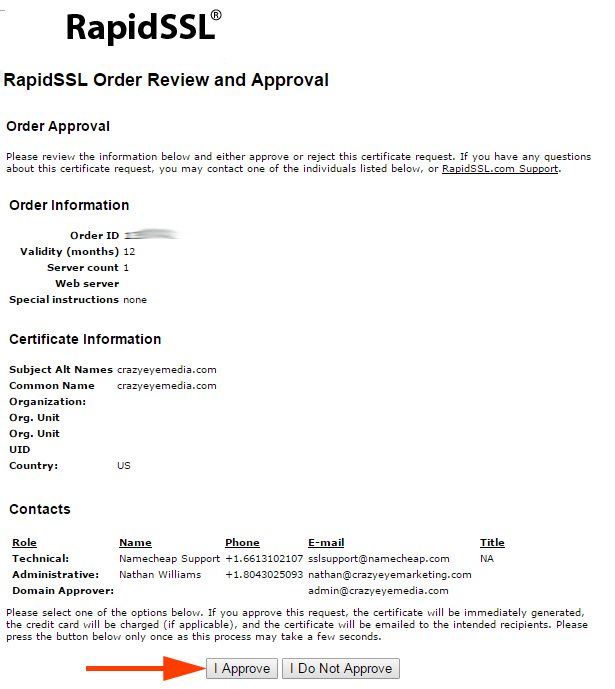
cPanel - SSL - 11v2

You will see a message about it being approved.

You will then receive another email that looks something like this:
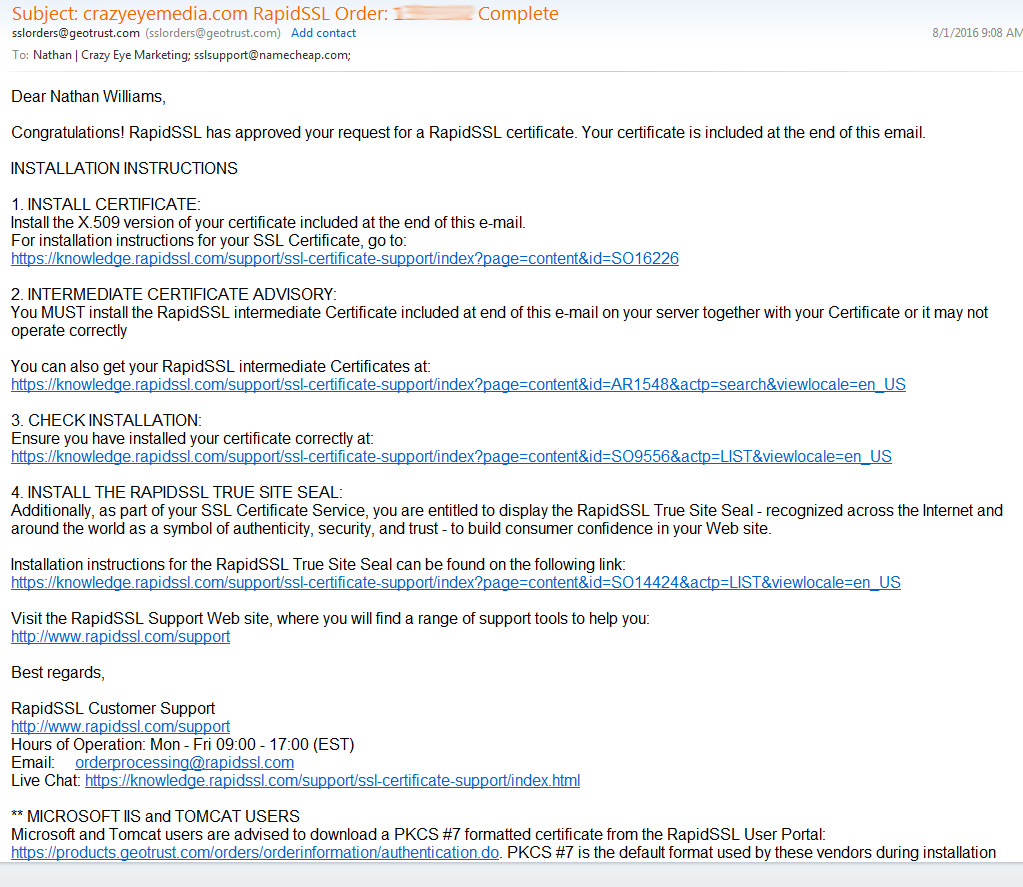
cPanel - SSL - 12

NOTE: If you don't receive this email within an hour, contact support at https://www.rapidssl.com/. There's the option to “Chat” at the top – start a chat. There have been instances where they've needed to verify my ID on the phone before they could issue the certificate.  You may need to do that too, if you don't receive the email within the hour.

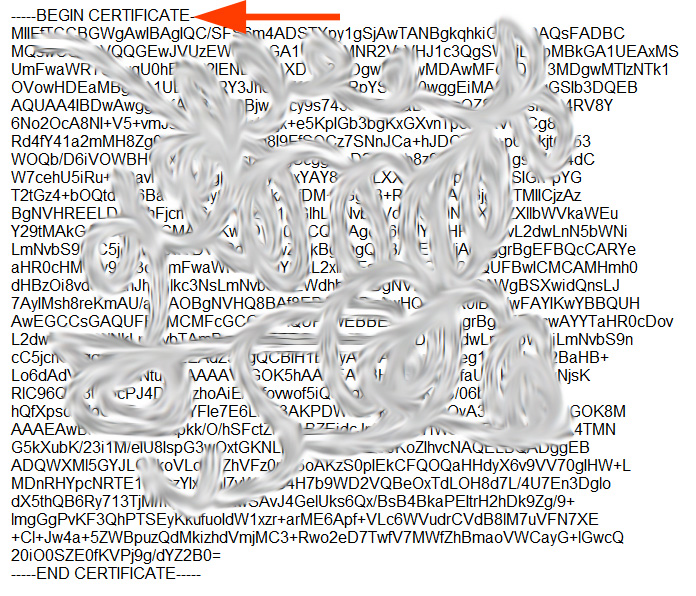
Assuming you receive the email, look for “—–BEGIN CERTIFICATE—-” and copy through it to the end “—–END CERTIFICATE—–”
cPanel - SSL - 13

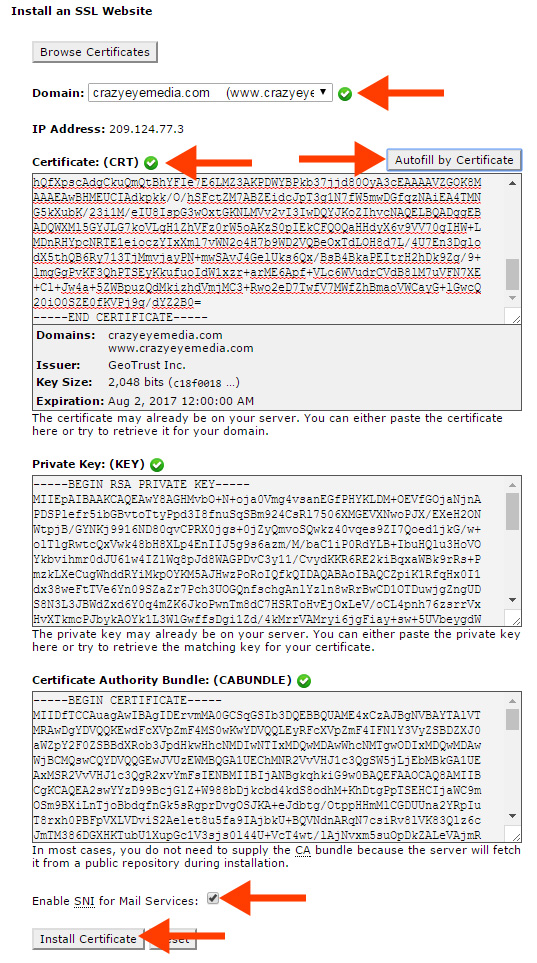
Go back to your cPanel, back to “SSL, TSL Manager” and this time click on “Manage SSL sites.”

Browse for the Domain you're installing the SSL Cert on.

Paste in the code you just copied from your email.

A button that says “Autofill by Certificate” will magically appear. Click it and it will auto-populate everything else.

Tick “Enable SNI for Mail Services”

And finally, “Install Certificate”
cPanel - SSL - 15

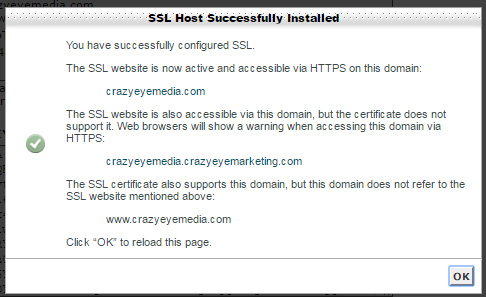
You should see this …

cPanel - SSL - 16

YAY – your site is now secure!

>> Click here to download this post in PDF format

Step #2: WordPress and OptimizePress

Install WordPress

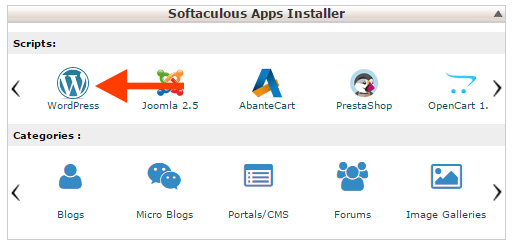
Go to your cPanel and locate the option for WordPress.
WordPress - 1

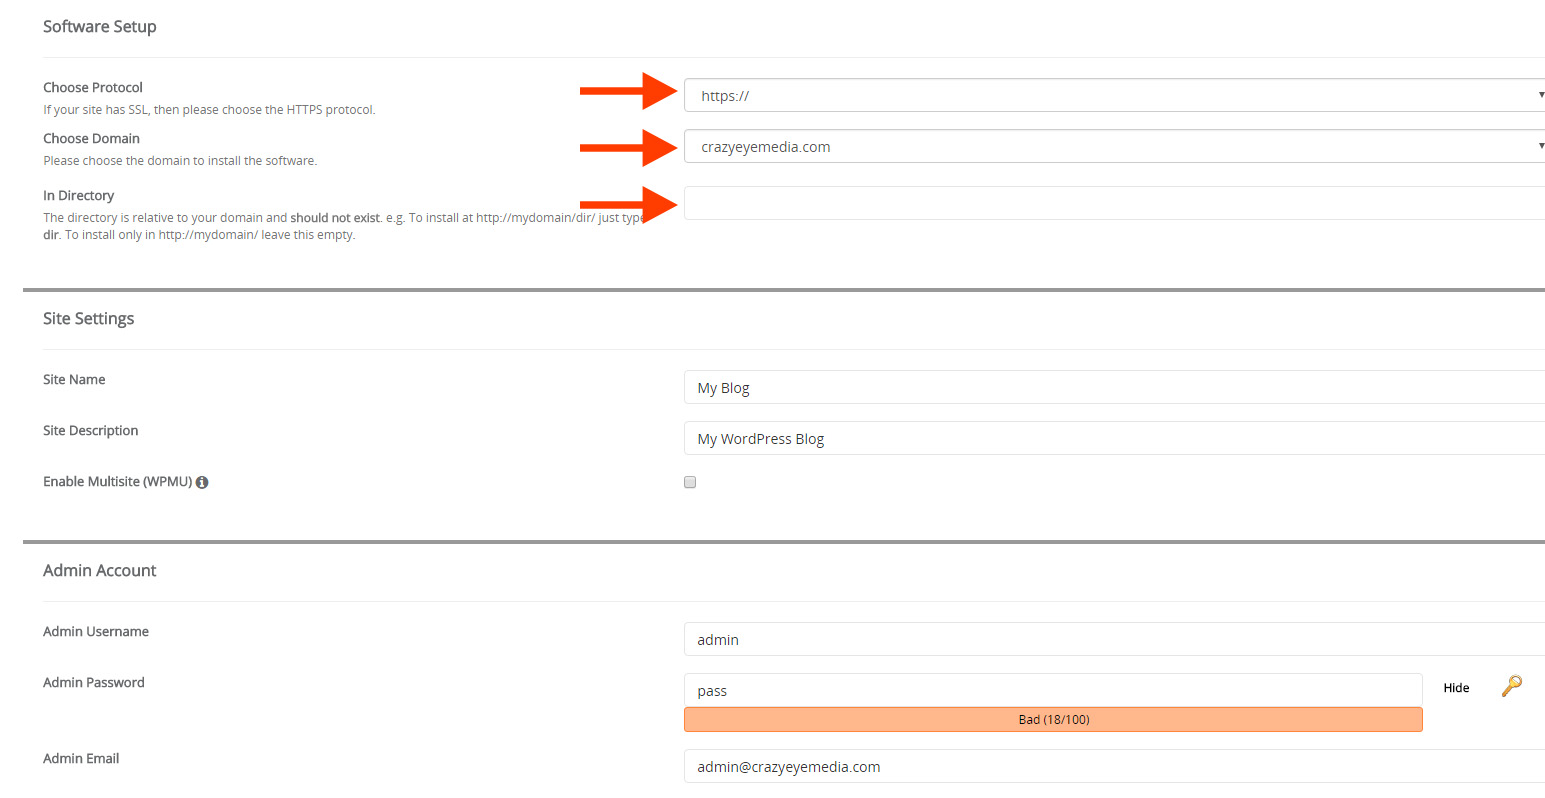
For Protocol, choose https://

Choose your Domain

In Directory, make it blank. (it's important that this be blank! You want your self-hosted landing page platform on the Root Domain.)

The rest of the info is pretty self explanatory; however, I recommend NOT activating any “special” plugins, themes, or options they offer as they tend to be sloppy and unnecessary. Go as bare bones as possible unless you have a specific reason to do otherwise.
WordPress - 2

After clicking “Install,” you'll have a beautiful, securely hosted, WordPress Website!

Get and Install OptimizePress

The first thing you need to do is purchase OptimizePress. It offers an outstanding page builder with a TON of features; it's the tool you'll be using.

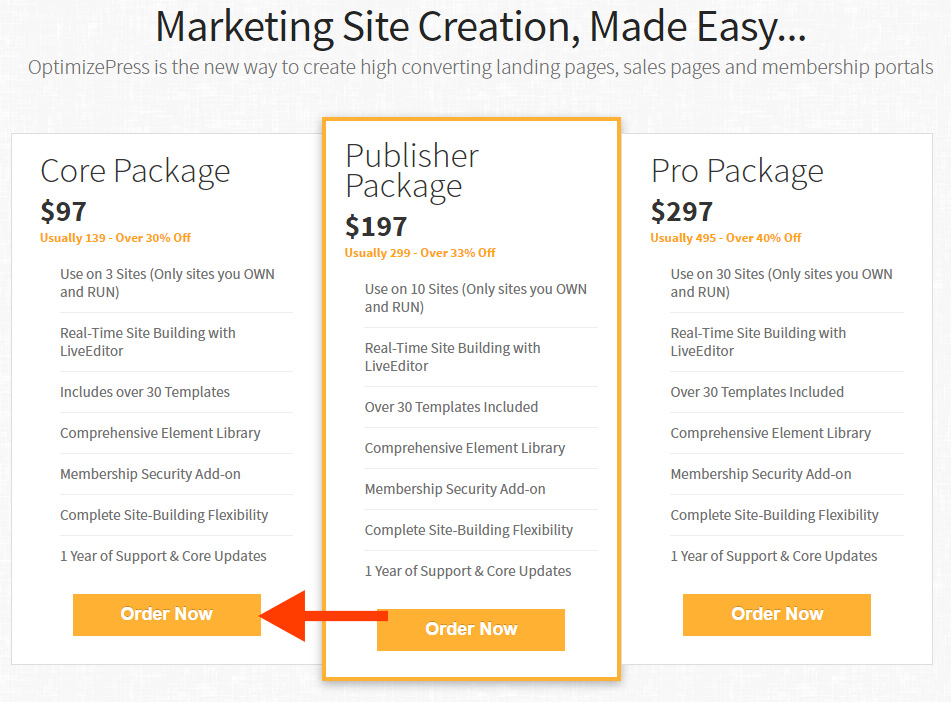
Select your package. More than likely, you only need the Core Package.  You will only be running OptimizePress (OP) on this site that is dedicated to landing pages.

OptimizePress - 1

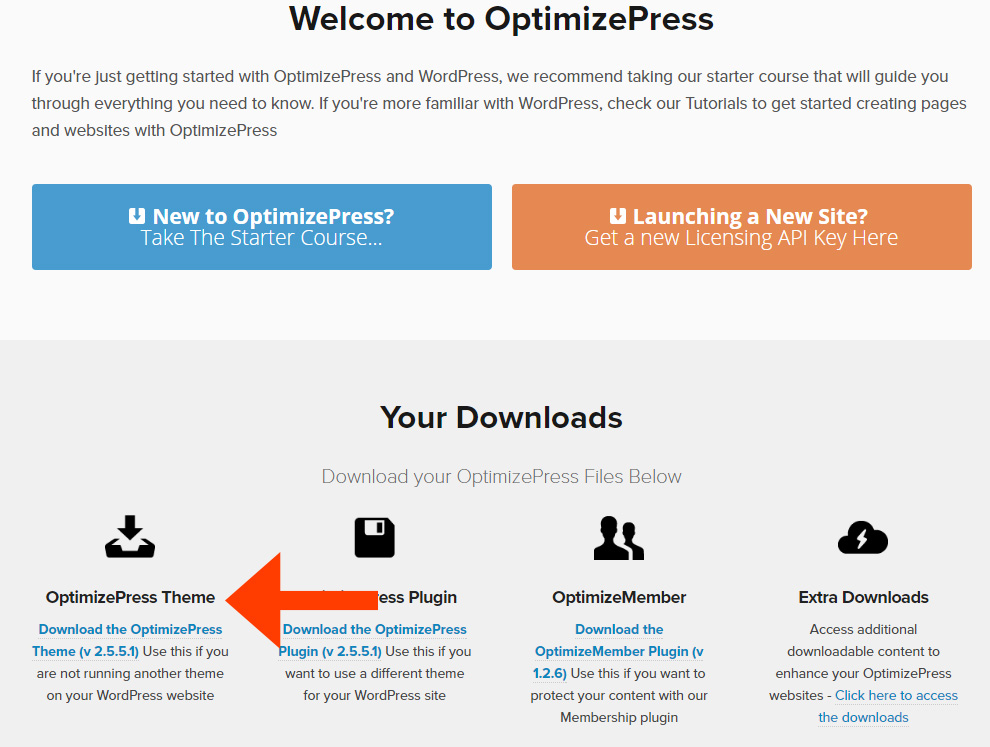
After purchase, you'll be able to enter the members' area where you can download the OptimizePress Theme. (Make sure you download the THEME, not just the plugin.)

OptimizePress - 2

Go back to your WordPress website and into the Admin Dashboard.

Navigate to Appearance, Themes, and Add New.
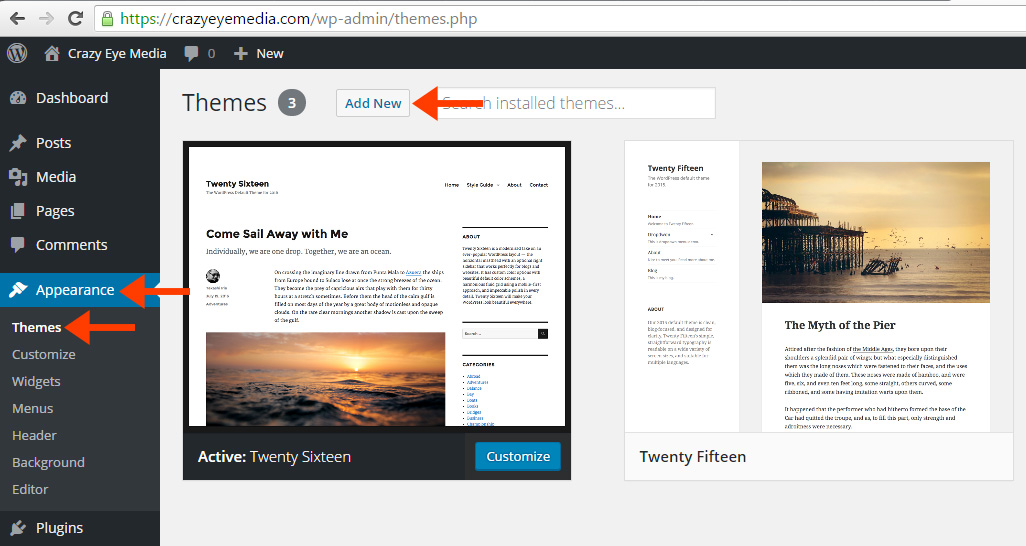
OptimizePress - 3

Click “Upload Theme”, browse to the OP Theme you just downloaded and select “Install Now”.
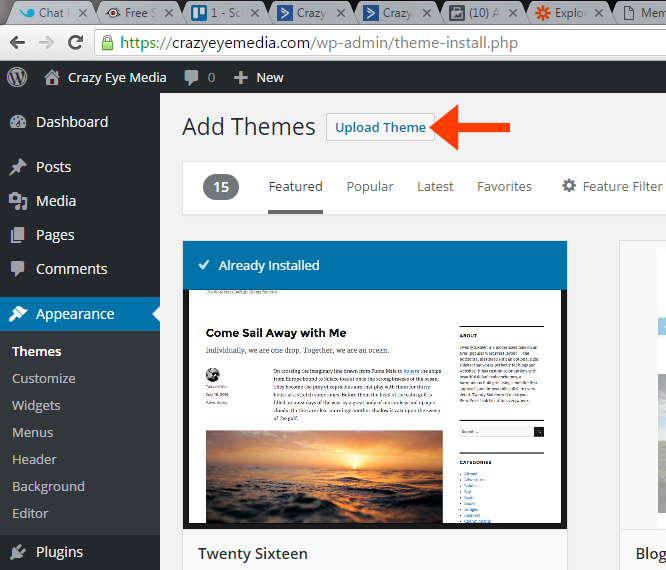
OptimizePress - 4

After install, click “Activate”.

You'll now have to input your API Key. Go back to the OP Members' Area and select “Licensing” in the navigation menu at the top.

Scroll down until you see “Registered API Keys” and copy one of them to your clipboard.

OptimizePress - 5

Go back to your site, paste your API key in the box, and click “Save settings”.
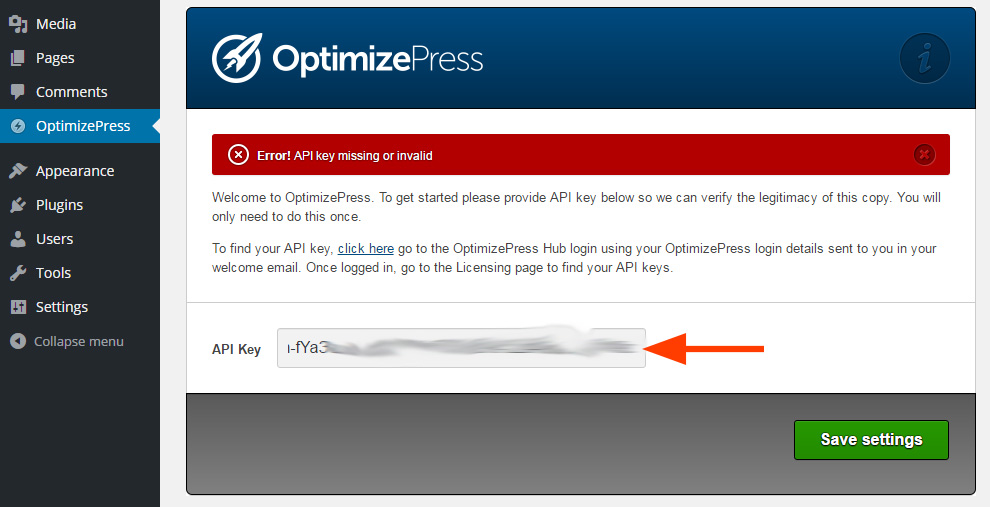
OptimizePress - 6


You'll land on something that looks like this:
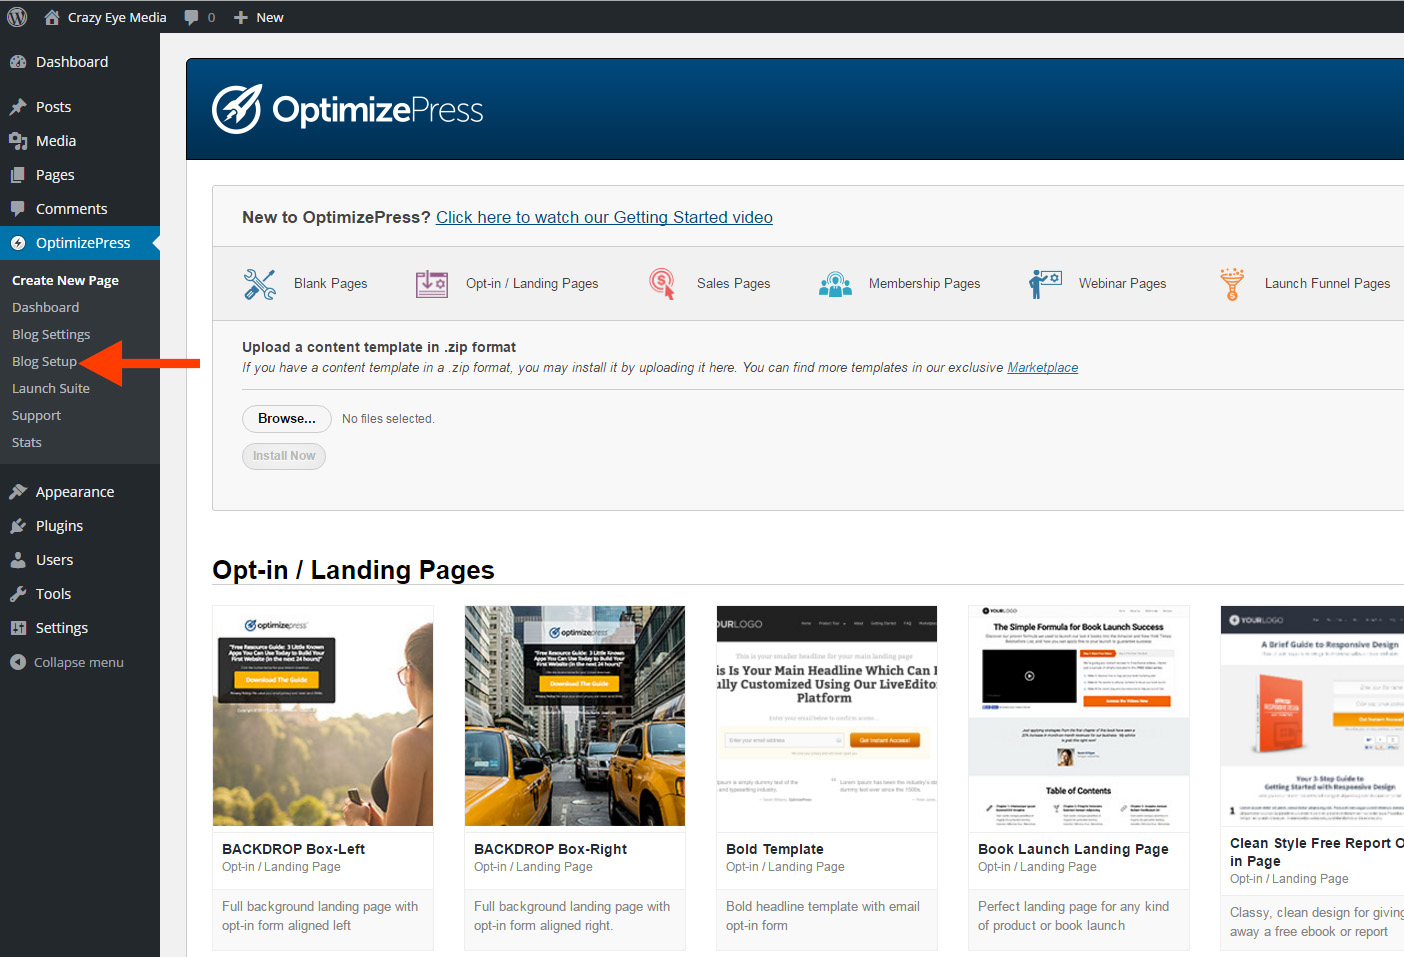
OptimizePress - 7

Click “Blog Setup”.

This part doesn't matter too much because you won't be using this site as a blog. Remember, this is your landing page platform … it isn't your “site”.

So, you can select whatever makes you the happiest! (I typically select “Theme 1” and then just click “Continue to Step X” without changing any options … but, feel free to customize it the way you want.)
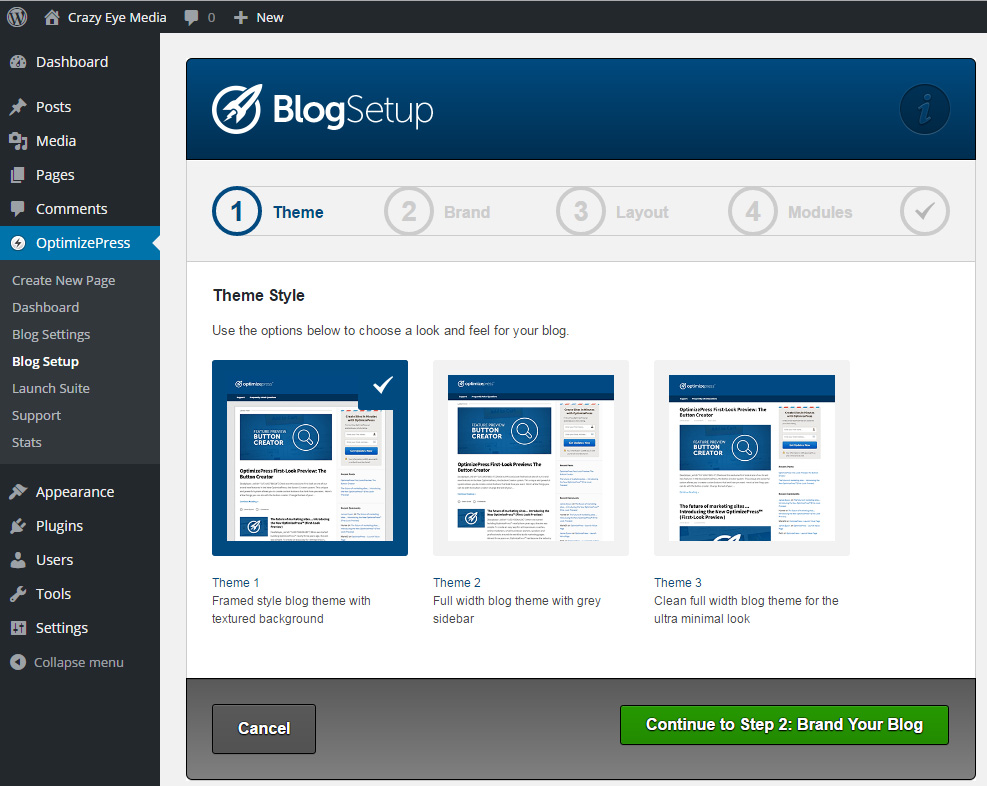
OptimizePress - 8

>> Click here to download this post in PDF format

Step #3: Speed Boost!

I've said it before and I'll say it again, speed is important!

Don't think speed is that important? Check out this infographic by Kissmetrics to see what only a 1 second delay does to your conversion rates!

Install Autoptimize

Autoptimize is a WordPress plugin that “squishes” your site, making it smaller, and thus – faster.

Login to your WordPress admin panel, navigate to Plugins, Add New, and search for “autoptimize”.
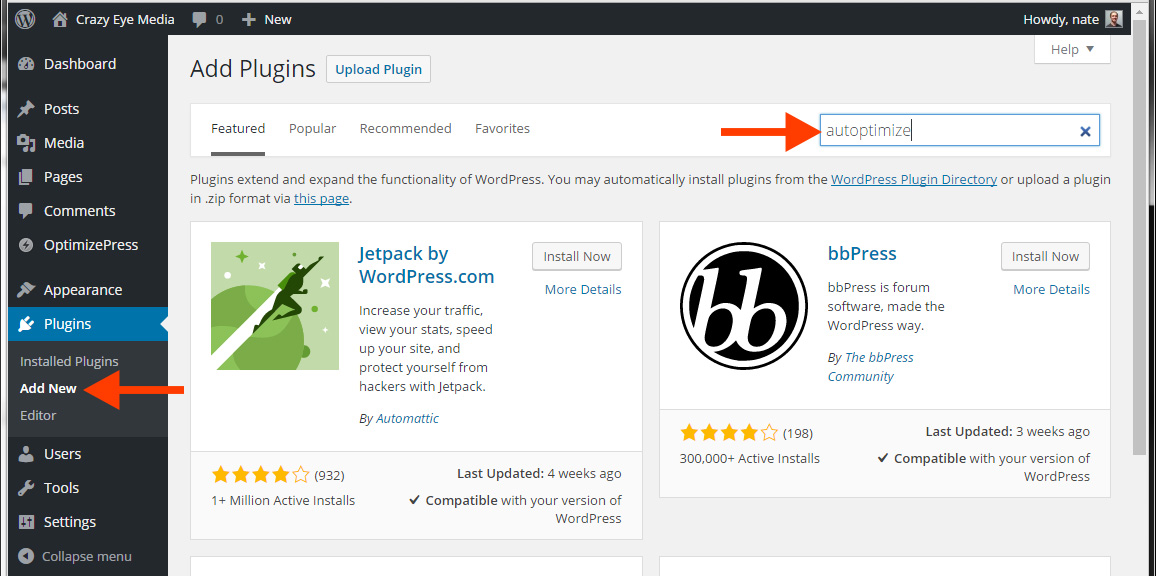
Autoptimize - 1

It should be the first result, if not scroll until you find it and click “Install Now”.
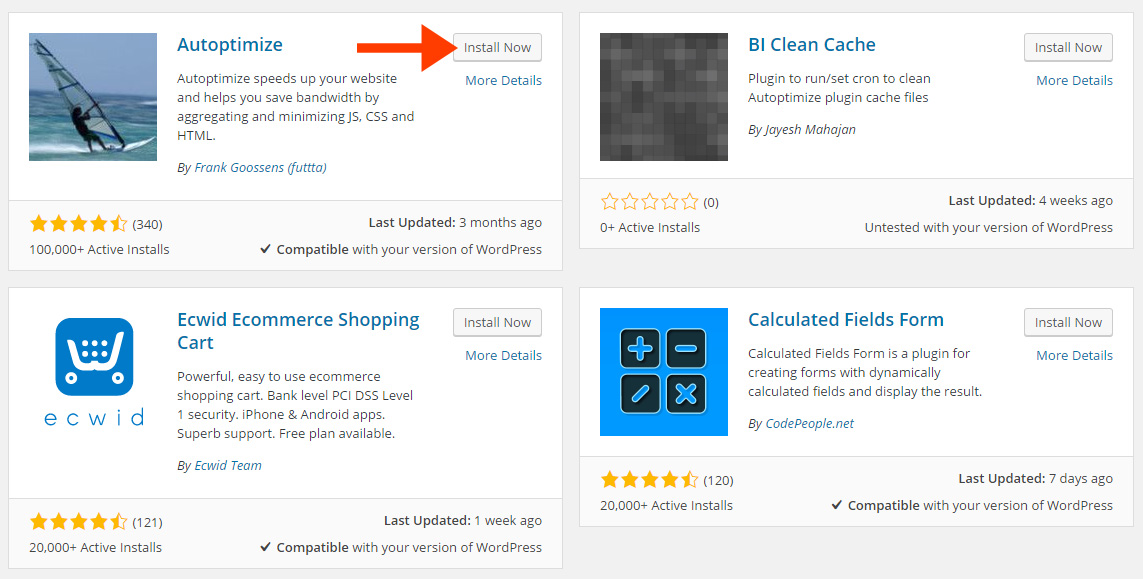
Autoptimize - 2

Make sure you click “Activate Plugin” after it's been installed.

Now, open up the Autoptimize Settings and turn on:

  • Optimize HTML Code
  • Optimize JavaScript Code
  • Optimize CSS Code

Then, click Save Changes and Empty Cache.
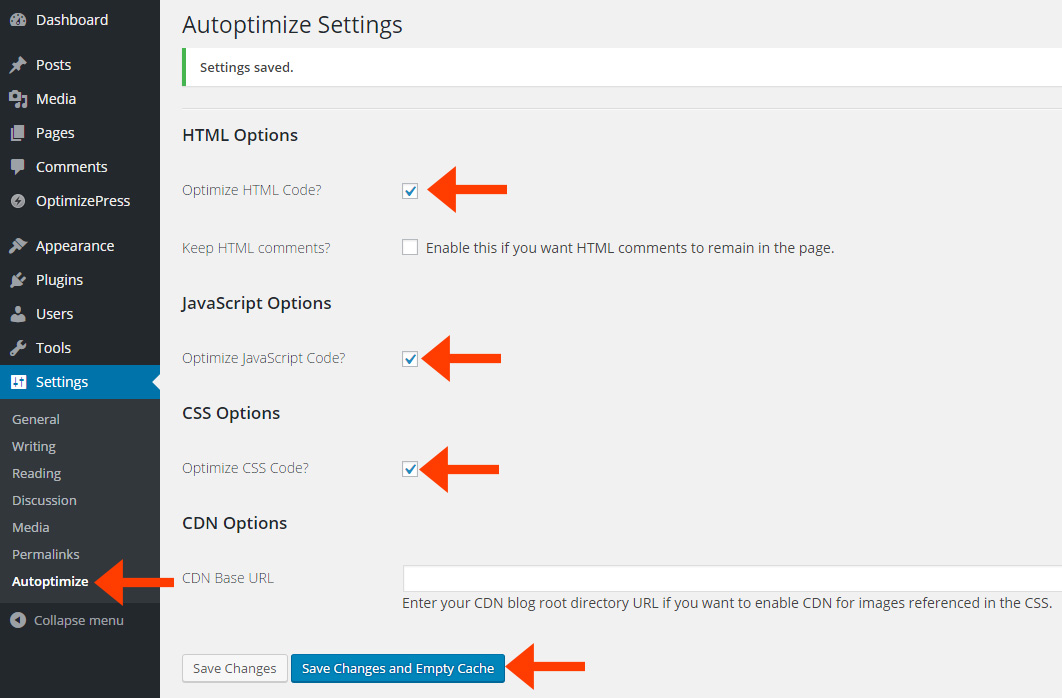
Autoptimize - 3

Check out the before and after!

Autoptimize - 4

The Load Time difference is negligible at .08s – I don't think the human eye could actually detect that; however, checkout “Page Size” and “Requests” – those numbers have nearly halved!

These size and request differences will make a massive impact on load time once you have a fair amount of traffic hitting the server.

So, while there's no real difference in speed right now, if a few hundred people are on the site at once … the Autoptimized site will outperform every time!

Install WP Smush – Image Optimization

Your source code, CSS, and JS have been “squished” … it's now time to “smush” your images!

Enter into your WordPress admin panel, navigate to Plugins, Add New, search for “wp smush”.  Then, Install and Activate it.
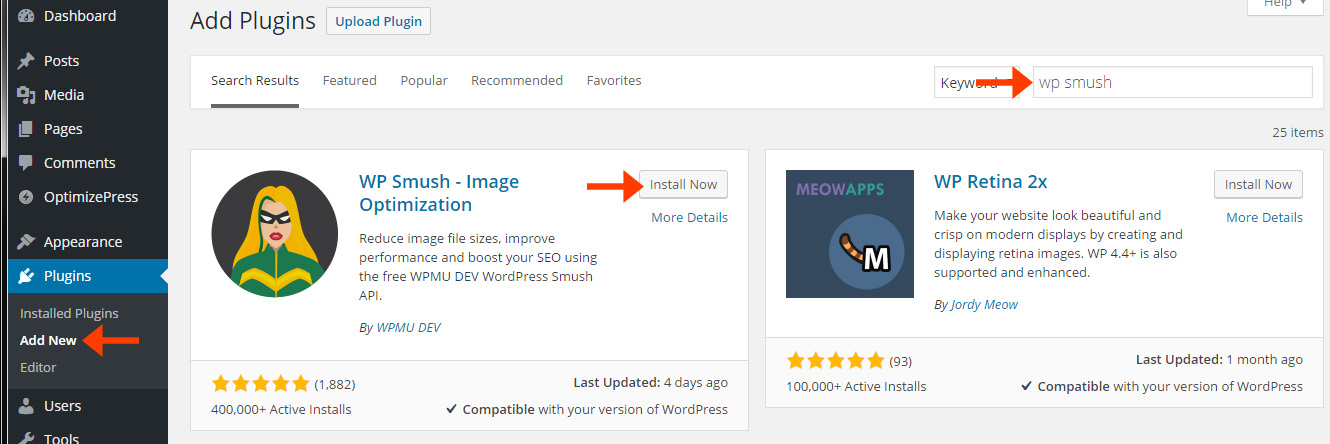
WP Smush

The nice part about this plugin … it basically comes out of the box ready to run!

More than likely you will want to “smush” the images you currently have.

Unless you upgraded to the paid version, you'll only be allowed to “smush” 50 images at a time.  If you're working with a new website, you won't likely have that many images to worry about; it should be a relatively painless process!
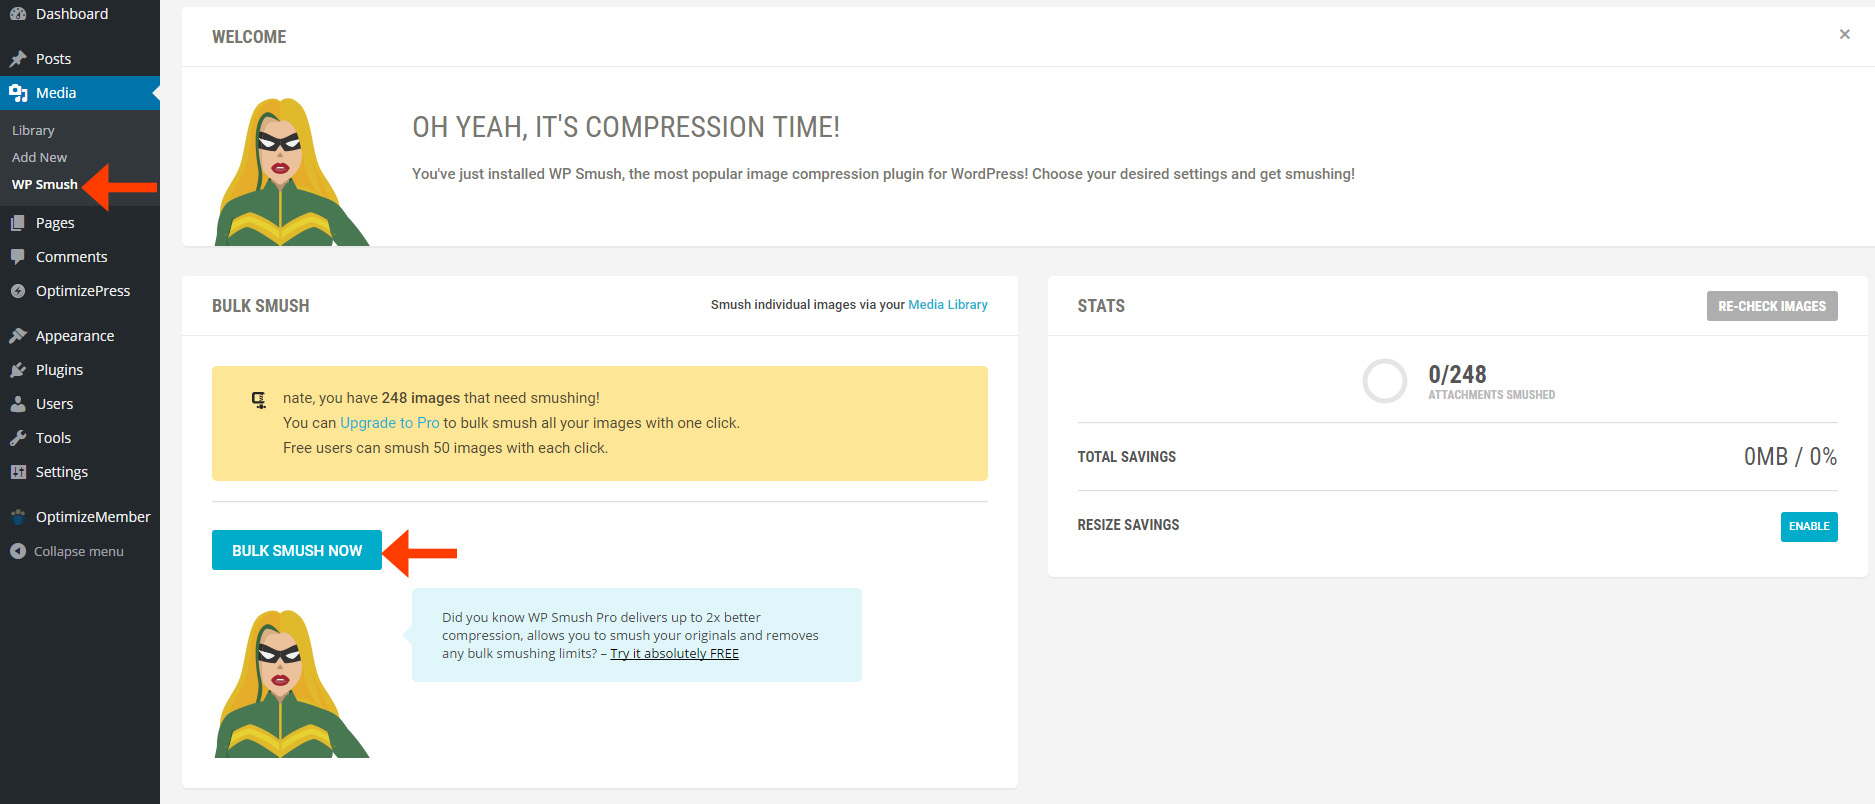
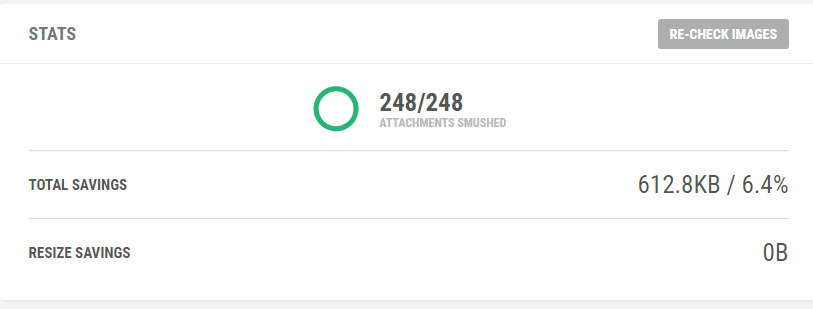
WP Smush - 2

Woo! Saved 6.4%!

WP Smush - 3

SUPER Boost With A CDN

Ok, this part is optional.  It will likely result in a few additional bucks per month; however, if you feel the need for speed, it's worth doing!

CDN stands for Content Delivery Network which is essentially a network of computers that delivers static files (images, scripts, css, etc.) very, very fast.

They're very fast because they perform based on geographic location and don't have to process (think) anything like your website server does … all they have to do is deliver what's already there. Hopefully that makes sense.

Anyway, we'll use Amazon's CloudFront CDN because it's fast and cheap.

The first thing you need to do is sign up for or into the Amazon Web Services Management Console.

Once you're in, you will come to a crazy screen like this:
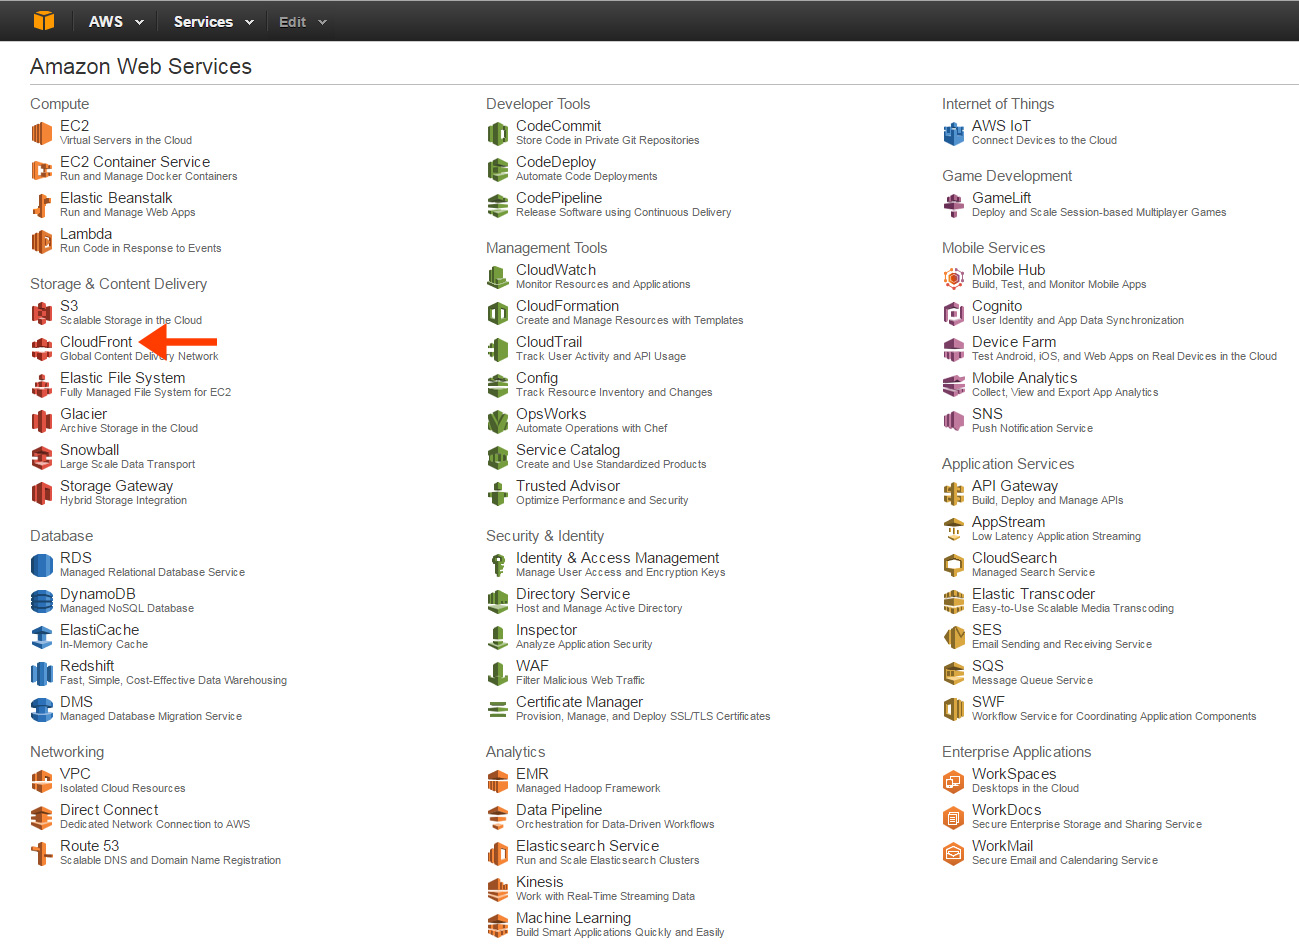
CloudFront

Find CloudFront and select it.

Click “Create Distribution” and it will ask “Web” or “RTMP” – you want “Web”.

In the “Origin Domain Name” text box, enter your full URL (ie. https://your-landing-page-domain.com).

Press “tab”.

Everything will auto-populate.

The only change you need to make is with “Origin Protocol Policy” – change it to “Match Viewer”.
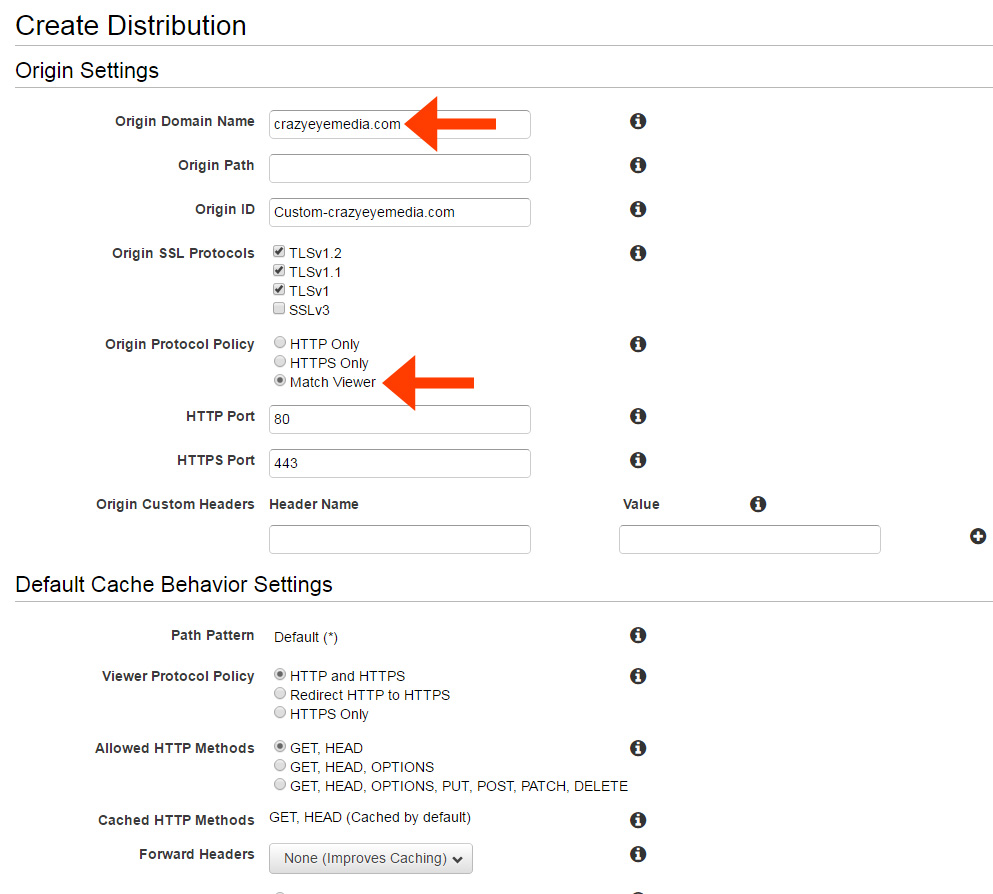
CloudFront - 2

Scroll all the way to the bottom and click “Create Distribution”.

You'll see a little spinny thing and it will take roughly 30 minutes to finish what it's doing.

Take a break. Go grab yourself some coffee or beer; come back in a little while!

CloudFront - 3

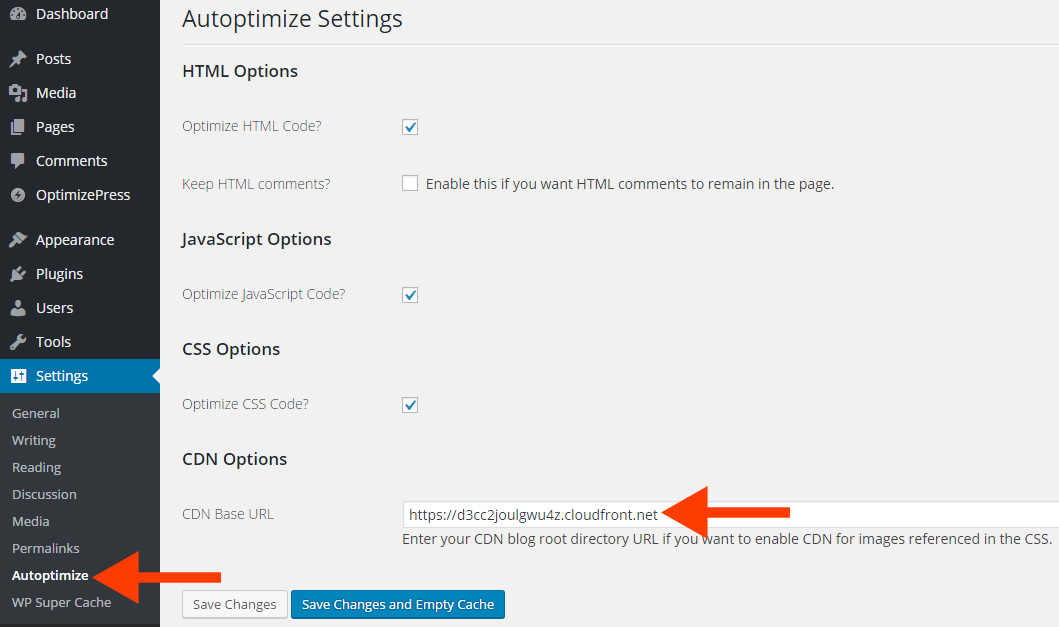
After the spinning stops, grab your CDN's link – ie. d3cc2joulgwu4z.cloudfront.net and head back over to your WordPress admin panel, go to Settings, Autoptimize, and find the CDN Base URL.

Enter your CDN's link, don't forget to add https:// and click Save Changes and Empty Cache.
CloudFront - 3.5

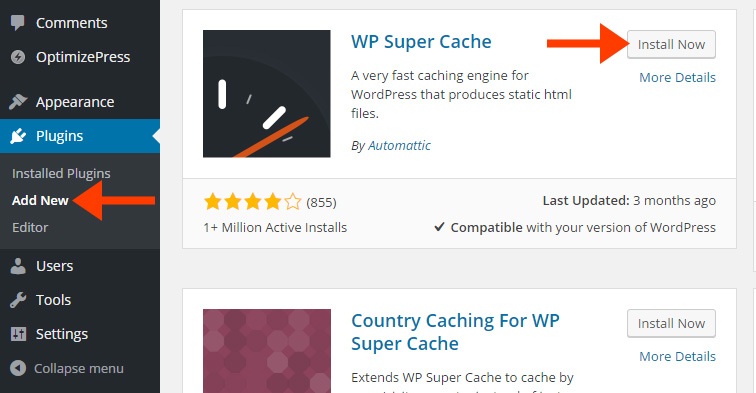
Now select “Plugins”, “Add New”, and search for “wp super cache” … then install and activate it.
CloudFront - 4v2

Ok, I'll be honest here – there are a lot of settings inside WP Super Cache that I don't quite understand … but, that's alright – because I know what works!

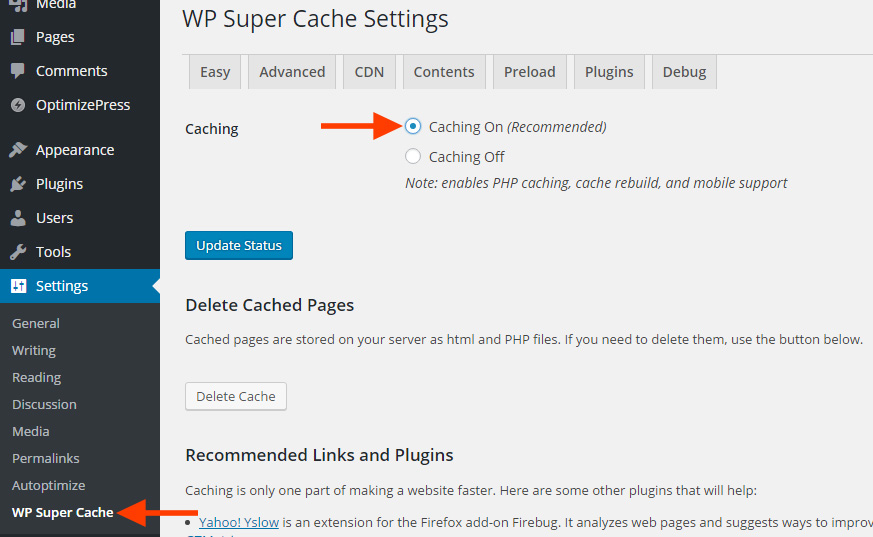
Find your way to the WP Super Cache Setting section and turn it on!
CloudFront - 5

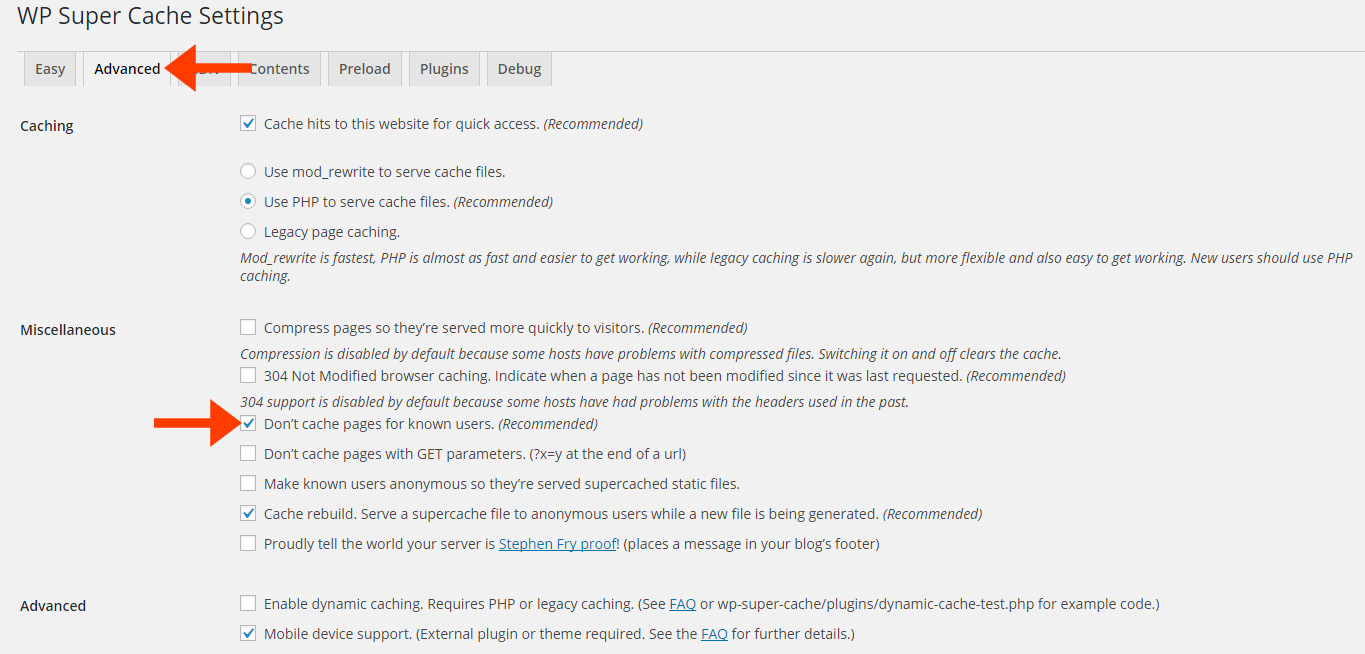
Under the Advanced Tab, leave everything they way it is with the exception of ticking the “Don't cache pages for known users. (Recommended)” box. Be sure to click “Update Status”.
CloudFront - 6

Navigate to the CDN tab.

Enable CDN Support and paste in the URL of your CDN. Make sure you add the https:// to the beginning! (ie. https://d3cc2joulgwu4z.cloudfront.net).

Click “Save Changes”.

You're done!

If you feel brave, you can tick other boxes inside WP Super Cache; however, every time I do, things start to break.

Check out the load speeds now 😛
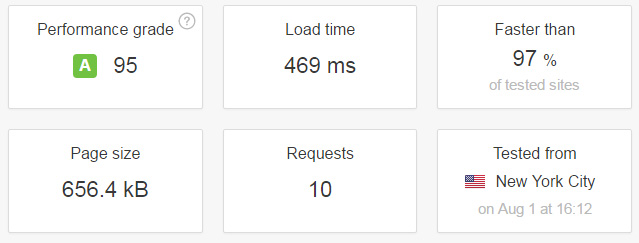
CloudFront - 8

>> Click here to download this post in PDF format

Membership, Digital Asset Delivery, and Taking Payments

This section is also optional; it only applies if you're wanting to take payments, run a membership portal, and/or deliver digital products.

NOTE: OptimizeMember is essentially the same thing as s2Member which means it's a really good membership plugin; however, it lacks one key feature when it comes to building funnels – the 1-click up-sell.

There are ways around this. For example, if you use ClickBank for your payment processor, you can do 1-click up-sells and it also offers built-in affiliate support – so, that's certainly an option.

You can also integrate with other platforms like SamCart, which add the 1-click up-sell functionality.

Finally, you may not even care about 1-click up-sells. You will still be able to offer One-Time-Offers (OTOs) and other up-sells … they just won't be 1-click!

I'm not going to show you how to build a membership site in this post as it's a separate topic … but, I'll get you pointed in the right direction.

Head over to your OptimizePress Members' Area, navigate to your downloads, and this time download OptimizeMember:
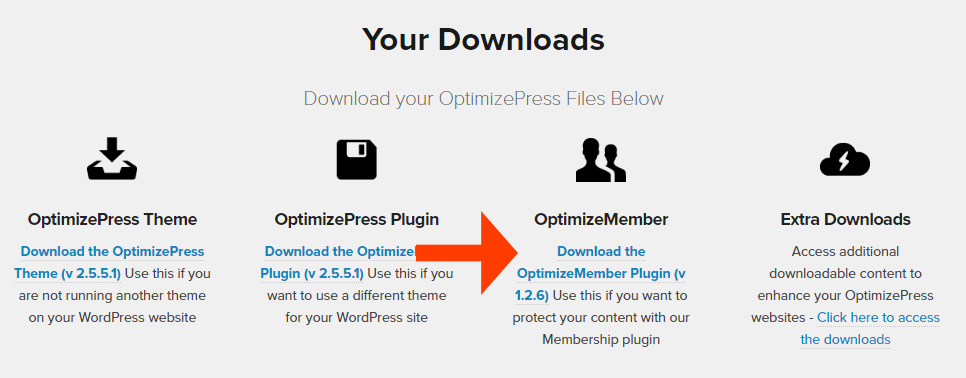
OptimizeMember - 1

Go back to your WordPress admin panel, navigate to Plugins, click Upload Plugin, and upload, install, and activate the OptimizeMember plugin you just downloaded.

After it's activated, you will see a warning message …

OptimizeMember - 2

BUT before we do what it says, go to Pages, Add New, call it “Join”, and click Publish.
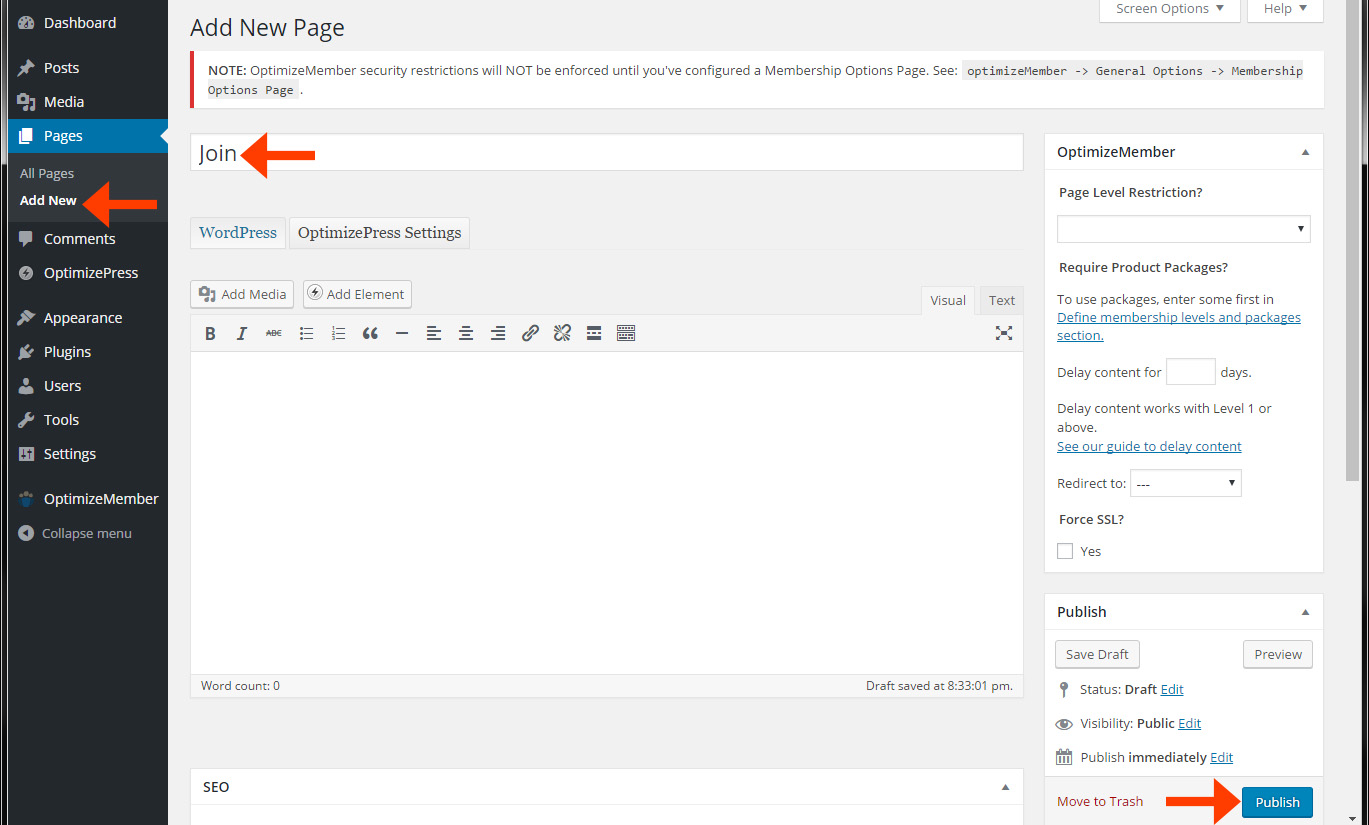
OptimizeMember - 3

Now follow the directions presented in the warning message. Select the “Join” page you just created from the drop down menu.
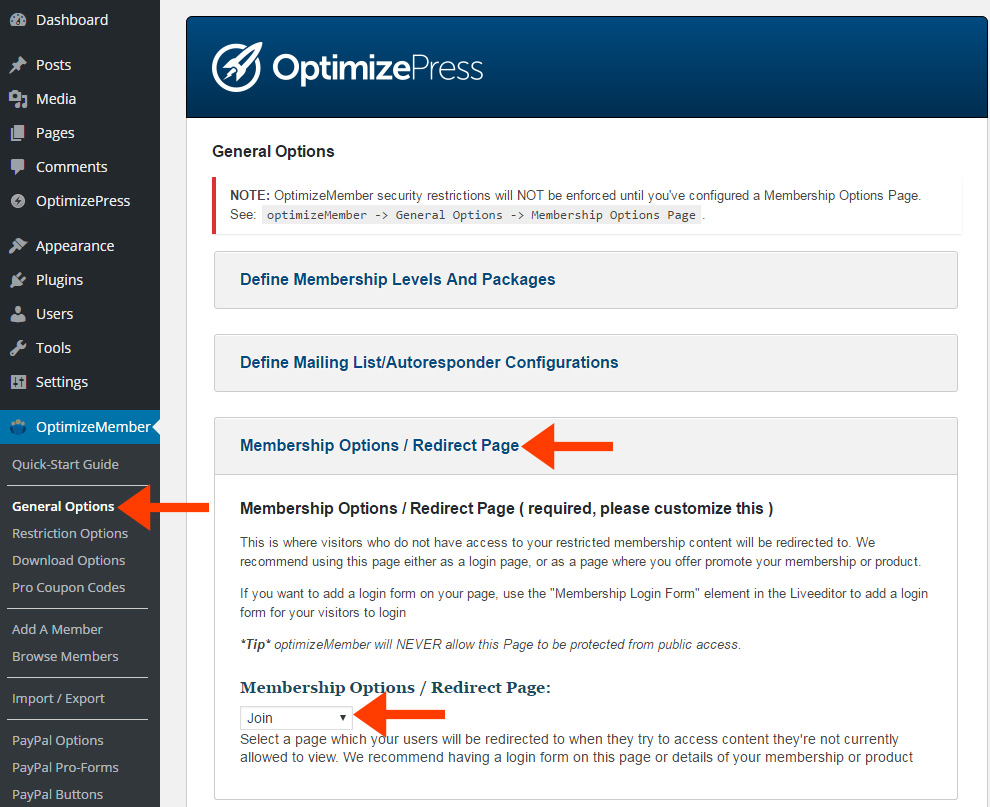
OptimizeMember - 4

Okie dokie!

That's all for right now!

Summary

At this time, you should have an insanely badass, self-hosted landing page platform!

One that goes above and beyond the competition.

One that is 100% under your control!

One that can integrate seamlessly with a bunch of autoresponder tools to include my favorite, ActiveCampaign.

Not to mention, it comes with a top-notch membership portal that can accept payments, deliver assets, and make you money all in one place!

You can't beat it!

>> Click here to download this post in PDF format

Moving Forward

Ok. I showed you how to setup your own landing page platform in the most efficient way I know.

Now, you need to learn how to actually use it!

The good news is it's an easy tool to learn and far easier than LeadPages (I don't understand why so many people recommend that tool, but I digress).

Of course, the folks at OptimizePress want you to be successful with their tool, so they have a bunch of tutorials.

I've also created an OptimizePess mini-course that will show you how to build an opt-in funnel with two different squeeze pages, a split test, and a Facebook pixel.

Don't Forget Strategy!

Finally, having a badass platform and knowing how to “technically” do everything can't fix a poor strategy.

For this reason, I highly recommend you take my free sales funnel training series!

How To Build Your Own Landing Page Platform2020-04-04T14:44:26+00:00

The Free Consultation / High End Sales Funnel

If you offer free consultations, or want to, this post is for you.

It'll give you an airtight strategy for scheduling more consultations and closing more sales.

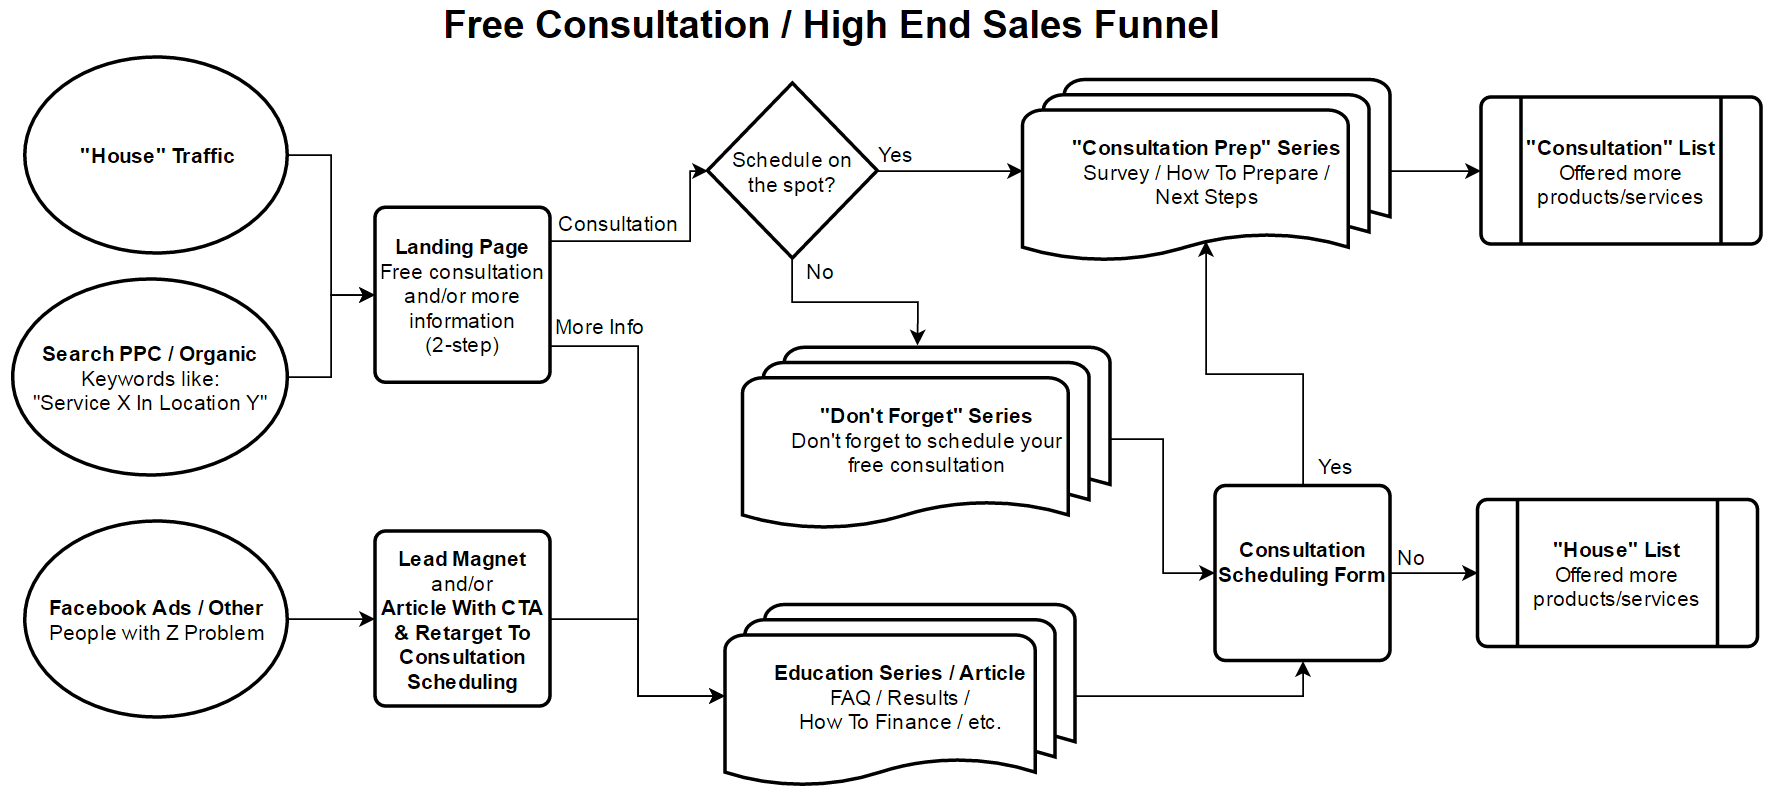
Let's get into it – I present to you The Free Consultation / High End Sales Funnel ~

Free Consultation - High End Sales Funnel

Scenarios

I'll use a few scenarios throughout this post to help better illustrate the funnel:

  • Dental Surgeon (DS) – Dental implants
  • Financial Advisor (FA) – Full wealth management
  • Marketing Services (MS) – Sales funnel service

Traffic

While there are a million and one ways to drive traffic to your sales funnel, I'm only going to focus on three categories for this particular funnel:

“House” Traffic

People that are currently on your email/contact list. They already have a general idea of who you are and what you do.

Search PPC / Organic

People searching for the service/solution you provide and arriving on your site in the process. This includes both paid traffic and organic (“free”/SEO).

  • DS – Dental implants near Richmond VA
  • FA – Financial advisor near Richmond VA
  • MS – Sales funnel service

Facebook Ads / Other

People that don't know you, but likely have a problem you can solve.

  • DS – People with dentures
  • FA – Physicians in the “fellow” stage
  • MS – Ecommerce businesses

Collecting Contact Info

The particular traffic source will set the stage for “how” you'll collect an individual's contact information and/or get them to schedule a consultation.

“House” & Search Traffic

Since these people know you and/or know they have a problem, you're able to ask them to schedule a consultation right away. There's little point in waiting.

For this reason, you will direct them to a dedicated landing page where they can schedule a consultation with you; however, I recommend giving the option to request to only receive more info as they may not be ready for a consultation.

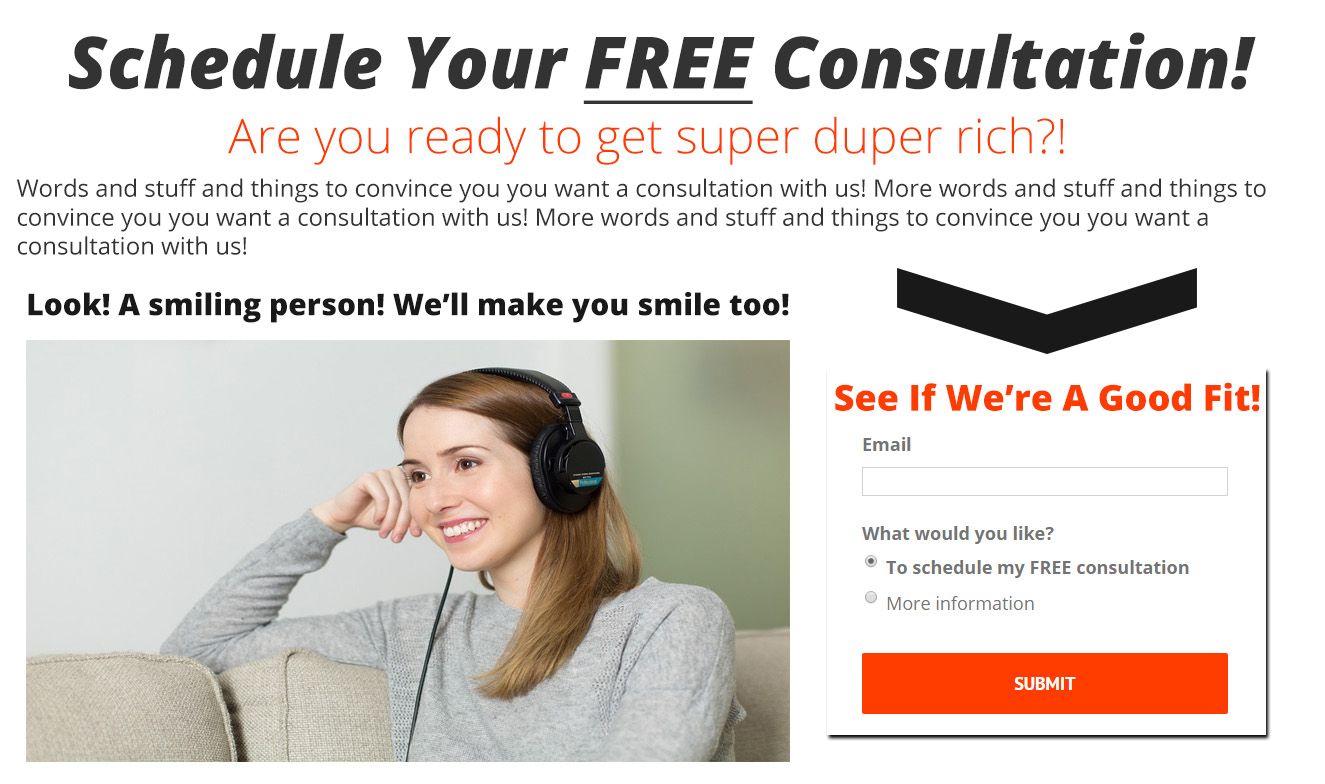
For example:

Free Consultation Landing Page

Upon entering their email, checking the “To schedule my FREE consultation” box, and clicking the submit button … two things happen:

  1. They'll be greeted with a form to fill out in order to schedule their consultation (I personally use and recommend https://youcanbook.me; however, there are a ton of similar services and I'm sure you'll find one that works for you).
    1. Note: Instead of going straight into the scheduling of a consultation you could instead implement an application process where you'll ask for more pertinent information to make sure they're the right candidate before scheduling a call.
  2. They'll be added to the autoresponder tool where they'll be tagged as “Wants a consultation”; however, this tag will trigger the “Don't Forget” Email Series in 24 hours, if they do not schedule their consultation. If they schedule their consultation within 24 hours, the “Wants a consultation” tag will be replaced with a “Scheduled consultation” tag, which will trigger the the “Consultation Prep” Email Series.

If the individual checks the “More information” box, they're added to the autoresponder tool with the tag ” Wants more information”. This will trigger the “Education” Email Series.

Facebook Ads / Other Traffic

You need to treat people that arrive on your site via Facebook and other traffic sources (other than your contact list and search traffic) differently for two main reasons:

  1. They probably don't know you, unless you're targeting your fans and/or are “recognized”
  2. They're not actively trying to solve their problem unlike when they are conducting searches on Google

Instead of hitting them with a “free consultation” offer, give them something else that re-iterates the fact they have a problem, to qualify them, and to establish yourself as an authority.

I'm talking about a Lead Magnet. Here are a few examples:

  • DS – Dentures vs Dental Implants – The definitive comparison.
  • FA – About to make the big bucks? Here are 5 investments you'll want in place before the cash starts rolling in!
  • MS – 7 sales funnel leaks 98% of Ecommerce stores have … and how to fix them!

Lead Magnet Tactics

There are two main ways you can handle the delivery of these Lead Magnets:

  1. Traditional – Make the Lead Magnet into a PDF or video, setup a squeeze page, and give it out in exchange for their email address
  2. Retargeting – Make the Lead Magnet a regular blog post or page on your site and run ads to your post. Then, retarget individuals that have seen your post with an offer to register for a free consultation and/or to receive more information (like the landing page example above). This method works because now they have a better idea of who you are, what you do, and the problem(s) they have.

Schedule On The Spot

As you see in the example Landing Page above, we only ask for their email and for them to check a box.

We don't ask them to schedule their consultation until after they've taken that first step.

Why?

Asking someone to schedule a call is a bigger “ask” than simply asking for their email. The individual will need to check their calendar to see when they're available, compare it to your calendar, then fill out a more in-depth form in order to schedule the consultation.

Because of all the extra “stuff” involved with scheduling a call, a lot of people won't set up the consultation right away.

They'll think to themselves, “I'll just do it later” … but, they wont … unless you remind them!

So, if someone says they want to schedule a consultation, but doesn't – follow up with a few reminder emails (“Don't Forget” Series) that direct them straight to the scheduling form.

Remember to re-iterate the benefits of the consultation, what they'll receive from the consultation, and how they have a problem that needs to be fixed.

While many people won't schedule the consultation right away – some will. Prep them with the “Consultation Prep” Series.

“Consultation Prep” Series

The “Consultation Prep” Series is a series of emails sent to an individual after they register for their consultation that “preps” them for the call.

You can give them something to read, ask them to fill out a survey that requests more information than what they gave when they scheduled the call, a read-ahead of questions you'll ask so they can have answers prepared, etc. Basically, whatever you need to send in order to make the consultation run smoothly.

“Consultation” List

The “Consultation” List is the list of individuals that have had a consultation with you. Ideally, the majority of these individuals will also be “buyers” and you'll have an established relationship with them. In this case, you'll have a normal client relationship that you'll need to maintain.

For the individuals that don't become “buyers” – treat them a little differently than the general public. They certainly know they want help in an area, but maybe they just weren't ready or maybe they didn't feel like YOU were the right person for them. Whatever the reason – they didn't commit.

And, while not everyone will be a perfect fit for YOU, they're serious enough to schedule a consultation and you can still help them get pointed in the right direction. Who knows, maybe that particular service wasn't a good fit for them; it doesn't mean the next problem they face wont require your services. Or, they may refer someone else to you if you help them the best you can.

“Education” Series / Article

The Education Series is a series of emails for the individuals that don't know you, what you offer, or their problems as well – the intent of the series is to educate them on those points.

This is accomplished by sending content that makes them aware of the problem(s) they're facing, the result of fixing those problems, handling objections like time and money, case studies, and other educational material that's helpful, informative, and motivates them to think the same way you do.

The point is to show the person they have a problem and you're the solution.

The call-to-action (CTA) is then to schedule a free consultation with you where you'll close the deal.

“House” List

No matter how hard you try, even with all the fancy email series and autoresponders, most people will not schedule a consultation with you. (If you happen to prove this wrong, let me know!)

It's OK, don't take it personally.

It doesn't mean they never want your help.

People are busy. People forget. People get distracted.

The ultimate point here is they've at least shown some interest in you, your business, the service(s) you offer, the problem they have … something … and you don't want to just let them wander off into the sunset.

For this reason, add them to your “House” List where you send more generalized content, recommend other products/services you offer, and continue building and maintaining a relationship with them.

Who knows, maybe six months down the road they will finally decide to fix the problem and schedule that free consultation!

Want More?

Do you want more awesome sales funnels like this one? Check out the Sales Funnel Training Vault!

The Free Consultation / High End Sales Funnel2016-10-14T18:29:10+00:00

The “Classic” Sales Funnel Model

There are many sales funnel models.

Some models are fairly general while others serve specific purposes like launching a product or conducting a webinar.

The model you use will depend on the product or service you're selling and you'll likely have many different sales funnels within your business.

For example, you may have a “Classic” sales funnel for selling your day-to-day products and a “webinar” sales funnel for your high-priced services.

The particular model we're going to explain today is what I call “The Classic”.

The “Classic” Sales Funnel Model

The Classic sales funnel model can be applied a number of ways and its design is dependent upon how and where it's applied.

However, the general idea remains the same: after the initial offer, there's another offer, and possibly a third follow-up offer.

The Classic sales funnel can be spread out and incorporate email automation OR it can be at the point of sale and function as a “checkout flow”.

Through the post, I'll walk through several examples and provide everything you need to know about “The Classic” Sales Funnel!

The “Mega Classic” Sales Funnel

Below is what I consider the “Mega Classic” sales funnel; it incorporates all the possible bells and whistles:

Classic Sales Funnel Blueprint

Let's walk through it, shall we?

  • Lead Magnet: A freebie like a coupon, checklist, cheat sheet, video, etc. that incentivizes people to enter their contact information, like an email address.
  • Offer #1: Immediately after someone opts-in for the Lead Magnet, they're presented with Offer #1. Sometimes this offer is referred to as a Trip Wire, Initial Offer, Self Liquidating Offer, or One-Time-Offer. I don't personally care what you decide to call it; however, it's usually a lower priced product that's too good to refuse and gets people to whip out their credit cards and hand you money.
    • Down-Sell: If Offer #1 is refused, the individual is presented with a down-sell. This could be a completely different product, or a payment plan or discount on Offer #1.
      • Email Series: If both Offer #1 and the Down-Sell are refused, the individual enters into an email series that focuses on selling Offer #1.
  • Offer #2: If the individual purchases Offer #1 at any point (initially, during the down-sell, or while in the email series), they're immediately met with Offer #2. Offer #2 is usually referred to as the “Core Offer” – it's usually your main product. It normally costs more than Offer #1; however, it doesn't necessarily have to – it could also be a complementary product.
    • Down-Sell: Just like the Down-Sell with Offer #1; however, it focuses on Offer #2.
      • Email Series: Just like the Email Series with Offer #1; only, it focuses on Offer #2.
  • Offer #3: If the individual purchases Offer #2 at any point (initially, during the down-sell, or while in the email series), they're immediately met with Offer #3. Offer #3 is usually referred to as the “Profit Maximizer” – it's usually the best product/service you offer. It normally costs more than Offer #2; however, it doesn't necessarily have to – it could also be a complementary product.
    • Down-Sell: Just like the Down-Sell with Offer #2; however, it focuses on Offer #3.
      • Email Series: Just like the Email Series with Offer #2; only, it focuses on Offer #3.
  • End: The funnel is complete and the individual returns to the Main Series (what's a Main Series?)

The “Core Offer Classic” Sales Funnel

As I stated above, the “Mega Classic” sales funnel I showed you is essentially everything you can do with a “Classic” sales funnel.

You won't likely need or want to do everything in the “Mega Classic”; it would be overkill.

Remember, the core concept of the “Classic” sales funnel is that after the initial offer, there's another offer, and possibly a third follow-up offer.

Here's what I call the “Core Offer Classic” sales funnel:

Classic Sales Funnel - Core Product

Ah, much cleaner!

Let's walk through an example and I'll use Crazy Eye Marketing as the scenario:

  • Lead Magnet: Our Top Converting Email Series – a PDF of our top converting email series for turning leads into paying customers.
  • Offer #1: The step-by-step course on how to implement the top converting email series we taught in the guide they just requested.
  • Offer #2: The Sales Funnel Training Vault, which is shown whether or not they buy Offer #1.
    • Down-Sell: If Offer #2  is refused, we offer a payment plan.
      • Email Series: If the Down-Sell is refused, we send 3 emails which provide an overview of The Sales Funnel Training Vault and a few case studies.
  • Offer #3: Sales funnel consulting/coaching services. This offer is shown whether or not someone purchases Offer #2 because, either way, people usually want assistance.

The “Trip Wire Classic” Sales Funnel

This next “Classic” sales funnel example is one that's really common and you've probably seen it outlined before.

I call it, the “Trip Wire Classic” sales funnel.

Classic Sales Funnel - Trip Wire

I believe the sales funnel model is relatively self explanatory at this point with the exception of Offer #1.

Essentially, there are two Offer #1s – A & B. Both are “cheaper” products that are hopefully too good to refuse, but may attract different types of people.

For example, someone requests the Lead Magnet and they're greeted with Offer #1A, but – they don't “need” what Offer #1A has to offer even though it looks like a really good deal, so they decline it. They're then presented with Offer #1B, which is also an amazing deal AND something they absolutely need, so they purchase it!

Whether or not they buy either Offer #1, they'll still flow to Offers #2 and #3.

The “POS Classic” Sales Funnel

Nope, I'm not referring to Piece Of [expletive] – I'm talking Point Of Sale, the “checkout flow”, I hinted at earlier.

It's relatively similar to the “Trip Wire Classic” sales funnel, but I want to present it another way.

Fast Food Example Sales Funnel

Look familiar?

McDonalds and most fast food restaurants are the kings of the POS sales funnel.

You walk in and order a burger, they ask if you want fries and a drink with that. You say yes; you don't want to be thirsty and fries are delicious. They then ask if you'd like to double your order size for only 30 cents. You don't need that much food because you know it'll make you sick,; you say yes anyway because it's such a good deal. Then they offer you some cookies, how can you say no to cookies? A hint of sweet to top off your meal – why not?! Finally, just as you think you're about done they ask if you want to round up to the nearest dollar and donate the difference to charity. You're not going to be the guy that doesn't support impoverished children's education … are you?! No.

Within about 10 seconds you've made your way through an entire sales funnel, ordered way too much food, and donated to a worthy cause.

Incredible!

Conclusion

There are many sales funnel models designed for various reasons.

“The Classic” sales funnel is one of the most popular models because it can be used in many situations to sell almost anything.

Just remember, the general concept is – after the initial offer, there's another offer, and possibly a third follow-up offer.

How you “move” people through, whether via email, at the POS or a combination of the two is up to you!

Are you ready to start building sales funnels? Checkout The Sales Funnel Training Vault!

The “Classic” Sales Funnel Model2016-11-17T16:28:11+00:00

The Ultimate Guide To Ecommerce Marketing Strategy

This is the most epic post I've ever written.

It's designed to hand you a full blown marketing strategy for your Ecommerce business that you can implement in less than 7 days.

It's highly actionable, which means you will have to do some work. Work yields results.

You want results.

To help assist you, I've put together a fill-in-the-blank document that can be downloaded by clicking the link below.

>> Click here to download the Ecommerce Marketing Strategy Worksheet & this post in PDF format

If this post fails to help you, it's because you didn't try.

The results you receive are 100% in your hands.

Let's get started.

The Master Plan

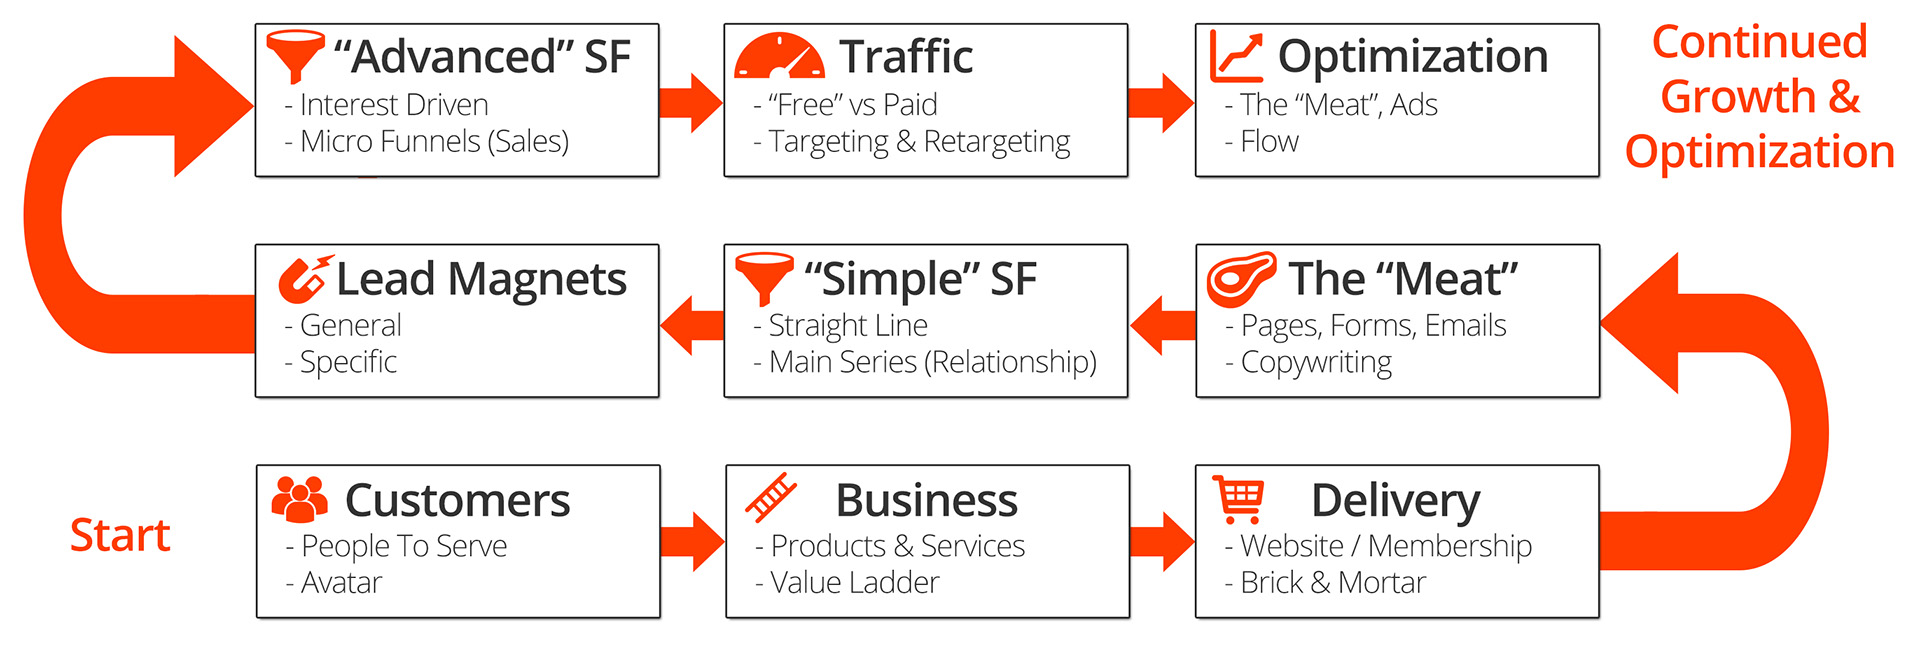
The Sales Funnel System

This is the master blueprint we'll be following to build your Ecommerce marketing strategy.

I urge you not to skip ahead to the “cool” stuff that involves automation, tracking, and other nifty tools. Yes, that stuff is fun; however, if you don't have the groundwork laid, you'll wind up spinning in circles and produce minimal results.

So, please, take the 60 minutes to define your customer and your business before moving forward!

Scenarios

I'll be using a couple model businesses in order to provide examples.

  • Ecommerce Store #1 – sells cordless power tools like drills, circular saws, blowers, etc. [example site]
  • Ecommerce Store #2 – sells women's clothing and accessories [example site]

Note: I have not worked for the example sites, they're simply to give you a visual.

Define Your Customer

There are many ways to define your customer. You can spend days developing the “perfect” customer avatar by conducting research, interviews, and brainstorm sessions, all while filling out a “map”.

Taking the time to do all this stuff is incredibly valuable; however, I know you … and you're not going to do it, so here are a few questions you NEED to answer before moving on:

  • What's your ideal customer's name? You need to give them a name!
    • James
    • Meghan
  • Where do they hangout? / How can you get in front of them? Online, offline, certain websites, forums, Facebook groups, etc.
    • Google, news websites (CNN, Fox News), direct mail
    • Snapchat, Instagram, Facebook
  • Where are they in the journey that is life? Baseline demographics, thoughts, desires, fears, etc.
    • Middle aged, established career (mid-level), has a house to maintain, a couple of kids, spends free-time with family and playing tennis.
    • Just graduated college, attempting to land dream job, single, wants to contribute to society, loves hanging out with friends on the weekends, enjoys adventure.
  • How do they see themselves? / How do they present themselves?
    • The provider and protector for his family. Dedicated family man. Knows what's going on in the world and has ideas how to fix it. Well read, smartest person in the room.
    • One cool, motivated, and forward thinking gal. Self disciplined, hardworking, and able to handle herself. Stylish and on trend. Successful.
  • How well do they know your products and industry? Do they “live” it, are they “new” to this world, etc.?
    • Knows about tools and which does what; however, doesn't know what makes one model “better” than the other.
    • This is her innate style. She knows the products like the back of her hand because she's shopped here many times.

That was easy, right?

All I'm looking for is a simple stream of thought about your ideal customer, that's it!

Customer FAQ:

Q: I have more than one ideal customer, how should I handle this?

A: Yes, you likely do have more than one ideal customer which is great, you'll ask yourself the same questions. I have two recommendations:

1) Make sure they're uniquely different. Make sure where they hangout is different, where they are in the journey of life is different, and how they see themselves is different.

2) Start with your top 1 or 2 ideal customers. The ones that are 80% of your business. You can always add more “ideal customers” later on, and I recommend getting the low hanging, obvious fruit first.

To Do

Answer the questions above.

>> Click here to download the Ecommerce Marketing Strategy Worksheet & this post in PDF format

Define Your Business

While we're about to talk extensively about the products and services your business offers, there's more to your business than what you sell.

You likely have a reason for being, a “why”, a mission, a purpose … something that made you launch your business.

Even if you originally started your business for the sole purpose of making money, after having customers and serving people, you've likely started to develop a purpose or mission – and that's OK.

Examples:

  • We make tool buying simpler. Our customers don't have to worry if X battery fits with Y tool, they'll be able to easily identify what goes with what.
  • We offer women unique, fashionable, and fun clothing that can't be found anywhere else.

Your Business's Personality

Unless you're a massive, global brand that's openly traded on the stock market and has hundreds of thousands of people to keep happy, you have the opportunity to stand out by injecting personality into your business.

In fact, in this day and age with competitors like Amazon, you're going to need personality to stand out from the crowd.

You can't simply be a generic Ecommerce business; you'll eventually starve.

Tips For Figuring Out Your Business's Personality

  • You be the personality. This one is pretty simple and obvious, especially if you're operating as a solopreneur. Let your personality shine!

That first one was a “gimme” as it's the easiest; however, if you have multiple people creating content for your business, you really need to take the time to figure out your business's personality so it stays consistent. Here are a few ways:

  • 1 or 2 steps ahead. Remember when you defined, “How your ideal customer sees themselves”? Be that person, but one or two levels ahead so you're positioned as the authority.
    • For example, I'm a dedicated family man and provider for my family, just like you; however, I'm also an independent contractor so I know these tools like the back of my hand
    • Another example, I'm a cool, motivated, and forward thinking gal that's self-disciplined, just like you; however, I've moved up the career path and am now a manager that's responsible for hiring, so I know what employers want to see.
  • Be just like your ideal customer. It's a fact, people like people like themselves. Be like your ideal customer on every level, “where they are in the journey that is life” and “how they see themselves”.

Your Products And Services

This step is important.

With Ecommerce businesses, there are two ways to think about your products and services:

  1. At the point of sale
  2. As a whole

Every Ecommerce business NEEDS to have the point of sale “stuff” figured out because it's the fastest and easiest way to increase order size.

The “as a whole” concept may or may not apply to your business in its current form. It's the holistic, high level strategy that encompasses your entire business.

At The Point Of Sale

You're going to have to map out your products, services, and how they're interconnected sooner or later and if you don't take the time to map them out now, you'll likely do a half-assed job later while you're piecing your funnel together.

So, for your sake, take the 30 minutes to get these pieces down!

Steps:

  1. Write down your top selling product across 3 different categories
    • Example, the “Journeyman Drill” in drills, the “Apprentice Saw” in circular saws, and the “Master Blower” in blowers
    • Example, the “Blue Dress” in dresses, the “Black Yoga Pants” in active wear, and the “Floral Print” in tops
  2. Write down the next level product up and/or down from the top selling product (up-sells and down-sells)
    • Example, for the drills, there's also the “Apprentice Drill” (cheaper than the “Journeyman Drill”) and the “Master Drill” (more expensive than the “Journeyman Drill”)
    • Example, for the active wear, there's also “Black Yoga Pants With A Stripe Down The Leg” (more expensive than regular ol' yoga pants)

Note: Sometimes it's hard to identify a “clear” up-sell and/or down-sell for a particular product, and that's okay. Sometimes the product is what the product is – there aren't higher or lower quality versions of it, it happens. Don't fret over not having up-sells and/or down-sells, as there will still likely be cross-sells!

Idea: Sometimes, more or less of a product can be the up-sell/down-sell.

  1. Write down all the products that complement the 3 product categories (cross-sells)
    • Example, drills (category) – drill bits, extra batteries, eye protection, hearing protection, stud finder
      • circular saws – saw blades, extra batteries, eye protection, level, ruler, etc.
    • Example, active wear (category) – shoes, watches, hair bands, sports bras
      • dresses – shoes, watches, purses, belts, sunglasses

WARNING: You can get too into the weeds here, especially if you offer a lot of products. I highly recommend keeping complementary products at the category level unless it makes absolute sense to go down to the product level. For example, let's say there's a magical drill bit that only works with one specific drill, and you really want to sell those drill bits, then OK. Otherwise, keep it at the category level or you'll drive yourself insane.

At this point, you should have 3 to 9 products written down from 3 different categories as well as a handful of complementary products for the 3 categories.

As A Whole

As I alluded to earlier, the Value Ladder concept I'm about to explain may not align with your business in its current form.

If your business doesn't “fit” this concept right now, it's fine. You should still take the time to develop a vague idea of what you “think” you want. You'll still have some direction this way.

Other businesses may already embody this concept, which is awesome! However, I still want you to read this section and write down what you have in place.

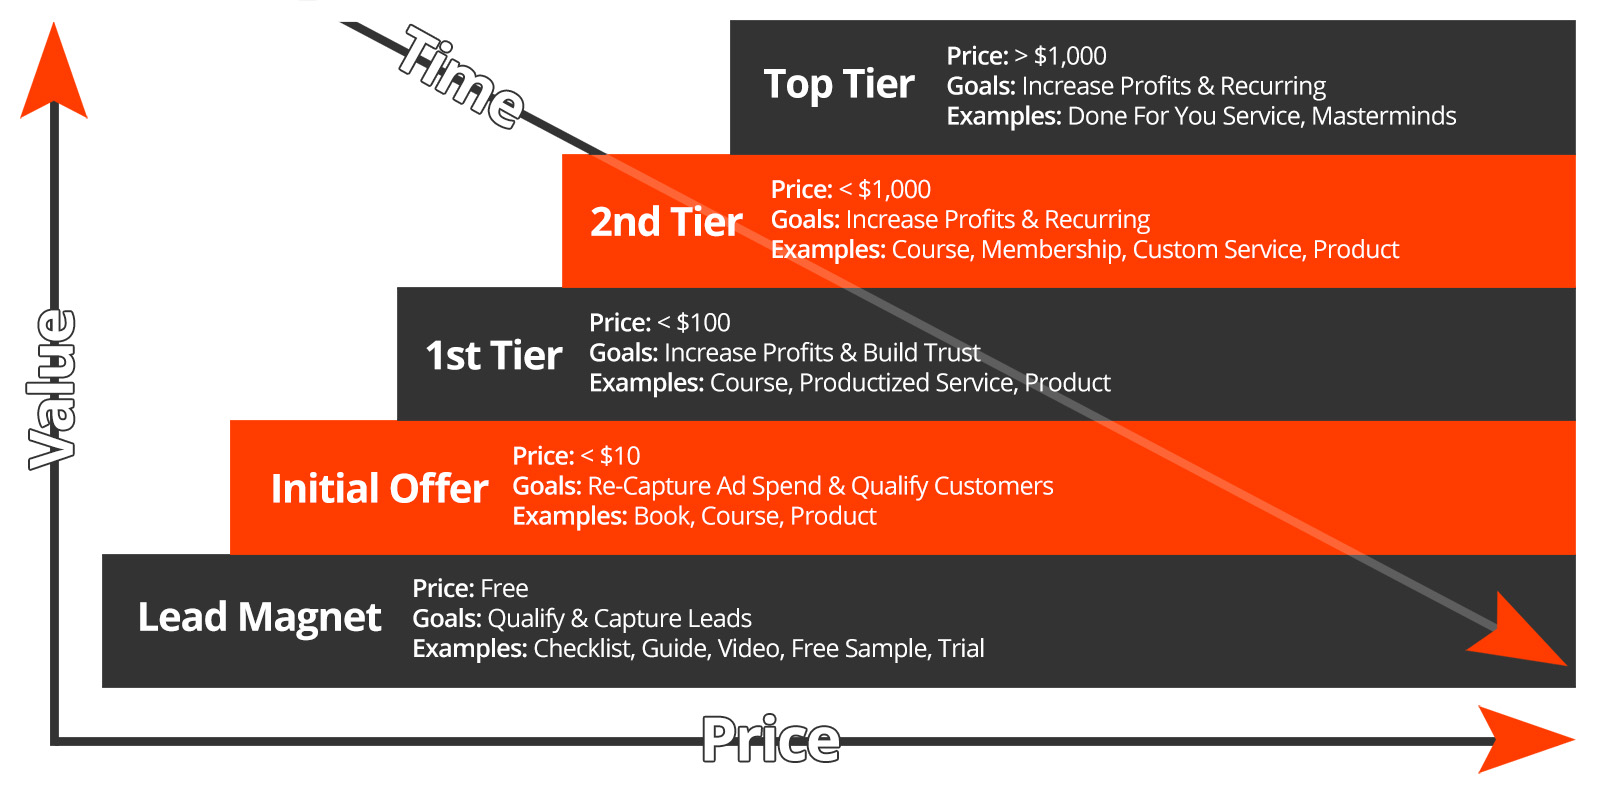
The concept of a Value Ladder, is simply your products and services mapped in ascending order of value and price that is normally delivered over the customer's lifetime with you.

Think of it like this:

Value Ladder

I'll address Lead Magnets in greater detail later in this post; however, for the time being, think of them as a “freebie” (like a coupon) you give to prospective leads and customers in exchange for their contact information.

Initial Offers are lower priced products that are supposed to be irresistible and “get people in the door” and give people a “taste” of what's to come. Normally, the goal is to break even on initial offer products.

1st Tier Offers are the first set of products that will net you a profit. They're probably less than $200 and likely bring in 80% of the sales.

2nd Tier Offers are the “next” level products to the 1st Tier. They're normally “what people need” after the 1st tier has been completed.

Top Tier Offers are the “end all, be all” of what you have to offer. They're the kitchen sink and the best you've got.

Examples:

Cordless Power Tools Store

  • Lead Magnet: 20% off coupon
  • Initial Offer(s): House Maintenance For Dummies book, simple project kits to build with kids (like a birdhouse kit)
  • 1st Tier Offer(s): Cordless power tools (drills, circular saws, blowers, etc)
  • 2nd Tier Offer(s): High end toolboxes, work benches, etc.
  • Top Tier Offer(s): Custom built workshop sheds

Women's Clothing And Accessories Store

  • Lead Magnet: 20% off coupon
  • Initial Offer(s): Sunglasses, T-Shirts
  • 1st Tier Offer(s): Sun dresses, swim suits
  • 2nd Tier Offer(s): Business attire (suits, dresses)
  • Top Tier Offer(s): Formal wear, wedding dresses, etc

I want to clarify something, people do not have to ascend in this fashion. Some people will show up and want the Top Tier product right away – that's awesome, sell it to them! Other people will only buy 1st Tier Offers, while others will only buy the Initial Offer and then vanish. It happens.

However, in an ideal situation, you'll want to be able to provide value to your customers at every level you possibly can. If there's going to be something else they need from your type of business, you might as well be the one to give it to them, or they'll wind up going elsewhere!

To Do

  • Write down your business's “why” (why do you exist?).
  • Write down, “who” your business is going to be (its persona).
  • Write down your Point Of Sale products (you should have 3 to 9 products [top seller + up-sell/down-sell] written down from 3 different categories as well as a handful of complementary products for the 3 categories.)
  • Write down what your Value Ladder is, what you “think” it is, or where you want it to go.

>> Click here to download the Ecommerce Marketing Strategy Worksheet & this post in PDF format

Delivery

As an Ecommerce business, your “delivery system” is already setup, ie. your store.

However, there's a couple things you should do RIGHT NOW that'll directly increase revenue:

1) Add Up-Sells, Cross-Sells, Down-Sells, And Bonuses To Orders

“People who bought this also purchased this.”

“Don’t Miss This Limited Time Offer!”

“Spend $3.37 more to qualify for free shipping.”

You’ve seen these lines used many times in many places. Why? Because they work. Are you using them?

If you mapped out your “Point Of Sale” products (the top selling products in 3 different categories and their up-sell/down-sell versions, plus the cross-sell products for the 3 categories) like you were supposed to 😉 , this part should be a piece of cake!

Depending on your business, how it’s setup, and the platforms you use – the implementation method will change; however, it’s certainly worth figuring out!

Fortunately, many shopping cart platforms have this functionality built in or have plugins that make this a piece of cake:

2) Add A Cart Abandonment Email Series

According to the Baymard Institute, 67.19% of shopping carts are abandoned.

67.19%!!!!!

While there are a hundred reasons a person doesn’t finish checking out – their credit card is upstairs and they’re downstairs, they’re at work and don’t want to enter their credit card info on a work computer, etc … one thing remains true, you’re missing out on sales.

After reading through about 15 case studies on cart abandonment recovery, it appears roughly 10% or more abandoned carts can be “won back” by simply sending a few reminder emails. A plugin can handle this automatically.

Like the up-sells, cross-sells, down-sells, and bonus options, the “how” will change depending on your system; however, being able to recover 10%+ of your lost sales makes it well worth figuring out!

To Do

  • Add up-sells, down-sells, cross-sells, and bonuses to your store
  • Add a cart abandonment email series to your store

>> Click here to download the Ecommerce Marketing Strategy Worksheet & this post in PDF format

The “Meat”

The “Meat” represents all the content your sales system consists of. This includes …

  • Sales Pages / Product Listings
  • Squeeze Pages / Landing Pages / LeadPages (whatever you want to call them)
  • Emails
  • Blog Posts
  • Social Media Posts
  • Everything…

All content needs to have a purpose. Whether the purpose is to sell a product or service, capture contact information, position yourself and your business as the authority, make someone laugh, whatever … it needs a reason for being.

If you're doing things to “check the box” or putting out bland, generic content – STOP! You're wasting your time.

I see too many businesses start blogs and write utterly useless, uninteresting crap. Or, even worse, they pay some guy or gal in the Philippines $6 for 1,000 words of pure, unintelligible garbage to try and “please” the almighty Google.

You're not going to please Google and you're not going to please people (which are more important than Google as they have the cash).

Everything you do and create needs to have a purpose.

The best way to understand this “purpose” is by studying the art and science of copywriting.

In simple terms, copywriting is a form of written or spoken word that convinces people to take action – ie. buy stuff.

It's very intentional and purposeful.

You Need Copywriting Skills

While you will not develop great copywriting skills overnight, or possibly ever if you don't work at it, it's still a concept you need to understand.

Knowing how to spur action with written word is critical to your Ecommerce store's success.

Ok, I'll get off my soap box now and get to some actionable stuff you can apply today!

Copywriting Tip #1

Write to your ideal customer.

Always consider where they are in life, what they're going through, how they see themselves, and how well they know your products and industry.

If your ideal customer is someone that's brand new to your business and industry, you'll likely need to be more educational and descriptive in your content, as opposed to someone who “knows” your business and industry. If your ideal customer “knows” you, you can be more entertaining, share inside jokes, etc.

Copywriting Tip #2

Write from your business's persona (you should have figured this out earlier 😉 ) – write how they talk.

This means using pronouns like I, me, you, we, he, she, etc.

This means using slang, jargon, and emotion like … (ellipses), YOLO!, naw, etc. (Of course, use what makes sense for your ideal customer. If you sell life saving medical supplies, being “goofy” probably isn't the best idea)

This means asking questions of the reader like, “Do you understand this copywriting “stuff”?”

People like doing business with people, so, be a person!

Don't be a generic machine. You're not a news source, you don't need to be some “better than thou” figure that doesn't have emotion.

Copywriting Tip #3

Remember when you defined where your ideal customer is in the journey of life and how they see, or present, themselves? (I hope so!)

What you need to do is take “where they are now”, “how they see themselves”, and bridge that gap with your product or service.

This is a marketing formula, aptly called, the Before-After-Bridge.

And, just because it's called the “Before-After-Bridge” formula doesn't mean you necessarily have to structure your words in that manner. Ultimately, you want to connect your product to how people see themselves.

Examples:

  • You may be tired after a long day at work; however, your kids are going to love building this birdhouse kit with you!
  • We know you're one hardworking, successful gal. But, do you look it? Show up to the office in our Blue Dress and look the part!

Copywriting Tip #4

Another marketing formula that works wonders and is easy to understand is the Problem-Agitate-Solve formula.

It first defines the problem, then addresses the pain/feelings/emotions caused by that problem, and then solves the problem with your product.

Examples:

  • Is your wife nagging you about hanging pictures on the wall? Grab our Journeyman Drill with a free level and ensure your pictures are straight! No more nagging!
  • Tired of job interview after job interview? That can really hurt your confidence going into future interviews, but there's good news! If you look good, you feel good – our Black Pant Suit will give you the confidence you need to really nail your next interview!

Copywriting Tip #5

List the features of your product, then say “which means”, and write that answer down. Ask “which means” again. And again. Pick the best one and list it as a bullet on your sales page, product listing, etc.

Examples:

Cordless Power Drill

  • “Lightweight and compact design” which means “it's easy to maneuver” which means “it easily fits into narrow spaces” which means “there's nowhere too small or narrow for you to drill a precise hole”.
  • “Lithium Ion Technology & 20V MAX” which means “the battery lasts 10 hours on a single charge” which means “you don't have to worry about charging it every time you want to use it” which means “it's ready when you are”.

Yoga Pants

  • “87% Nylon 13% Spandex” which means “they feel nice and stretchy” which means “you'll be comfortable when you workout” which means “you'll get in a good workout and reach your fitness goals quicker”
  • “Moisture wicking” which means “you won't be basting in your own sweat” which means “you won't smell bad” which means “people will appreciate you”

Ok, sorry about that last one … I feel weird talking about women's yoga pants and should have chosen another product, alas I did not! However, I believe the concept was still clear.

The “Other” Stuff

If you understand copywriting, or at least the concept of producing content with purpose – the “other” stuff is technical.

How to create opt-in forms, pages, design emails, etc. is all technical. Sure, it takes time to learn and understand; however, it's not what's truly important because tools will come and go.

There will always be a new social media platform, or a new way to contact your customers, or a better Ecommerce platform, but copywriting and having a purpose behind your content is what truly matters. It's the meat and potatoes.

Learn everything you need to about the “other” stuff by joining The Sales Funnel Training Vault!

To Do

Armed with your newly found copywriting skills I want you to review the 3-9 products you identified earlier (the top selling products in 3 different categories and their up-sell/down-sell versions) and, if they're lacking on copy – update them!

As time permits, do the same for the complementary products you identified earlier.

Ultimately, you should review and update all product listings and sales pages.

>> Click here to download the Ecommerce Marketing Strategy Worksheet & this post in PDF format

The “Simple” Sales Funnel

The “Simple” Sales Funnel or “Straight Line Sales Funnel” is simply a fancy way of saying “email autoresponder series.”

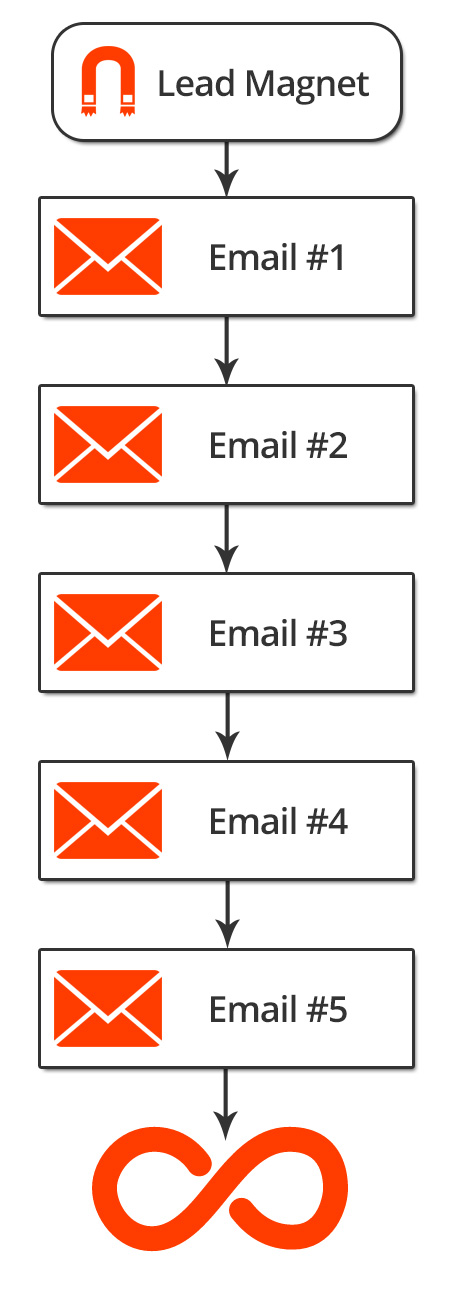
An email autoresponder series is a series of emails automatically sent to a subscriber.

While email autoresponder series and automations can be very complex, as we'll discuss later with the “Advanced” Sales Funnels section, in this “Simple” section we're only going to talk about sending emails in a straight line.

Think of it like this:

Straight Line Sales Funnel

What's The Point?

I'm glad you asked! We're building this email series for a few reasons:

  • This email series will automatically build and maintain a relationship with your leads and customers while simultaneously converting them to your way of thinking
  • This will serve as the backbone for more complex email automations we'll later build on
  • Your personal understanding. If you have trouble making emails trigger in a straight line, when we get into more advanced topics you'll really struggle

How Many “Simple” Sales Funnels Should You Have?

Most of the time, you will only need one. The type of content you send in this funnel will be interesting to people interested in your type of business or industry.

For example:

  • People who are interested in home repairs
  • People who are interested in women's fashion

There are a few instances where you may need 2 or more, for example if you sell nutritional supplements, your customers are tremendously different. One half of your market may only be interested in losing weight while the other half is interested in gaining weight and putting on muscle (complete opposites). In this case, you would likely want 2 different “simple” sales funnels.

If you have more than one “simple” sales funnel, you'll need to segment individuals at the very beginning by asking them “who” they are.

What Type Of Content Should You Send?

Remember, the point of this particular sales funnel is to build and maintain a relationship and convert them to your way of thinking.

To accomplish this, send 3 types of emails:

  1. Educational – emails that teach people how to do something, about the market, about what's happening, etc.
  2. Entertaining – emails that are “fun” like inside jokes, critiques, testimonials, events, etc.
  3. Earning – emails that remind people you sell stuff like deals, top selling products, etc.

I've aptly named these emails the “3 E Emails”.

Now, this doesn't mean an email can only be 1 of the Es at a time. Like, you can only send a boring how-to tutorial, or only send a silly cat video. That's not what I mean. Your how-to tutorial should be entertaining and can even sell your product at the end. That's like killing 3 birds with one stone!

However, each email should have 1 core focus.

Is the primary aim of the email to educate, entertain, or earn?

  • Educational emails tend to build relationships while converting people to your way of thinking
  • Entertaining emails tend to build and maintain relationships
  • Earn emails tend to ring the cash register

Examples:

Cordless Power Tools Store

  • Educational: Send a link to a video on how to properly find a stud in the wall. Have an entertaining host and sell a stud finder at the end of the video.
  • Entertaining: Share a success story where a father and his son built a birdhouse together with one of the kits you sell; they then enjoyed watching the birds build their nest and watching the babies learn to fly.
  • Earn: Here's a 10% off coupon available for the next 48 hours.

Women's Clothing And Accessories Store

  • Educational: Talk about what's “in fashion” this season. Be entertaining in the process while also selling the latest fashion.
  • Entertaining: Send a “who wore it better” with side by side comparisons of people wearing your clothes. Depending on your brand and personality, this could be really silly like comparing a female in a dress compared to a male in a dress.
  • Earn: Here are our top selling items across 3 different categories.

Where Do You Get Content?

Ideally, your emails will bring people back to your website and your store. Of course, this requires a blog or pages setup to present the content.

If you lack your own content, I recommend you change that ASAP.

And remember, content doesn't necessarily mean blogging. While you still want to display the content on your site to “bring people back”, it can mean, video, audio (podcasts), images, etc.

For example, if my brother is your target audience, blogging is a terrible idea. He doesn't read anything and you need to draw him in with video.

HOWEVER, and it's a pretty big one – Google can't really “watch” videos. It won't matter how good your video content is from a search engine perspective. Blogging is still the #1 way to rank in the search results.

The Most Epic Blogging Strategy Of All Time

  1. Write the most epic post for your ideal customer, as it relates to how they see themselves and how it relates to your business/industry. If that is too esoteric, think of it as, “How does your business help people go from point A (where they are now) to point B (where they want to be/how they see themselves).” (3,000+ words)
    • 101 Home Improvements You Can Do With Just A Few Tools
    • Your Complete Summer 2016 Fashion Guide
  2. Write more in-depth articles for each individual section of your “epic” post. (500-1,000 words)
    • 9 Steps To Fixing A Leaking Faucet
    • Why Bright Colors Are “In” This Summer
  3. Write case studies, testimonials, reviews, etc. and/or create videos and/or pdf checklists for each of the “more in-depth” articles. (500-1,000 words and/or 3-5 minute video and/or a 1 page checklist)
    • A video tutorial that shows how to fix a leaky faucet
    • An article and picture gallery of 10 “hot” celebrities wearing bright colors

Of course, you link your products as they “fit” the particular articles.

How Often Should You Email?

As often as is necessary.

Wow, Nathan – that's helpful.

This answer varies from industry to industry; however, normally – two to four times a week. The first 3-5 emails are sent daily, no matter what, because this is when the lead is “hot”.

During the “Advanced” Sales Funnel portion, there will be more instances where you email daily because the lead will “tell” you they're “hot” again.

To Do

  • Write down 3 EPIC blog post ideas

>> Click here to download the Ecommerce Marketing Strategy Worksheet & this post in PDF format

Lead Magnets

A Lead Magnet can best be thought of as the freebie or offer that motivates individuals to give you their contact information.

Many times, in the Ecommerce world, a coupon or discount works well as a Lead Magnet.

A few more Lead Magnet examples include videos, guides, checklists, and webinars.

There are two types of Lead Magnets:

  1. General
  2. Specific

General Lead Magnets

A General Lead Magnet is attractive to anyone who visits your Ecommerce store and is usually presented as a form on most pages of your site. The form can be a lightbox, bar/ribbon, landing mat, sidebar, slide-in, etc.

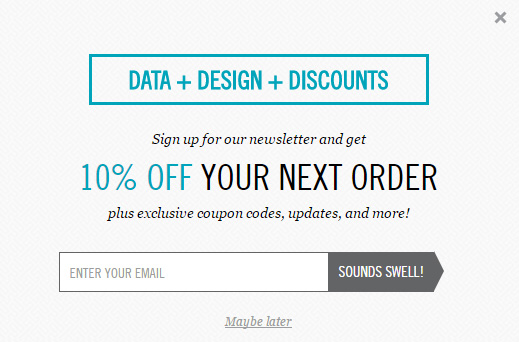
For example:

Lightbox Lead Magnet Example

From Pop Chart Lab (lightbox on homepage)

Anyone that visits this particular store will likely be interested in 10% off their order.

Specific Lead Magnets

A Specific Lead Magnet is attractive to individuals interested in a certain product or category of products and many times is presented as a Squeeze Page (although, this isn't always the case).

What's a “Squeeze Page”?

A Squeeze Page is a page dedicated to one thing and one thing only – “squeezing” the email address (and possibly other contact info) out of a visitor, turning them into a lead.

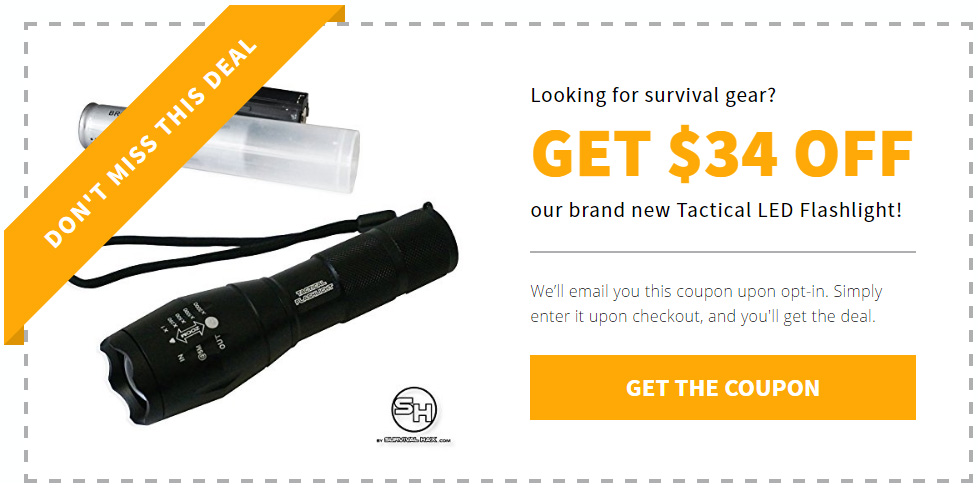
Here's an example:

That's an entire page. The only option is to click the “Get The Coupon” button which opens an opt-in form and requests an individual's first name and email.

Only people interested in receiving that specific flashlight would be interested in requesting the coupon.

99% of the time, paid traffic should be sent to dedicated Squeeze Pages like the example

You can follow up with emails that “push” the particular item to individuals that don't buy right away.

In addition to Squeeze Pages, you can present opt-in forms that present Specific Lead Magnets.

For example, if someone is looking at cordless drills, you can present a lightbox opt-in form with a Specific Lead Magnet for 20% off the purchase of a cordless drill.

Coupons Aren't Always The Best Option

I know I just mentioned 2 different Lead Magnets – 1 general, 1 specific that were both coupons; however, coupons may not be the best Lead Magnet.

The only time a coupon is needed is when someone is about to checkout. Not everyone wants to checkout right away. Sometimes, people just want more information. If you offered a coupon to those just looking for information, you'd miss out on collecting their contact information, building a relationship, and making a sale.

The point is, sometimes a video or checklist lead magnet will perform better in the long run than a coupon.

To Do

  • Write down 3 General Lead Magnet ideas
  • Write down 3 Specific Lead Magnet ideas (probably for your top selling products)

>> Click here to download the Ecommerce Marketing Strategy Worksheet & this post in PDF format

The “Advanced” Sales Funnel

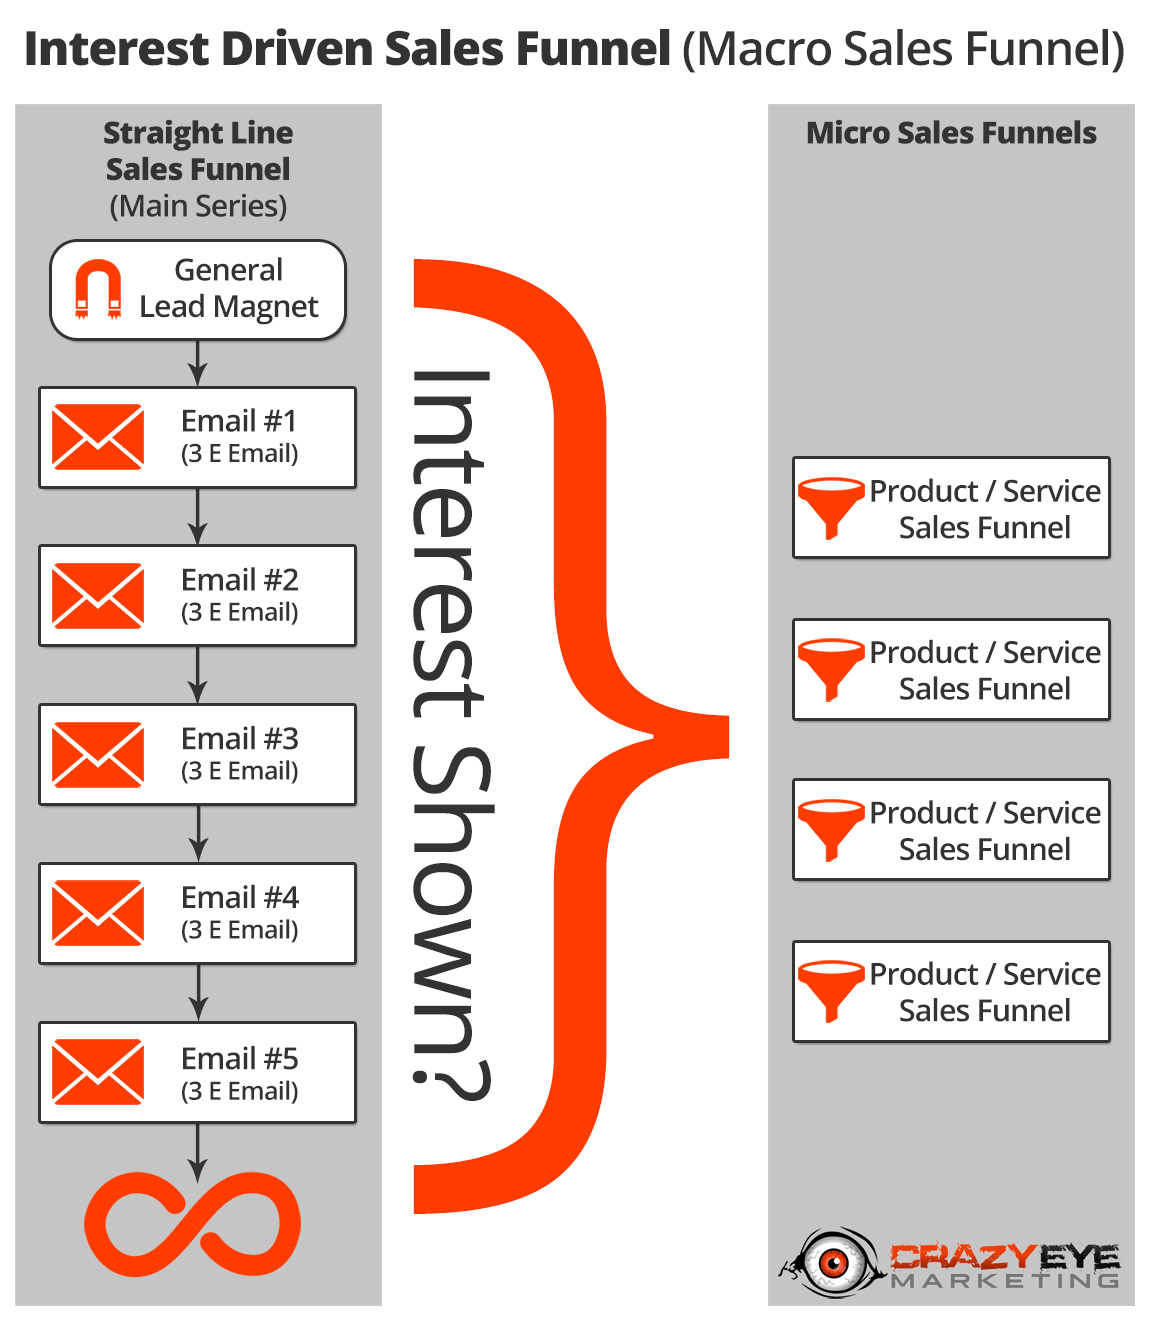
The “Advanced” Sales Funnel is driven by interests, hence, it's other name the “Interest Driven Sales Funnel.”

Essentially, people join your email list and based upon which links they click, pages they view, and lead magnets they request – you'll send relevant emails in order to try and sell a product.

Here's what an Interest Driven Sales Funnel looks like:

Interest Driven Sales Funnel

As you see on the left hand side you have your “Simple” or “Straight Line” Sales Funnel (also called the “Main Series”).

As previously mentioned, this autoresponder series acts as the backbone for your Interest Driven Sales Funnel. As it sends emails that follow the 3 E strategy, it automatically pays attention to how people respond to certain emails.

If people respond a certain way (show interest), a “Micro Sales Funnel” (Product / Service Sales Funnel) will automatically trigger. The point of the Micro Sales Funnel is to sell a product or service.

You will likely have lots of Micro Sales Funnels. Ideally, one for each category of products you offer and in some instances, individual products will have their own.

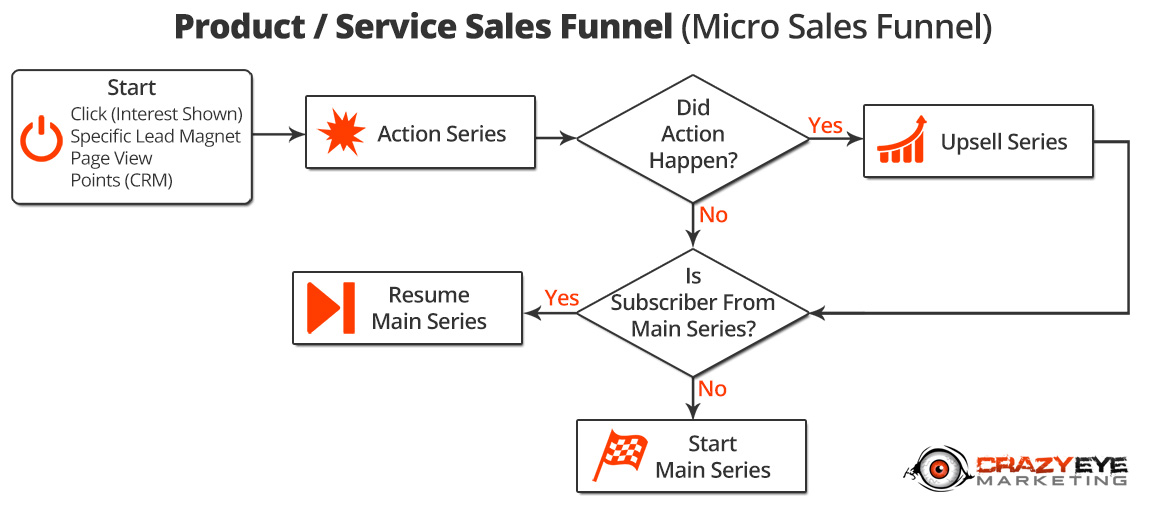
Here's an example of one:

Product Service Funnel

A Micro Sales Funnel may differ from the above example based upon what you're attempting to sell, your Value Ladder, and your approach.

Quick Explanation

No matter what the Micro Sales Funnel looks like, the start and end will look the same.

The Start

The Start occurs when an individual shows interest in a product you offer or a topic you talk about. We can gauge interest by tracking their link clicks, Specific Lead Magnet requests, page views, and via points (if you use a CRM).

The End

The End occurs when an individual has gone through the entire Micro Sales Funnel. If the individual went straight into the Micro Sales Funnel by requesting a Specific Lead Magnet and they have yet to enter the “Main Series” (Straight Line Sales Funnel) – they'll now enter the Main Series starting at the beginning.

If the individual was in the Main Series, showed interest in a product by clicking a link, and entered a Micro Sales Funnel – upon entering the Micro Sales Funnel, their “trip” down the Main Series would have been paused, and upon exiting the Micro Sales Funnel, they'd resume their “trip” down the Main Series.

The Rest

Action Series

A few emails that attempt to drive action, ie. a purchase of the product or category of products the individual has shown interest in.

Did Action Happen?

If the desired action was taken, go to the Upsell Series.

If the desired action was not taken, go to The End.

Upsell Series

An email or two that attempts to sell more, usually complementary, products.

Examples

Cordless Power Tools Store

An individual joins the email list by opting in for a Specific Lead Magnet that offers 10% off all cordless drills. Being that the coupon is only for cordless drills, we know they're interested in them.

We then send 3 emails that talk exclusively about cordless drills.

  • Email 1: Features of a “good” cordless drill
  • Email 2: The differences between our top 3 selling drills
  • Email 3: Reminder that the 10% off coupon will expire in 24 hours

Let's pretend that on Email 2 they purchase one of our drills. We then end that series (we won't send email 3) and launch into our Upsell Series where we send 2 emails that attempt to sell complementary products.

  • Email 1: 3 pieces of gear you need to get the most out of your drill (sell drill bits, safety goggles, and a level)
  • Email 2: Offer a 10% off any complementary pieces of gear

After completing the Upsell Series, they enter our Main Series from the beginning where we begin to build and maintain a relationship and gauge more interest(s).

Women's Clothing And Accessories Store

An individual has been on our email list and in our Main Series for a few weeks when they receive a 3 E email about “how to dress for a job interview.” They click the link contained in the email.

By clicking the link, we know they're interested in “how to dress for a job interview.” We pause the Main Series and trigger 3 emails that talk about that topic, while promoting our products.

  • Email 1: Dresses vs Suits – which lands you the job? (turns out, dresses land jobs more often than suits)
  • Email 2: 3 Dresses that'll help you land a job
  • Email 3: 10% off any of our dresses

Let's pretend our 3rd email results in the sale of a dress. The individual is then sent the Upsell Series for dresses:

  • Email 1: How to decide what accessories to wear in order to make your dress “pop”
  • Email 2: 3 accessories to make your dress “pop” (hand bag, earrings, belt)

To Do

  • Write down 3 Action Series ideas, 1 for each category of your top 3 selling products (defined earlier in this article)
  • Write down 3 Upsell Series ideas, 1 for each category of your top 3 selling products (the complementary products you defined earlier)

Note: Many of these emails will likely link to blog posts and other content you've created, fitting nicely within your Epic Blogging Strategy.

>> Click here to download the Ecommerce Marketing Strategy Worksheet & this post in PDF format

Traffic

There are over 1,645,444 ways to drive traffic to your Ecommerce store.

Maybe there's not quite that many ways to drive traffic; however, there are still A LOT.

There are online and offline methods. “Free” and paid methods.

There are so many options and so many people “pushing” the one they think is best.

I get it – it all sounds super attractive …

HOWEVER … do you remember the second question I asked you to answer?

“Where does your ideal customer hangout?”

Wherever they hangout is where, and how, you'll advertise.

It doesn't matter if someone just made a million dollars by advertising on LinkedIn. If your customers aren't on LinkedIn, you will never find success.

So what if someone is getting leads for 2 cents from Twitter ads. If your customers aren't on Twitter, you will never find success.

All that being said, and given the fact that you're an Ecommerce business, and you need people comfortable with shopping online … there are 2 sources of traffic that at least some of your ideal customers hangout on:

  • Google
  • Facebook

While I can't possibly run through everything you need to know about these two platforms in this post, I'll at least point you in the right direction.

Google

No matter your niche, the almighty Google will always be a source of traffic.

While Google provides a number of ways to drive traffic, I'm going to break it down into two: “free” and paid.

“Free” Google Traffic (SEO)

While SEO (organic) traffic might not cost you money, it's going to cost you time – which is why I place “free” in quotes.

Ecommerce stores tend to have a lot of pages. Thousands in some instances, depending on the number of products you offer.

However, product listings normally contain “thin” content (a few hundred words max that aren't interesting or unique).

It is difficult for “thin” content to rank well in the search results, especially when you're up against behemoths like Amazon, Walmart, Target, etc.

Ideally, you'll go through your top listings, follow some of the copywriting tricks I outlined above and “beef” up your product listings. This will help your listings standout a little more and gain a competitive advantage over the behemoths.

The other advantage your Ecommerce store may have is its blog.

In following the Epic Blogging Strategy, you'll likely gain attention from Google in ways big stores won't.

Paid Google Traffic (Adwords)

Google has an advertising platform called Adwords that essentially allows you to pay money in order to “bump up” your listing in the search results for given keywords.

I won't go further in depth on Adwords. I'll give you some paid advertising tips after I talk about Facebook.

Facebook

Nearly everyone has a Facebook account which means at least a subset of your audience can be found on the platform.

“Free” Facebook Traffic

By creating a page for your Ecommerce store, sharing great content (like stuff from your blog), and by promoting your page, you can gain a following on Facebook that leads to “free” (organic) traffic.

Plus, there's built in social proof, sharing, and possibilities of virality by being present on Facebook.

Paid Facebook Traffic

Facebook's Ads Manager is an incredibly powerful tool.

It allows you to target your ideal customer in every way imaginable from demographic information to interests and likes.

Rules For Paid Traffic

#1: ALWAYS TRACK EVERYTHING!!!!!!!!

The most important rule – yet, every client I've ever worked with on paid advertising has failed to do this from the start.

Google, Facebook, and most reputable advertising companies allow you to track everything – cost per lead, cost per purchase, average order size, and much more.

If you're not tracking your results, you will make poor decisions and throw money away.

#2: Always Send People To A Dedicated Page

When paying for traffic, you need to send people to a dedicated landing page whether it's a Squeeze Page where you're trying to capture contact information or a Sales Page where you're trying to make a sale.

Like the content you produce, everything needs a clear purpose and objective.

#3: Have A Reasonable Budget

There will be a learning curve with paid advertising.

Expect 9 out of 10 of your ads to fail.

You'll likely spend $1k+ before you start seeing real success. Consider it an education.

Point is, if you don't have $1k+ to spend on an education in paid advertising – don't start. Do the “free” stuff first.

#4: Have Patience

When you're learning and losing money, it isn't fun.

You'll likely want to change things very quickly (pause ads, launch new ads, etc). You can't do this.

Generally, you need a few thousand people to see your ad before you can determine if it's bad and a few hundred people to land on your Squeeze Page or Sales Page to determine if it's bad.

You need to collect the data. It's part of learning what does and does not work.

Point is, if you change everything every 10 minutes, you're not going to learn anything and you'll likely fail.

To Do

You're not going to send paid traffic until you have a Straight Line Sales Funnel in place, at a minimum. Ideally, have an Interest Driven Sales Funnel setup before you spend a dime on traffic.

Having said that, only focus on “free” traffic for the time being.

  • Implement the Epic Blogging Strategy.
  • Start a Facebook Page and share your blog posts on it.

>> Click here to download the Ecommerce Marketing Strategy Worksheet & this post in PDF format

Optimization

Unfortunately, you cannot optimize something you don't have – so, you will need to implement the Ecommerce marketing strategy you drafted with the help of this post.

However, when you begin optimizing your sales funnel, there's a certain way to think about it on a macro and micro level.

Macro Level

Your entire sales system is an integrated system.

Who your customers are, where they hangout, how you present your business, how you deliver your products, your product listings, your pages, your emails, your ads … it's all integrated and how well one part performs affects the other parts.

For example, if you're advertising to the wrong people, it doesn't matter how good everything else is, your entire system will fail.

If you're unable to match your products to your customers needs, your entire system will fail.

The Golden Rule

Start at the beginning.

If you're having trouble with your sales system, start at the beginning – with your customers. If you're absolutely positive you're trying to attract the correct customers, move onto your business – how you portray yourself, what you sell and how you sell it (Value Ladder).

Does everything make sense? Is the “flow” of the Value Ladder natural? Is your business's persona coming across as sincere or as a douche-bag?

How are your products listed on your sales pages? Do you have high quality photos? Good copy that's attractive to your ideal customer? Is the checkout process easy?

Work your way through the entire system, piece by piece.

If the early stuff isn't right, it won't matter how good the later stuff is as no one will ever get to it.

Micro Level

Beyond optimizing at the Macro Level, you have the Micro Level – and, to be honest, this is what most people focus on already.

These are things like email subject lines, page titles, calls-to-actions (CTA), ads, etc.

The good part is, a few % increases here and there can increase the performance of the entire system very quickly.

For example:

Sales Funnel Optimization Example

A few minor tweaks (all 5% increases or less) to the ad, squeeze page, thank you page, action series, and upsell series resulted in 10 more customers than before and 2 additional upsells.

Imagine if only the ad's CTR increased … what would happen …

Sales Funnel Optimization Example 2

We'd still add 4 more customers!

It's amazing what even a half-percent change can do!

To Do

Implement.

>> Click here to download the Ecommerce Marketing Strategy Worksheet & this post in PDF format

How To Implement

This post should have your Ecommerce business on a path for success; however, there's still a lot of work and technical understanding that needs to happen.

There's still …

  • Email marketing automation configuration
  • Landing page and opt-in form integration
  • Advertising campaign launches and optimization
  • Tracking tools and pixels to implement
  • Various other areas that'll need tweaking

Of course, you can piecemeal all this together from various sources, or you can save a bunch of time, effort, and energy by joining The Vault!

The Vault includes all the training, resources, and support you'll need to implement everything you planned above!

Click here to see how The Vault can help your Ecommerce Business!

The Ultimate Guide To Ecommerce Marketing Strategy2020-04-04T14:49:01+00:00

A $40,000 Marketing Education In 45 Minutes

The other day, I was having a really great 8 mile run and around mile 3 a thought popped into my head.

I studied marketing in college and now I “do” marketing, so I thought, “Hmm, do I actually use anything I learned in college?”

For the next 5 miles of my run I thought about how college has helped/hurt me in my pursuit of marketing greatness!

What I realized was I may have learned some base level marketing terms and concepts; however, college trained me to be a marketer at a massive corporation like Nike or Microsoft. They taught me about how to be part of a massive marketing team that has a multi-million dollar marketing budget.

Which, I guess, is fine … if that's what you want.

However, they didn't even touch on ground floor marketing. Where the rubber meets the road. The type of marketing small businesses and entrepreneurs NEED to focus on.

What I know about ground floor marketing has all been learned after college, through reading and studying other people's work and LOTS of trial and error.

Ultimately I thought, “How could I best impart what I know about marketing to small businesses and entrepreneurs? What concepts could I explain to help them understand where to focus their energy? How could I show them a formal education in marketing isn't what they need?”

After my run, I stretched, showered, put together a calculator, and hopped on a live stream … this is the result …

* Efficiency Tip: Click the gear in the bottom right hand corner of the video, select “Speed” and “1.5” … now you'll get a $40,000+ education in about 30 minutes!

A $40,000 Marketing Education In 45 Minutes2016-11-17T17:40:35+00:00

5 Ways To Increase Revenue In Less Than An Hour

Sales funnels are awesome.

By following the right strategies and taking advantage of some automation tools – you can grow your business on autopilot (pretty much – it still takes work as you have to optimize and expand … but, I digress).

Building sales funnels takes time. You need to plan, write copy, setup automations, install tracking … you need to do a bunch of “stuff”.

Most businesses see the value in all of this; HOWEVER, most don't have the time or resources to do it all and they need “instant” results.

I get that.

Especially if they can use the revenue from these “instant” results to fund the development of the rest of their funnel *cough-cough* OR to invest in some training *wink-wink*

Alright, let's get into it!

1) Sell On The Thank You Page

One of the biggest mistakes I ever made was NOT selling on my thank you pages. (the page someone lands on after subscribing to an email list)

I used to say the usual, “Thanks for joining my email list! Check your email for the lead magnet!” … yeah, I literally told people to leave my site.

Dumb.

Then, one day, I saw someone was selling a low-end offer on their thank you page. I copied their idea and found, on average, between 3% to 10% of the people that land on my thank you page purchase the corresponding low-end offer (normally under $10).

Example

Thank You Page Example

2) Modify Your Checkout Page

The checkout page is one of the most overlooked pages on a website – it's taken for granted.

One would assume that if someone winds up on the checkout page, they're there to checkout; however, this is not always the case.

There are several things you can quickly and easily do to increase conversions:

  • Remove unnecessary fields. With more and more people purchasing via mobile devices, and the tediousness that comes with filling out a form while on a mobile device – you only want to ask for the essentials. Do you really need the person's birth date to complete the order? Unlikely. Ask for it later in a follow up email.
  • Add testimonials. Instill one last lit bit of confidence; this can go a long way when it comes to your order form conversion rates.
  • Remind people what they're ordering. Don't only mention the name of the product/service they're about to receive, but list some of the features and benefits to remind them of the greatness they're about to receive!
  • Include your guarantee. Remind people that, should something go wrong, they're safe and have nothing to worry about.

As of posting this article, SamCart has a webinar that describes how modifying the checkout form can boost sales by up to 400%, it's worth checking out … at least the first 30 minutes or so.

Example

Order Form Example

3) Add Up-Sells, Cross-Sells, Down-Sells, And Bonuses To Orders

“People who bought this also purchased this.”

“Don't Miss This Limited Time Offer!”

“Spend $3.37 more to qualify for free shipping.”

You've seen these lines used many times in many places. Why? Because they work … are you using them?

Depending on your business, how it's setup, and the platforms you use – the implementation method will change; however, it's certainly worth figuring out!

Fortunately, many shopping cart platforms have this functionality built in or have plugins that make this a piece of cake:

Down-Sell Mega Tip!

It can be hard to sell a $200+ product online as not everyone has a few hundred bucks lying around.

So, after making the initial offer for the $200+ product, if it's turned down, offer a down-sell by offering a payment plan!

Example

Downsell Example

The page itself looks similar to the thank you page example I showed you above (there's a video and write-up explaining the payment plan).

4) Cart Abandonment Email Series

According to the Baymard Institute, 67.19% of shopping carts are abandoned.

67.19%!!!!!

While there are a hundred reasons a person doesn't finish checking out … their credit card is upstairs and they're downstairs, they're at work and don't want to enter their credit card info on a work computer, etc … one thing remains true, you're missing out on sales.

After reading through about 15 case studies on cart abandonment recovery, it appears roughly 10% or more abandoned carts can be “won back” by simply sending a few reminder emails. A plugin can handle this automatically.

Like the up-sells, cross-sells, down-sells, and bonus options … the “how” will change depending on your system; however, being able to recover 10%+ of your lost sales makes it well worth figuring out!

5) Collect Email Addresses

While collecting email addresses won't add to your revenue “instantly” – you can start collecting addresses in less than an hour.

Having a list of people that are interested in what you and your business do is indispensable.

Email remains the #1 way businesses keep in touch with their customers, and if you don't believe it, read this page: http://www.emailisnotdead.com/

Anyway, collecting email addresses doesn't have to be difficult, I mean … how long do you think it took me to setup this page? (it converts at over 50%)

Collect Email Addresses

Plus, there are a ton of tools that make adding an opt-in form to any website a piece of cake. Here are a few:

Most of these offer a free version and even include options to store the email addresses within the tools themselves. You won't have to signup for an autoresponder service or anything like that. You could literally take the list of emails, plug them all into the BCC line of your email client and email your list straight from your personal email account.

It's literally that easy.

Final thoughts

Taking the time to setup and implement a full fledged sales funnel is certainly worth it. It will pay dividends for years to come. You can even boost revenue while you build your sales funnel with a few minor tweaks.

5 Ways To Increase Revenue In Less Than An Hour2016-10-14T18:29:18+00:00

How To Create A Value Ladder For Your Sales Funnel

This Is Important!

Before charging head first into sales funnel creation, you need to take the time to map out your value ladder – your products and services mapped in ascending order of value and price.

The Value Ladder

The Value Ladder

General Concept

As people “ascend” your value ladder, they're offered more value; however, this value comes at a price ($).

Note: Value doesn't necessarily mean “more”. You can also provide greater value by saving people time.

Tiers

Your value ladder doesn't necessarily need 5 tiers as the diagram above shows, but offering multiple value tiers at various price points gives you more opportunity to give your customers exactly what they need.

Lead Magnet

The freebies you give away to grow your list and get people in the door.

  • Price: Free
  • Goals: Qualify & Capture Leads
  • Examples: Checklist, Guide, Video, Free Sample, Trial, Coupon

Initial Offer

The low-end products you offer that ideally cover the cost of advertising and “prove” the lead has enough “pain” that they're willing to spend money to resolve it. Many times you'll see “Free plus Shipping” offers.

  • Price: < $10
  • Goals: Re-Capture Ad Spend & Qualify Customers
  • Examples: Book, Course, Product

1st Tier

The low-mid range products and services you offer generate profit while simultaneously building trust with the customer as they receive more value from you and your business.

  • Price: < $100
  • Goals: Increase Profits & Build Trust
  • Examples: Course, Productized Service, Product

2nd Tier

The high-mid range products and services you offer generate profit, ideally recurring revenue, from membership and continuity programs.

  • Price: < $1,000
  • Goals: Increase Profits & Recurring
  • Examples: Course, Membership, Custom Service, Product

Top Tier

The biggest and best product/service you have!

  • Price: > $1,000
  • Goals: Increase Profits & Recurring
  • Examples: Done For You Service, Masterminds

Product Based Businesses

I know what you're thinking, “A value ladder sounds nice, especially for digital and service based businesses, but I sell physical products … and things just aren't “fitting”.”

Don't worry, I've got you covered!

The Value Ladder - Physical Products

Incorporate The Hub And Spoke Model

The “hub” is the core product and the “spokes” are all the accessories and peripherals that “enhance” the core product.

Hub And Spoke Model

Many times, businesses that sell physical products can't “ascend” customers the same way as digital and service-based businesses can.

For example, if you sell cars, you can develop and give away a lead magnet and you can likely come up with an initial offer for under $10 (ie. a car buying guide). However, after those first two steps … there's not much … you gotta sell a car!

You're not going to try and sell a motorized bicycle, then a scooter, then a motorcycle, then a car, then a nicer car, then an even nicer car (at least not in one sitting). It simply doesn't work that way; however, after the individual purchases a car they're going to need a lot more stuff – accessories, maintenance, insurance, credit, etc. for years to come.

The car is the “hub” and the additive products/services are the “spokes”.

Eventually, ideally, when the individual is ready for a new car, they'll ascend to the next level, get a new car (hub), and start buying more stuff (spokes).

Another Example (Retail)

A few years ago, when I first came across the value ladder concept, I tried to apply it to an ecommerce business that also had a brick & mortar location. This particular retailer sold women's clothing – dresses, to be exact.

They offered many different types of dresses from seasonal, to work, to formal, to wedding … what “appeared” to be a natural ladder … and it kinda was.

Many times, women would come in for a seasonal dress and leave with two or more dresses – for work and for play. However, there were many occasions where women would only need one type of dress for one specific occasion – ie. a formal occasion.

This was where the hub and spoke model came into play as there are a TON of accessories with formal wear – shoes, bags, jewelry, makeup, etc.

Let's stick with the woman that came in and purchased a formal dress. In this case, a wedding dress, even though it's “technically” the next step in the value ladder, doesn't have to be the next step … especially if she's not engaged and/or doesn't have a boyfriend (or girlfriend, whatever floats your boat – not the point).

The point is, there are likely many seasons and occasions for more dresses (hubs) and accessories (spokes) between now and then that can be capitalized upon, if done correctly.

If it makes sense to ascend people up your ladder, ascend them. If not, be sure to incorporate enough spokes!

Offer Continuity

Often, customers will not ascend your entire value ladder ever, much less in one sitting. For those that do ascend, it can take weeks, months, or even years to ascend to the next level.

This is where offering a continuity program or recurring offer comes into play because it'll help accelerate ascension while increasing capitalization.

For example:

  • A car dealership can offer oil changes. Cars need oil changes, making this is a natural offer.
  • A dress shop can offer a subscription service where every month or season they send out the appropriate style of sunglasses for maybe $10/mo. Not only will this sell more sunglasses, but it'll serve as a reminder to the customer that they need a new dress for the new season!
  • Digital products businesses can offer a community and/or premium support as a recurring offer.
  • Dentists offer 6 month check-ups.

Bundles & Down-sells

Bundles and down-sells come in handy, especially if you're stuck or are truly limited in what you have to offer.

Let's say you sell 10 different products, that all cost $30, and don't have any additional accessories, even ones you could offer as an affiliate. (unlikely, but this is a hypothetical!)

Could you create bundles of these products? Maybe a 3 pack, 5 pack, and 10 pack? There's your ladder!

For example:

  • This concept can be applied to businesses that only offer one thing, for example, a soft serve ice cream shop. Beyond up-selling more ice cream, they can offer a punch card for $X that grants the holder 5 cups, 10 cups, 20 cups, etc. at various price breaks.
  • Barber shops can also take advantage of the bundling concept. While many offer other services like shaves, dyeing, massages, etc., that can bundle into packages, they can also bundle visits onto punch cards in a similar fashion to the ice cream shops.
  • Here at Crazy Eye Marketing, we offer courses and resources individually and as a bundle we call The Vault.

Down-Sell Mega Tip!

One of the best ways to help people ascend your value ladder quickly is to reduce the entry price to the next tier.

How?

Payment plans!

Let's say your 1st Tier product costs $97 and your 2nd Tier product costs $247, you can split your 2nd Tier product into 3 easy payments of $93.67!

Doing this makes the 2nd Tier product a no-brainer as it costs less than the 1st Tier product (at least for today – which is what the mind tends to focus on

[instant gratification]).

Reverse The Entire Ladder!

This entire time I've been talking about having customers ascend your value ladder, but what if you reversed it and had them descend?!

Value Ladder - Reversed

You still start with a lead magnet in order to attract and qualify leads, but then you'll go straight into presenting your top tier offer!

If they're not interested, try a “down-sell mega tip” (payment plan). If that doesn't work, move to the 2nd Tier offer. If that doesn't work, try a payment plan. If that doesn't work, move to the 1st Tier offer, and so on.

Who knows, maybe implementing a reversed value ladder will yield greater results … it's certainly worth trying!

Share Yours!

Do you have a value ladder? Are you working on one? Share it below!

More Examples & Support

Do you want more value ladder examples and help brainstorming one for your business? Join The Vault!

How To Create A Value Ladder For Your Sales Funnel2016-10-14T18:29:18+00:00

Case Study: 88% Decrease In Cost-Per-Lead (Facebook)

I'm excited to share the results of our latest Facebook Ads case study because I believe the approach we used to decrease cost-per-lead can be applied to everyone's Facebook ad campaigns!

You may wonder how big a decrease of 88% is …. well, it allows you to acquire nearly 7 times the number of leads for the same price you were paying for a single lead.

Imagine, instead of spending $1 and getting 1 lead, you spend that same dollar and get 7 leads!

So … it's freakin' huge!

I'll walk you through the data first; I'll then discuss the changes we made so you can apply them to your Facebook ad campaigns.

The Data

Overall

Overall Campaign Results

Note: They switched from the Old to the New Facebook pixel which resulted in the “loss” of 10 leads. I added the true numbers in orange.

Above are the “overall” results for the Before and After campaigns.

We'll get into the ad sets of each campaign in just a second; however, I want to point out a few things first:

  • Amount Spent: Each campaign has spent over $500; these results are consistent and accurate. It's not like we spent $5 and got lucky.
  • Cost per Lead: $0.32 vs $2.67 = 88% decrease in cost per lead!
  • Purchase: These “cheaper” leads were quality leads – they were still buyers. Finding “cheap” leads isn't hard; however, if they don't buy then there's no point in collecting their data … the point of a lead is to eventually turn that person into a paying customer.
  • Cost per Purchase: $12.91 vs $72.69 = 82% decrease in cost per purchase (also insane!)

Note: The “Purchase” data needs to be taken with a grain of salt. These numbers reflect sales made directly off the Thank You page (front end sales) and do not reflect sales that resulted in the back end. So, technically, the number of purchases is higher, cost per purchase is lower, and purchase volume is higher.

Before

Before - Facebook Ads

Note: They switched from the Old to the New Facebook pixel which resulted in the “loss” of 10 leads. I added the true numbers in orange.

The image above shows all of the ad sets in the “Before” campaign. Each ad set targeted a different audience and/or device/placement. They used the same ad (a boosted post) for all of their ad sets.

These ad sets were essentially a hodgepodge of various audiences and placements as opposed to a systematic setup – ie. testing desktop vs. mobile.

After

After - Facebook Ads

Note: If you notice a little difference in the numbers from the “Overall” pic above, it’s because several of these ad sets are still live and some stuff changed between screen captures!

The image above shows all of the ad sets in the “After” campaign. Each ad set targeted a different audience and/or device/placement. We used the same ad (a boosted post [however, it was different than the ad used in the “Before” Campaign]) for all of our ad sets.

As you can see, we have two Lookalike audiences running – one that looks like our customers (people that have paid money) and one that looks like our leads (people that have joined the email list). These two ad sets have the lowest cost per lead at $0.24 and $0.25; however, you'll notice the front end purchase conversions are not as good as the first ad set (Audience 1 [mobile]) which is targeting a specific audience we created.

Alas, the point of these campaigns is to generate leads because the bulk of the money is to be made on the back end. We're simply tracking front end sales to make sure some purchases are happening!

Finally, I also want to draw attention to the fact that not all of our ad sets performed well. Look at the last two (Audience 2), we were spending between $0.89 and $3.60 per lead … of course, those ad sets were eventually shut off. It just goes to show that an “ad” isn't everything, targeting and placement are huge factors as well!

3 Changes We Made To Decrease Cost Per Lead By 88%

Time to get into the good stuff – the changes we made to the ads, presented in a way that will help you make similar changes!

1. Changed The Offer

I believe this change had the single biggest impact on our advertising.

The original offer presented people the opportunity to receive a product for free, as long as they covered the cost of shipping and handling. For example, we'll ship you this book for free, but you pay the $7 shipping and handling.

Instead, we bundled several products together and offered people the opportunity to participate in a monthly drawing for the bundle of products valued at around $100.

Now, people can opt-in for “free-free” as opposed to an opt-in for a “free plus shipping & handling”.

Takeaway: Instead of offering your audience a coupon or something where they still have to spend money to receive the benefit – what can you offer for “free-free”? (a chance to win a gift card or a product?)

Mega Tip!

We moved the “free plus shipping & handling” offer to the Thank You page which allowed us to make money on the front end!

2. Systematized Audience Targeting

Before we began helping this business with their Facebook marketing, their audiences were a random hodgepodge of interests, age groups, placements, etc.

There wasn't a consistent strategy.

We systematized it …

  • We kept the same demographic information (age, gender, religion, income, etc) across all ad sets.
  • We tested one interest at a time.
  • We tested that interest on mobile news feed and desktop news feed.
  • We spent roughly $20 before deciding to “kill” or keep an ad set – our criteria was 20% better/worse. For example, if Audience 1 on mobile performed 20% better than Audience 1 on desktop – we'd “kill” the desktop ad set.

By following this systematized strategy, we've stuck with 3 ad sets that have a cost per lead between $0.24 and $0.31.

3. Used Lookalike Audiences

Facebook offers some pretty nifty tools in their ads platform. One of these tools is their custom audience feature. This enables marketers the opportunity to create audiences, based on what pages people have viewed, whether they've purchased a product or not, and more! [Learn more]

For example, we created two custom audiences – one that contained all of our Leads (if they landed on our Thank You page, they were automatically added to our Leads audience) and one that contained all of our paying customers (we uploaded a list of email addresses for people that had purchased products from the store).

We then used the “Lookalike” function to create audiences that “looked like” our Leads audience and our Customers audience (ie. they had similar demographics, interests, etc as the people who were “proven” to convert!). We then targeted those lookalike audiences with our ads!

As you can see above, these two audiences have the lowest cost per lead and you can likely use Lookalike audiences in a similar way!

Other Key Takeaways

Below are a few other key takeaways that I want to point out that … if you're not doing already … will help you tremendously.

Optimize For Conversions

You HAVE to optimize your ads for conversions.

Ok, technically, you don't have to; however, Facebook gives you the option to do so and they do an excellent job in getting you the “cheapest” conversions possible. It's to your benefit to allow Facebook to do its job!

For more info, checkout my Case Study called Facebook Ads: Optimize for Conversions or Clicks or Engagment.

If you don't know how to set up conversion tracking, check out my Facebook Ads course by clicking here!

Test Different Ads

While I did not test different ads in the case study above, I highly recommend doing so because the ad is a HUGE factor with regard to getting clicks and, therefore, conversions.

Why didn't I test different ads? The company I was running the tests for spent a good chunk of change to have a “pretty” graphic developed and they wanted to use it. Thankfully, it was a great image and yielded great results – normally, I'd test multiple ads.

Step-By-Step

Did you grasp the ideas and concepts delivered in this post, but need help with the “how”?

No problem! I've got you covered!

I have a course called How To Increase Leads & Sales On Facebook With The Triple Threat Strategy to walk you step-by-step through the exact process I used in the case study above!

Case Study: 88% Decrease In Cost-Per-Lead (Facebook)2018-03-27T13:38:11+00:00

Case Study: 4,897 Cold Emails Sent – What Worked, What Didn’t

A few months ago I was approached by a small mobile app company that was launching a new app and they wanted to recruit new users via cold emailing.

I had never done a cold emailing campaign at the scale they were going for, but they were still on board with moving forward with me (awesome!).

This post outlines how I setup the campaign(s), our results, and what did and didn't work.

NOTE: The name and capabilities of the app have been adjusted in this post to provide anonymity. For the sake of this post, the app is for used car dealers and I'll call it “The Car App”. Its USP (Unique Selling Proposition) is that it helps them “push” new deals to their prospective customers. It also costs over $1,000/year (this part is true).

For example, I want to buy a Ford Mustang from Nathan's Used Car Dealership, so I download the app to my phone and whenever that particular dealer acquires a Mustang, I get a push notification letting me know that one is in stock and I can go check it out.

Preparing For The Cold Email Campaign

When I took on the job, they sent me a list of 4,917 emails that they'd acquired through a top leads generation service. I'm going to leave their name out of it as well because I don't think they did a good job. I'd say it was a borderline scrape job – one where they used a bot to scour the Internet scraping contact info.

Also, I believe the quality of the leads were low. For example, our app was for used car dealers; however, the list they produced included a bunch of new car dealers as well – for which our app did not apply, making those businesses unlikely to respond.

So, I believe the money could have been better spent setting up a squeeze page and running ads to it; however, that's neither here nor there ….

Anyway, after removing duplicates, the list dropped to 4,704.

I then ran the list through Kickbox.io.

Kickbox.io

Kickbox.io is a nifty service that lets you upload a list of email addresses and it verifies whether the email address is “legit” or not.

Kickbox Results

Post Kickbox.io the list of emails was cut in half – down to 2,160 “good” email addresses.

ReplyApp.io

ReplyApp.io is a cool little tool that allows you to setup autoresponders for cold email campaigns.

Now, there's a little bit of a learning curve with regard to ReplyApp.io. It's a newer service, so I'll give them a little leeway; however, I found it to be a bit clunky in some areas and not quite as intuitive as I think they think they made it.

For example, handling people was really weird and it was much easier to organize them in Excel and then upload the list to ReplyApp.io in segments as opposed to uploading the entire list and once and using ReplyApp.io to organize it.

We chose ReplyApp.io because it can connect to ANY email service provider, not just Gmail like so many other cold email tools – our original plan was to use The Car App's email server for the emails; however, we later decided the best move was to use Gmail.

Why We Used Gmail

We setup 3 Gmail addresses for the cold email campaigns and had them forward replies to “real” @thecarapp.co email addresses. This way, no one would have to login to the Gmail accounts to check for replies.

We used Gmail for two primary reasons:

  1. Increased Deliverability – @gmail.com email addresses have high deliverability across all email service providers whereas an @thecarapp.co email address may wind up under the “promotions tab” or “junk” folder.
  2. Disposable Addresses – In sending thousands of cold emails, you will likely receive a few spam complaints. Instead of having those complaints hurt the @thecarapp.co domain, we might as well have them hurt some free email addresses that we'll probably ditch anyway.

Our Cold Email Campaigns

The plan consisted of developing 5 different email series, sending them to a few hundred people to see which one worked the best, and then send the best one to everyone else.

I wrote a few of the series from scratch while others were “proven” cold email campaigns that I found across the web and modified slightly to fit The Car App.

We also targeted different “asks” or CTAs (Calls-To-Action):

  • 15 Minutes: 1 series, 3 emails, asked for 15 minutes of time
  • Interest + Discount: 1 series, 2 emails, offered a discount and asked them to reply to the email or give us a call
  • Strange Question: 1 series, 2 emails, asked for a response to a “strange” question ~ ie. We're a mobile app company doing some research for used car dealerships and we're wondering if there's a mobile app solution you've been looking for, but are having trouble finding
  • Sales #1 & #2: 2 series, 2 emails each, asked them to click a link to buy the app ~ this is our app, here's what it can do for you, and here's how to buy it

The Winner!

The winning email series was the one that asked for 15 minutes and was 3 emails long.

Disclaimer: I cannot say for certain that the content of the winning email series is what made the series win … I believe it had more to do with the CTA (asking for 15 minutes). If I had more time to do more testing, I would have switched the CTA of the sales emails and instead of asking for them to “purchase” the app, I would ask them for 15 minutes.

I believe the sales emails would have performed much better if I had done that. Either way …

Winning CTA: Ask for 15 minutes.

I cannot take full credit for this series as it's one of the “proven” ones I found online.

Click here to see the original version produced by Sidekick, a Hubspot company

Here's what our version looked like:

Top Performing Cold Email Campaign

Click Here to download all 5 of the cold email campaigns!

The Data

Overall Results

These are the overall, “big picture”, results from all 5 of our cold email campaigns:

Cold Email Campaign - Overall Results

Top Performing Cold Email Series Results

Below you'll find the results from the top performing cold email series that I showed you earlier. I'm sorry I didn't consolidate the results of the “worser” campaigns – unfortunately, ReplyApp.io's reporting features are very limited and the pull down of data to fill in this simple chart took about 3 hours. To calm your mind, know that no other campaign came close to this one – this was the clear winner!

Cold Email Results

Notes:

  • I believe the reply rate would have been higher had the leads been better qualified. As I stated above, a large number of leads ran businesses other than used car dealerships – resulting in zero need for our app and likely ignored our requests.
  • Not all replies were “good” replies; however, 45 replies (~ 2.8%) resulted in “getting people on the phone” – which I would consider high for a cold email campaign based on a semi-poor lead list.

Key Takeaways

  • Run leads lists through tools like Kickbox.io – it saved us from emailing over 2,000 “bad” email addresses. (Note: we did send 400 emails to “bad” addresses to see if they really were bad – and they definitely were. Kickbox.io did a good job!)
  • Use Gmail (or another free email provider) to run your cold email campaigns so you don't “hurt” your own domain.
  • Ask for 15 minutes in your cold emails. Don't “sell” and don't be “weird” or “mysterious” about what you're doing (Strange question series).
  • Although I do not have the exact numbers on this, using peoples' names and business names, even if they were wrong, increased reply rate – use them when you have them.
  • Having 3 emails in the series increased reply rate.
  • Test your content! Now that I see asking for time is the clear winner with regards to CTA – if I had more time, or another chance, I would test different types of content in the emails to see how that impacted reply rate.
Click Here to download all 5 of the cold email campaigns!
Case Study: 4,897 Cold Emails Sent – What Worked, What Didn’t2020-04-04T14:50:44+00:00

Start Here: Sales Funnel Parts Breakdown

All too often the phrase “sales funnel” is used interchangeably with “email marketing.”

I know I've done it … and it's wrong.

Email marketing is part of a sales funnel – it's not the sales funnel.

While email marketing tends to be the glue that holds the funnel together, there are many other pieces involved.

There's the audience you need to attract through advertising.

There are the products and services you offer.

There are landing pages, optin forms, lead magnets, relationship building materials (blog posts, videos, etc.), sales pages, and thank you pages.

Then there's all of the tracking, optimization, metrics, and split tests.

And yes, of course, all the emails, series, and sequences that “connect” everything together.

It's a lot.

It takes a combination of technical skills and marketing abilities to craft a top performing sales funnel.

I don't say all of this to overwhelm you.

I say all of this so you're aware of what you need to learn and master.

This post is to serve as a framework or guide through the pieces that make up a sales funnel.

The Sales Funnel Framework

I've spent the better part of 2 years focusing solely on sales funnel development and after lots of trial and error, I've realized that all successful sales funnels need to incorporate these 9 specific areas:

The Sales Funnel System

Any great sales funnel/system has to start with its Customers. Who are they? Where do they hangout? What do they look like? What are their goals, dreams, desires, fears, pains, and problems?

Your Business consists of the products and services you deliver to your customers that help them achieve their goals, dreams, and desires while avoiding fears, pains, and problems. The products and services should be positioned to offer an array of different price points, up-sells, down-sells, and cross-sells (a value ladder).

Your Delivery System is how you get your products and services into the hands of your customers. This can be accomplished through a website, ecommerce store, membership portal, or even via brick & mortar.

The “Meat” is the best phrase I could come up with to describe all the content within a sales funnel. All of the sales pages, squeeze pages, opt-in forms, emails, etc. are included here … and of course, require some copywriting skills.

A “Simple” Sales Funnel is the starting point. While it’s the simplest of all sales funnels, it can yield some incredible results and it’s the place you need to start before moving onto bigger, “better”, more advanced sales funnels.

There are two types of Lead Magnets: general and specific. Both are used to attract leads; however, one gauges interest and intent while the other is more for “everyone.” Knowing when and how to use each type is one of the keys to success.

An “Advanced” Sales Funnel can take a lead, figure out their specific interests, and distribute tailored content to those individuals … improving relationships and increasing sales with little effort.

You need Traffic in order to keep your sales funnel full. While there are many ways to drive traffic, the best way is to hangout where your ideal customers hangout.

Finally, in order to have continued growth, you’ll need to test, tweak and Optimize your entire system in order to achieve the best results possible.

Preface

Customers

Business

Delivery

The “Meat”

“Simple” Sales Funnel

Lead Magnets

“Advanced” Sales Funnels

Traffic

Optimization

Misc.

Start Here: Sales Funnel Parts Breakdown2017-01-07T12:52:23+00:00